Introduction
Installation
Pre-Rigged Models
Rigging
Contact
Animation
IK Ranges
Aligning Chains
Chain Visibility
Pivoting
Motion Paths
Automatic Features
Follow Rotation
System
The automatic features that come with the Kinematic Tool are designed to handle some of the operations that would be necessary to use after certain actions. For instance, after making an adjustment to a pose at the starts and ends of an IK range, there will always be a need to align the FK chain to the IK chain at those frames. There's never a reason to skip aligning the chains at those frames, so naturally, instead of manually using the "Align Chains" operator, one can start to dream of some sort of automatic feature that handles these operations on their own.
Same goes with interpolations. There's always a need to update the interpolations on keyframes that help guide the kinematic switching system, the follow rotation system, and the pivoting system every time all the keyframes in the action editor are batch-interpolated.
Same goes with motion paths. Blender sometimes updates motion paths, but it seems unreliable. Why won't it just update automatically?
So to solve this need to constantly use certain operators after specific actions, I've implemented some automatic features into the Kinematic Tool, one for automatically aligning chains, one for automatically interpolating keyframes, and one for automatically updating motion paths.
These automatic features can save you a lot of time and effort that would be spent clicking on operators, but they require working inside of certain conditions. You see, these auto-features are an extension of a very fringe and lesser known feature inside the Blender scripting system that allows a script to listen to and respond to actions that occur inside of Blender. But the downside is that the script will listen to every single action that occurs, such as simply clicking a bone or rotating a bone even a slight amount, to name just a couple.
If the Kinematic Tool were to fire an automatic update anytime any of these action occur, then the tool would start to chew up a lot of processing time when doing even rudimentary actions, and the whole animation experience would start to feel rather sluggish. So to solve this, I've implemented a set of filters to the automatic features, so that auto-updates fire only when certain conditions are met.
For instance, I wouldn't want the Kinematic Tool to try and update the alignments of chains when I'm in Object mode, since there's no reason for it to do so, I'd only want it to happen when I'm in Pose Mode, when I'm working with pose bones.
So here's a list of the conditions I've implemented that must be met for the automatic features of the kinematic tool to work.
The first set of conditions are general and are first checked before anything substantial is done, to keep processing to a complete minimum.
This checks:
After months and months of trying to get the automatic features to work without auto-keyframing, I decided requiring auto-keyframing is the best route to take, because these auto-features really need up-to-date keyframes to work, since they make changes based on the current data.
Once these conditions are satisfied, the Kinematic Tool fires an operation that waits a moment, then checks to see if it's the last of its kind to act, and if it is then it goes through the next step of checks, which are a bit more processor heavy. This way the operations only fire once there's a momentary pause between actions.
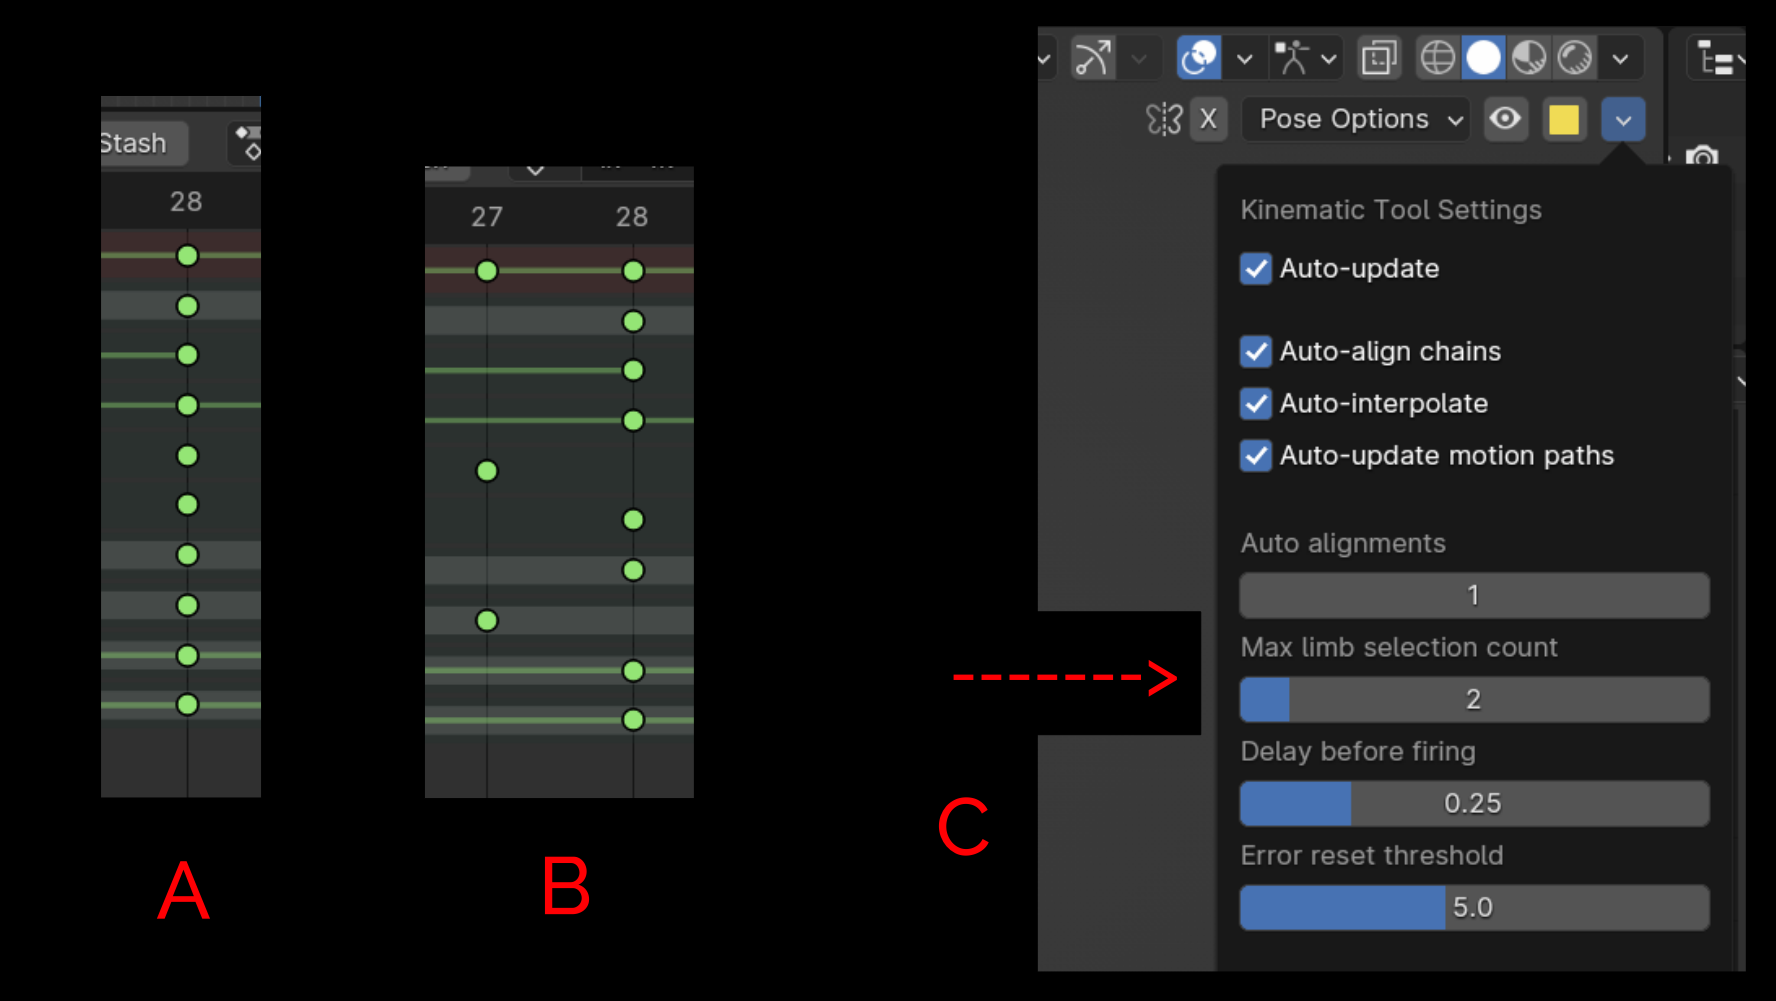
The amount of time the tool waits to fire can be adjusted in the settings drop-down menu with the "Delay before firing" setting. Default is half a second, and that can actually feel a bit slow. I like it around a quarter of a second (0.25), and if you set the value to something super super low, you might start finding it missing or skipping or causing some problems. I suggest experimenting with this number. It's meant to prevent clogging your animation workflow while still providing the nice auto-updates between one action and another.
Once the final operation is cleared to act after this delay, it then checks a more substantial set of conditions:
For all three updates options (the alignment, interpolation and motion path updates):
Satisfying these conditions will allow the motion path updates and interpolation updates to occur, but the align-chains update must still pass through more filters:
The reason the tool checks if a keyframe column is broken is because I was running into bugs whenever I was dragging around keyframes and the tool was writing in new keyframes onto alignment columns. This was causing memory overwrite problems that crashed Blender. So the way I solved it was just to check to make sure the keyframes are already there and established.
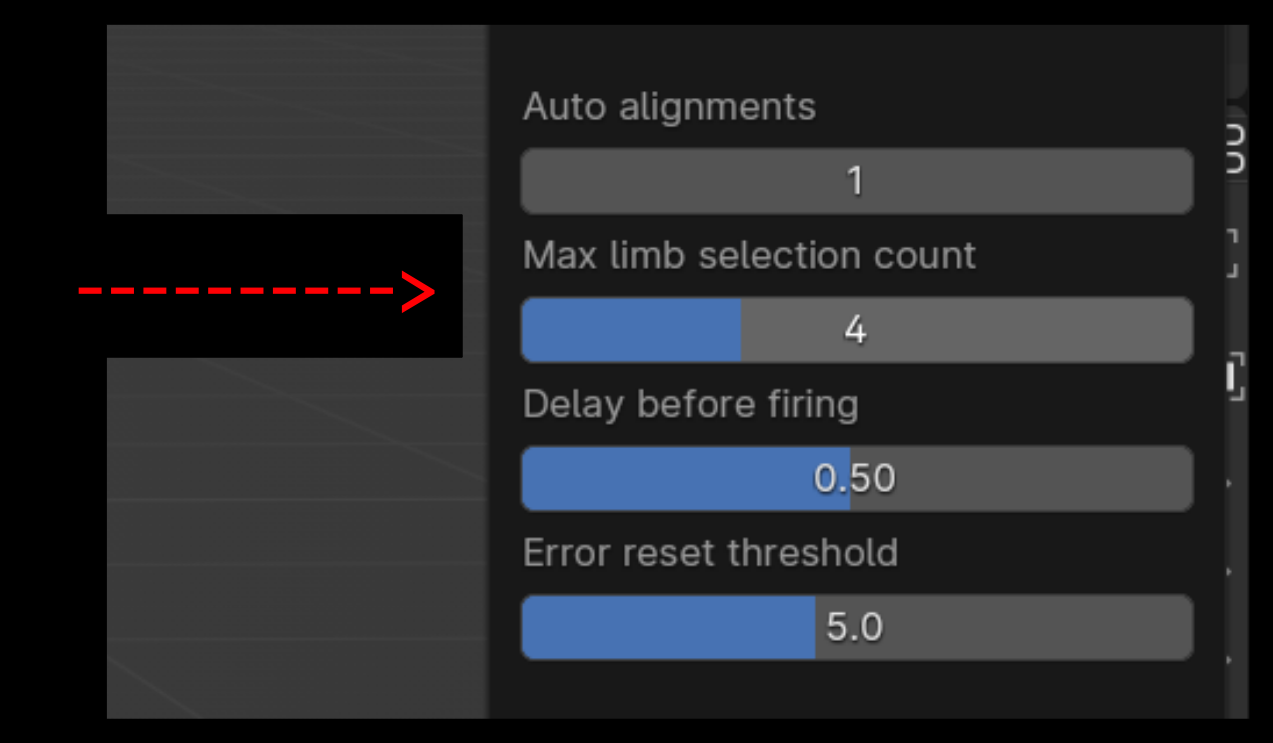
The condition which checks the selected limbs and compares it to the "Max limb selection count" value was implemented to prevent a lot of updates from occurring if you have some crazy wild rig with a bunch of limbs and you have all the bones selected. The default is set to 2, but for regular characters which have limbs extended through the "Add Bone to Limb" operator in Edit mode, I suggest setting this to 4.
You can see now how much of a dance I've had to do to work around a lot of the native ways Blender behaves, just to get these automatic features to work reliably, but I think it was worth it.
In a simple animation scenario, all of these auto-updates realistically happen in something like a sixth of a second. But if you crank up the amount of keyframe columns that are updated by adjusting the "Auto alignments" value, or have a motion path that has a ton of points, you'll likely start to experience a bit of a hiccup with each update, and if you have all three auto-updates running in a big animation, you might start to feel like you're wading through a swamp, so use these automatic features with discretion.
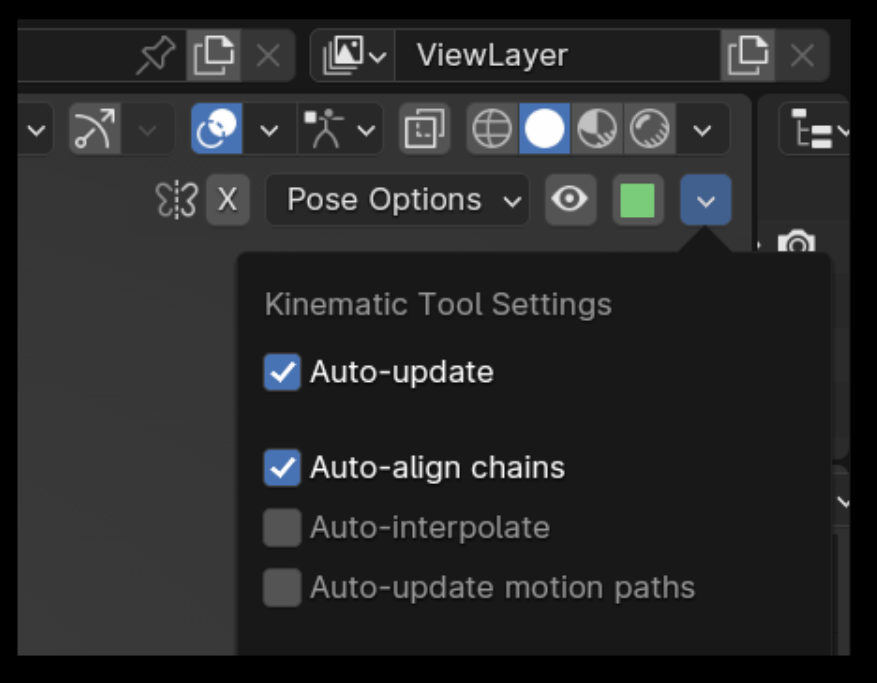
I typically use the auto-align option most often, and especially early on while setting poses. If I'm changing the interpolations of keyframes a lot, then I'll turn on the auto-interpolate feature, otherwise I tend to have this setting off. For the motion path, if I'm using the auto-updating feature, I typically have just a range of frames calculated, rather than the entire animation, because, as mentioned, trying to update a giant animation with a bunch of points in the motion path really starts to take awhile to update.
I have to admit that sometimes I feel like the filters I've had to implement in the Kinematic Tool to get the system to behave robustly are a bit more restrictive than I'd prefer, and that can be a frustrating when working with keyframe handles in the Graph Editor, since Blender does this super frustrating thing where it deselects bones when directly selecting keyframes. I tried to figure out a way around this problem, but I just ran into a wall. (The way to get around this, if you have a selected bone and the current frame is on one of the bone's keyframes, you can Shift-box select a handle in the graph editor to prevent deselecting the bone.)
But I will say, after months and months of wrestling with this system, and trying to figure out a whole bunch of ways to prevent any sort of continuous firing or ways the automatic features might trample over some of the more common actions you might take, the automatic features are quite robust, meaning I haven't run into any bugs or strange infinite loops with them in awhile, thanks to all the filters I've implemented. On one hand, when working with them in ideal scenarios they can save a ton of time, and act as a cool little assistant, but in certain scenarios where the conditions aren't able to be met and the auto-updates won't fire, the auto-features can feel like they aren't pulling their weight, and it's just easier and faster to turn them off and use the manual operators available for the tasks.
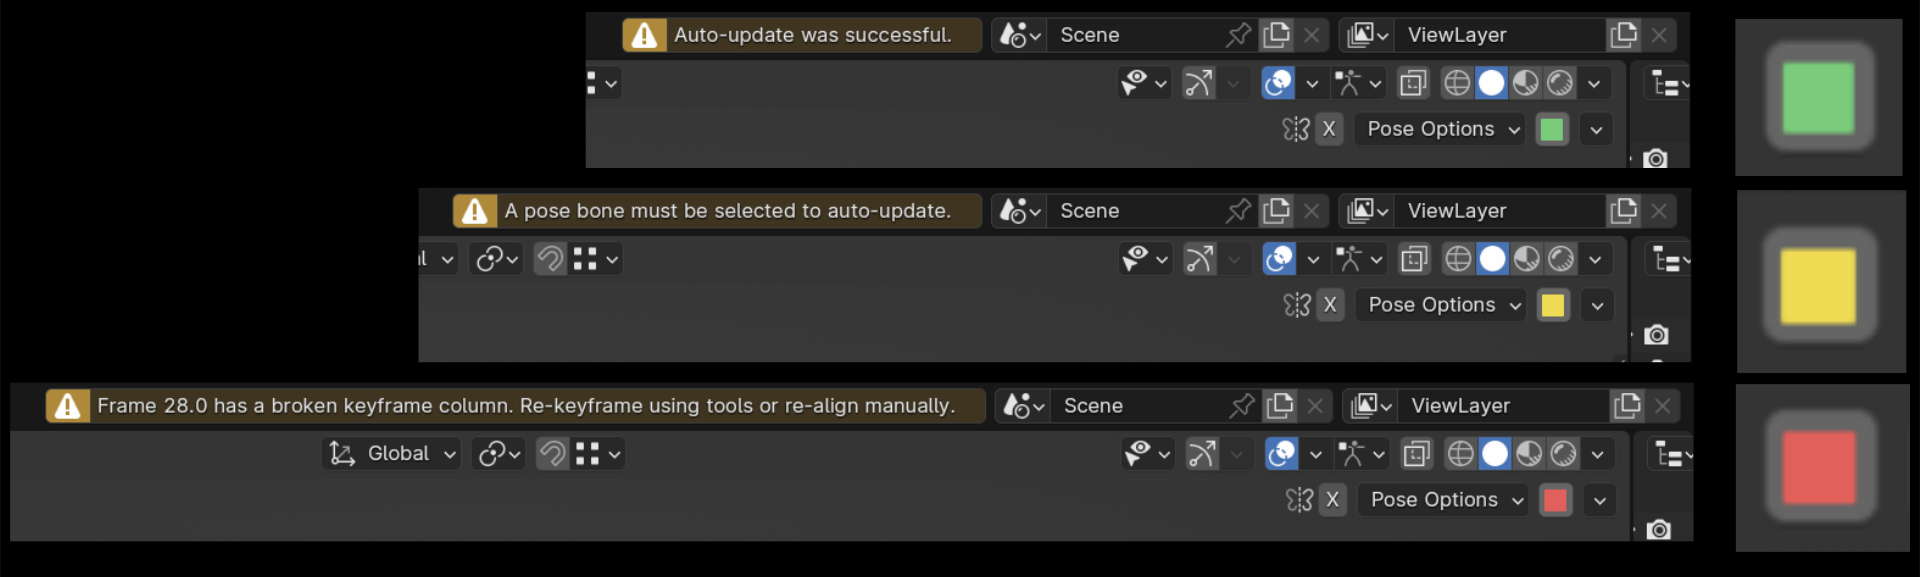
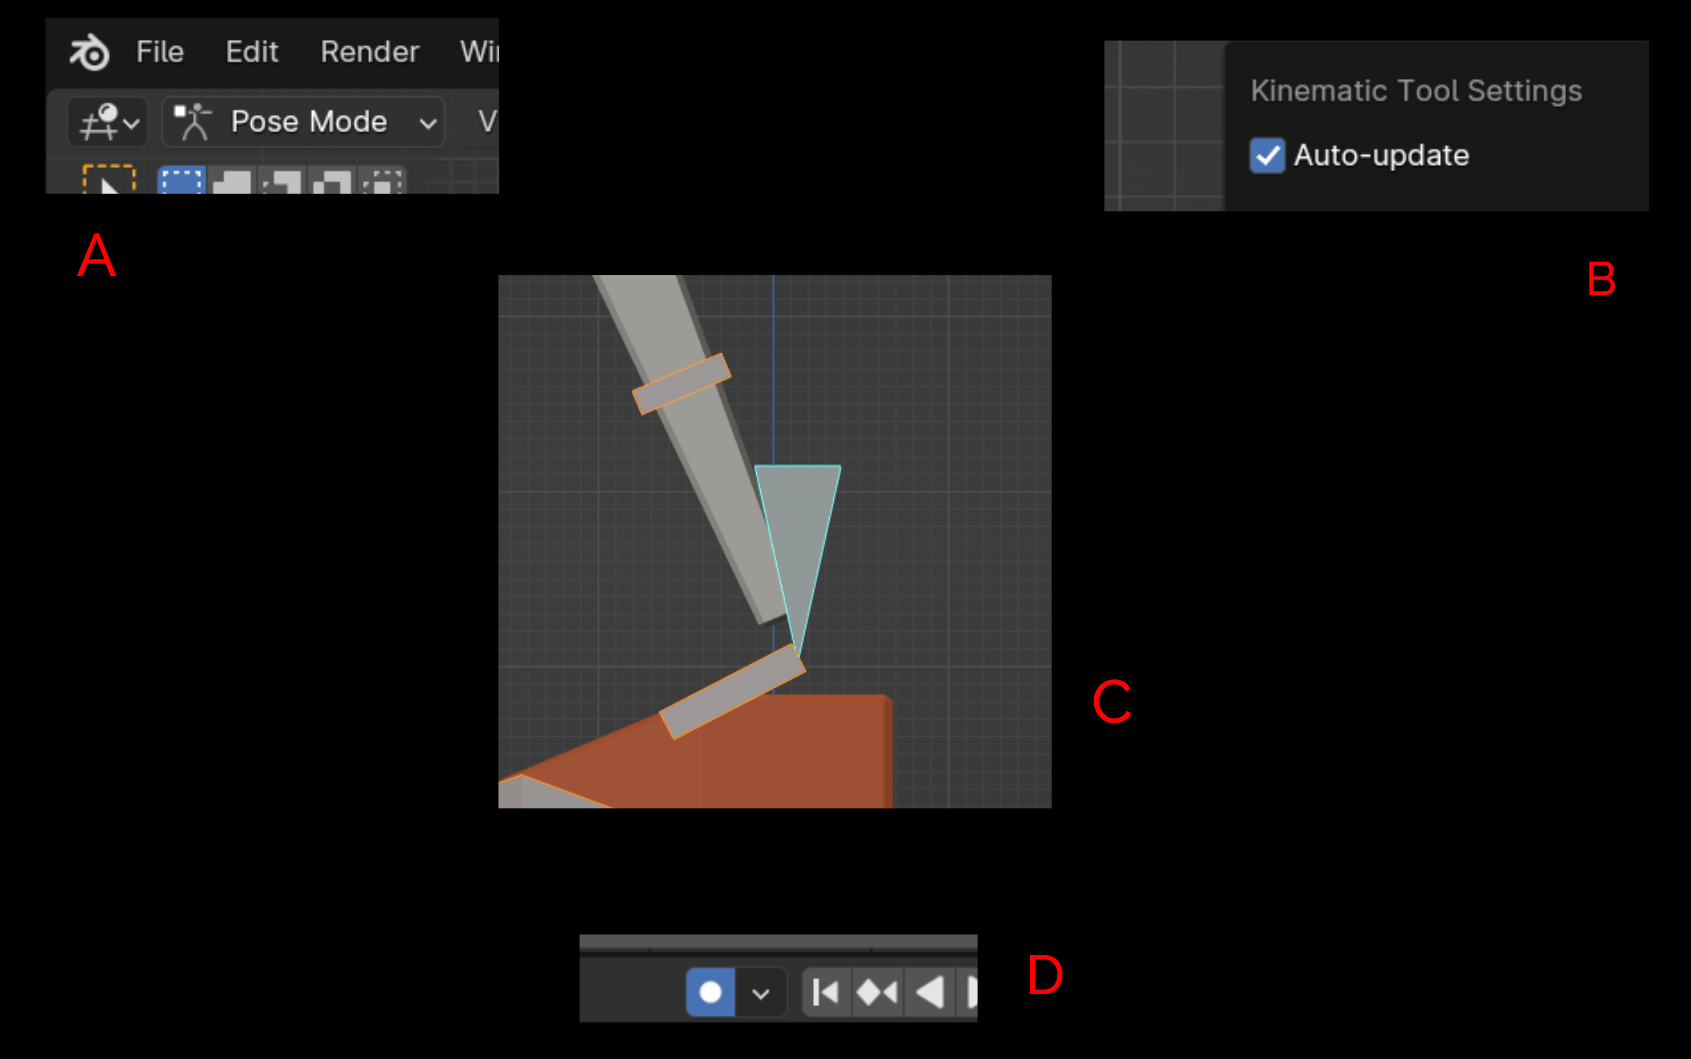
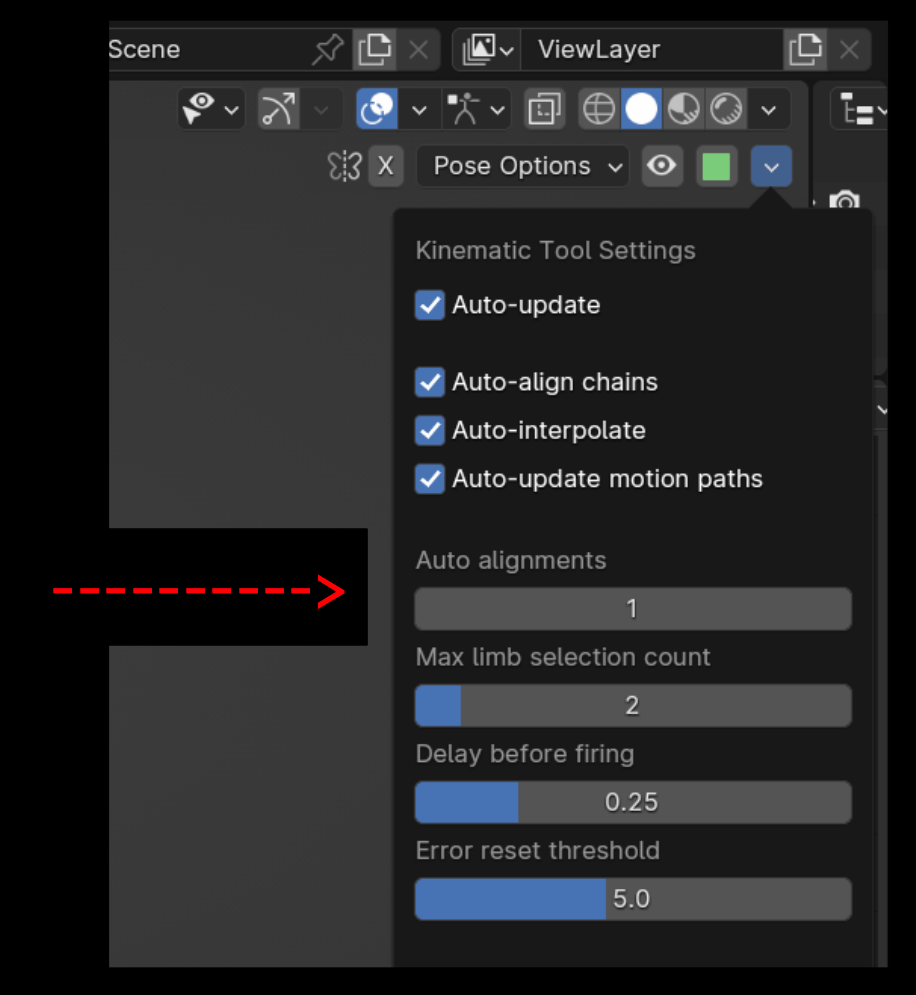
The final little piece I want to show you before I get into some simple demonstrations is this cool little update icon I included. It essentially changes color depending on whether an auto-update is successful or not, and you can even click it to get a reading for what's happening. Green indicates a successful update, red is a failure to update, and yellow is a failure to update because of a soft reason, like a bone isn't currently selected, or it's just waiting a moment to fire. You can add this status icon to the top right tool shelf via the Kinematic Tool's Settings drop-down menu available in Pose mode.
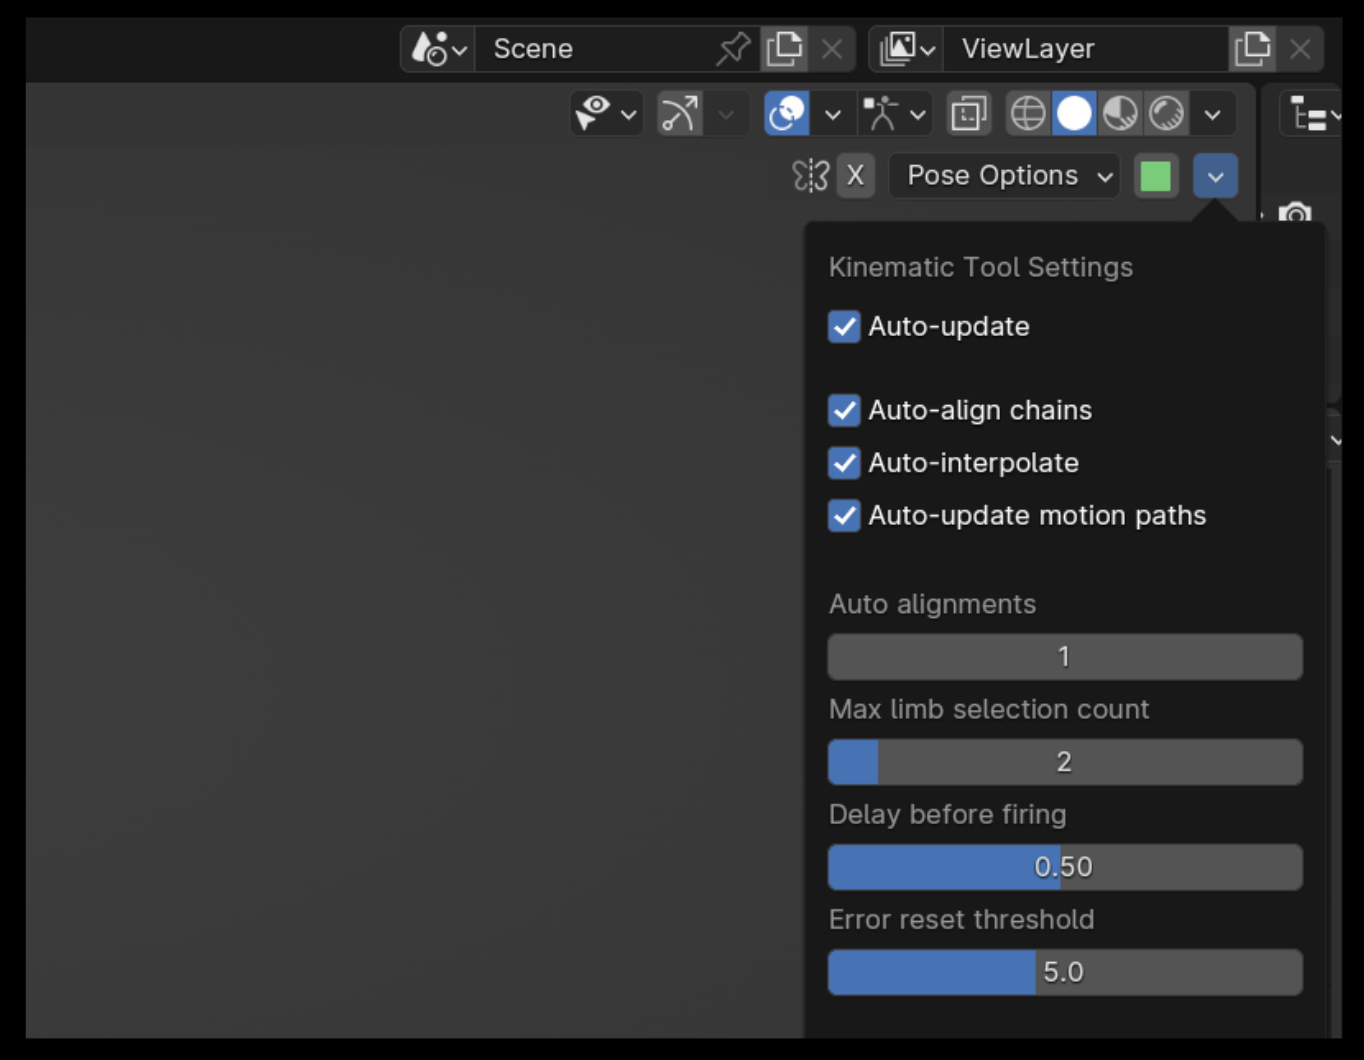
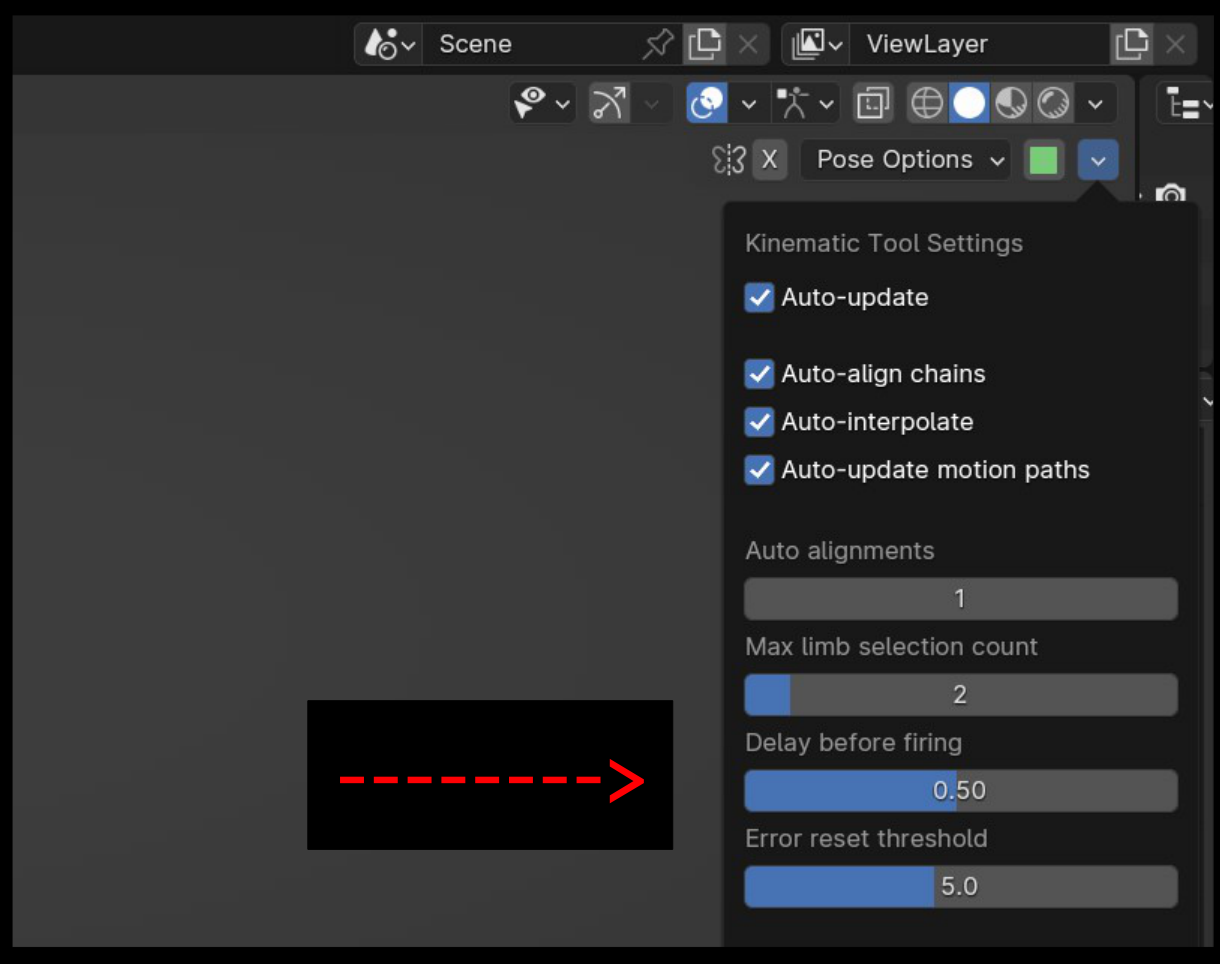
Aside from the ability to toggle on or off the updates, the Kinematic Tool comes with 4 settings you can adjust. Let's talk about them briefly.
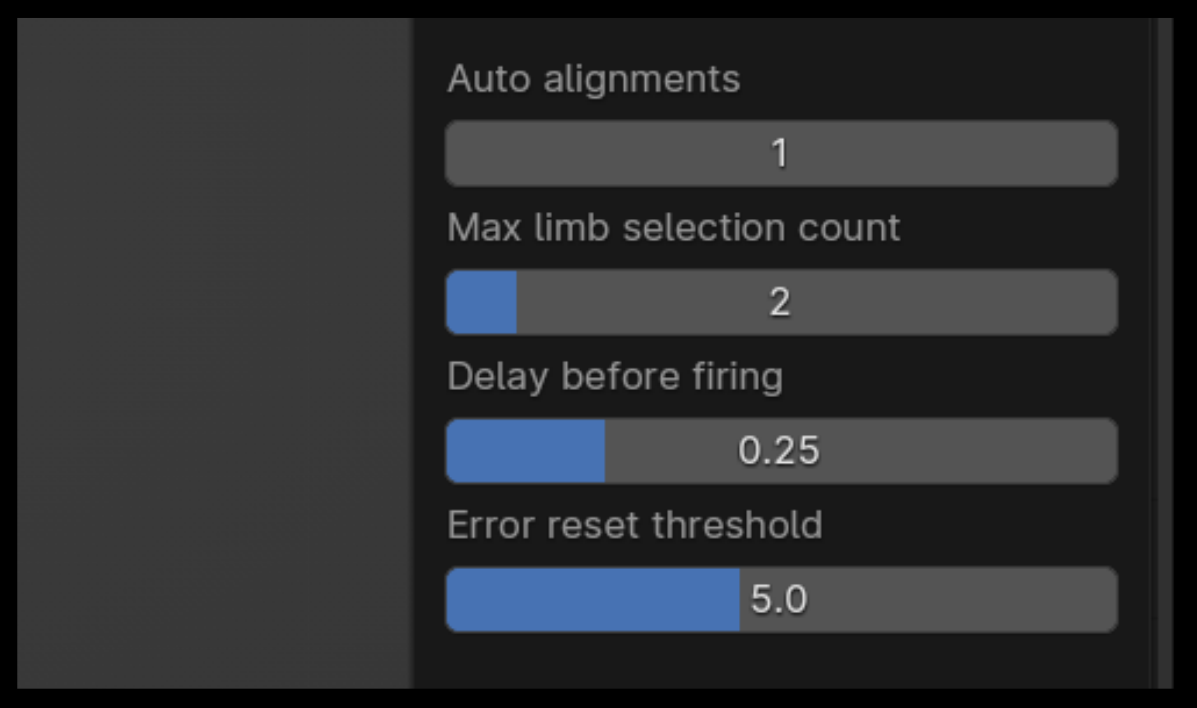
"Auto alignments" is short for "Auto alignments per side of current frame". To prevent the automatic updates from becoming super sluggish once you've built a hefty animation, this setting limits the amount of keyframe columns that are updated for the selected limbs. By default it's at a measly 1, but if you aren't noticing any hiccups (in other words if you have a pretty fast computer), experiment with raising the value. Personally I find a value of 3 or 4 is suitable for my needs.
"Max limb selection count" is a setting that helps those who have slow computers prevent the auto-features from firing if all the limbs are selected. If you aren't having any problems, you can probably get away with setting it to 4. The default is 2.
"Delay before firing" is the amount of time in seconds the auto-features wait to fire and run heavier processes. It's simply a way to prevent several auto-updates from occuring immediately after one another when doing various actions in Blender. I like it around 0.25, and the default is at 0.5. If you turn it waaaay down, you might start to experience skips or problems. Try some different settings and see what results you get.
"Error reset threshold" is a bit technical, and you'll probably never need to adjust this. It's a setting that determines the amount of time the tool will wait before resetting the system back to its rest state in the event that an error occured in Blender while an operator was happening. If this reset-threshold wasn't included, the auto features could potentionally get stuck from working. The default is 5, which means if the system has been considered "active" for 5 or more seconds, then turn off, so auto-updates can start working again. (The system will not fire when other operations are actively firing, to prevent stepping over active processes. Computers!!)
Let's say you're on a start or end of an IK range for a leg and you move the position of your character's pelvis. Well the leg is dowstream of the pelvis, so anytime you move the pelvis it also moves the position of the leg. This will throw off any alignment the FK had with the IK chain. You'd want to FK chain to align to the IK chain anytime you make an adjustment to the position to the pelvis (because the leg is downstream of the pelvis). Since the Kinematic Tool will only update a limb when one of its bones is selected, there needs to be a way to include the pelvis in the auto-updating.
The Kinematic Tool comes with two Edit mode operator, "Add Bone to Limb" and "Remove Bone from Limb".
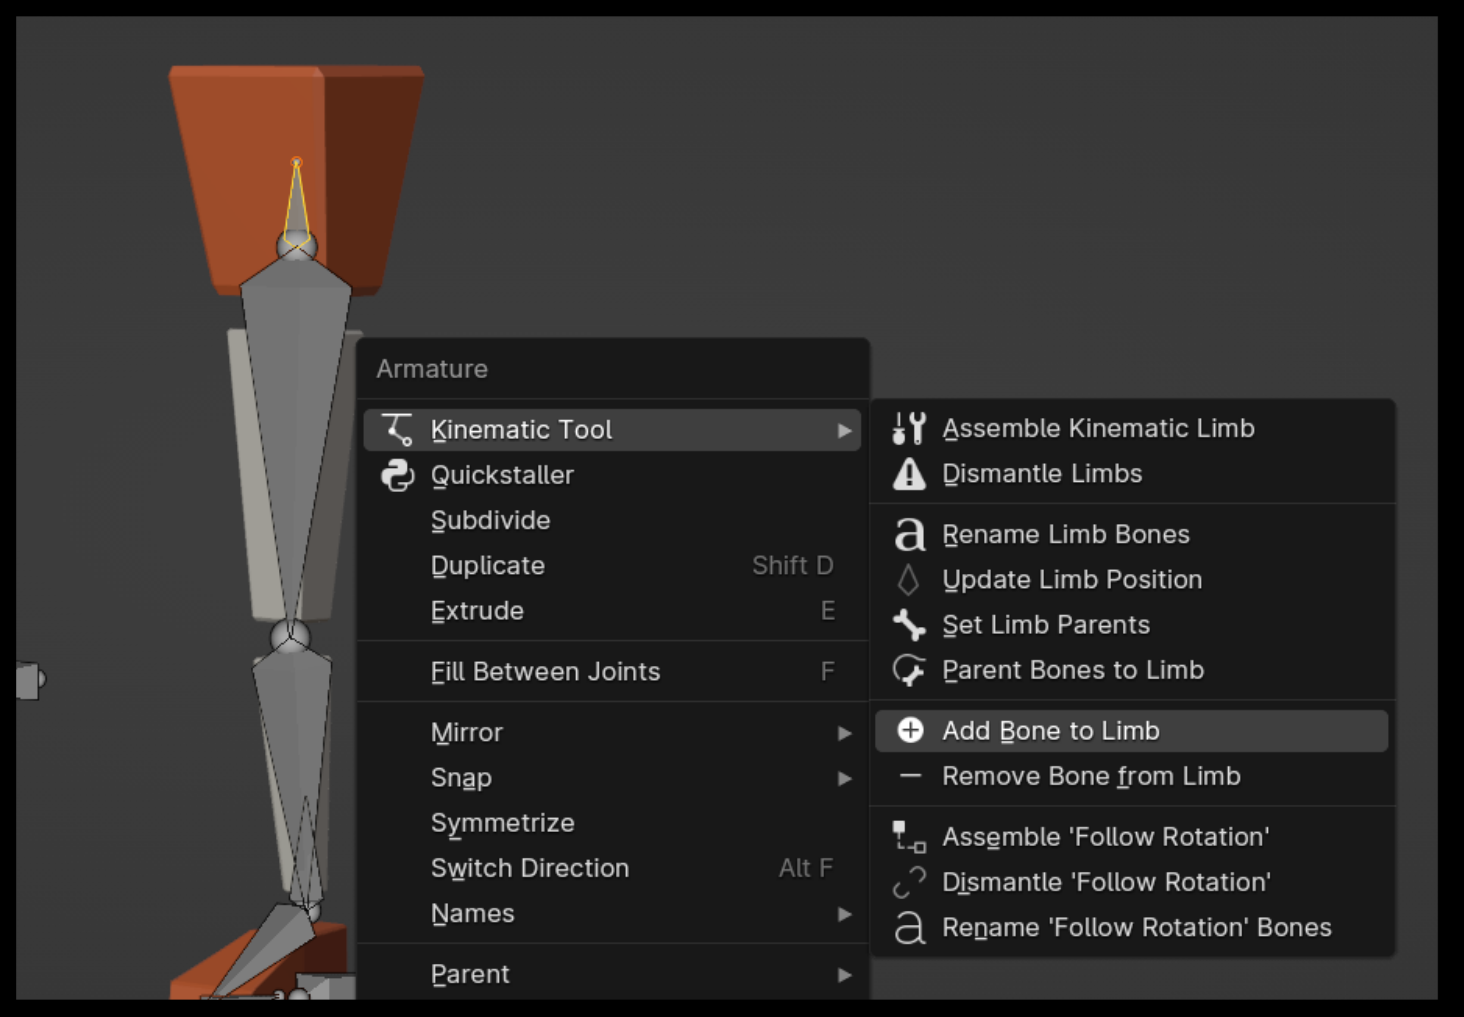
To include a bone with a limb for auto-updates, simply select the bone you'll be animating with, then use the "Add Bone to Limb" operator. You'll be given a list of assembled kinematic limbs (gathered via the Bone Collections) and you can choose the limbs to add the bone to.

You can reverse this process using the "Remove Bone from Limb" operator.
If you have a bone, such as a general torso controller, where its movement affects both the arms and the legs of a character, make sure to adjust the "Max limb selection count" to reflect that (likely 4).
Let's next take a look at the Follow Rotation system, which allows you to control whtether or not a limb or a bone follows the rotation of its parent.