Introduction
Installation
Pre-Rigged Models
Rigging
Contact
Animation
IK Ranges
Aligning Chains
Chain Visibility
Pivoting
Motion Paths
Automatic Features
Follow Rotation
System
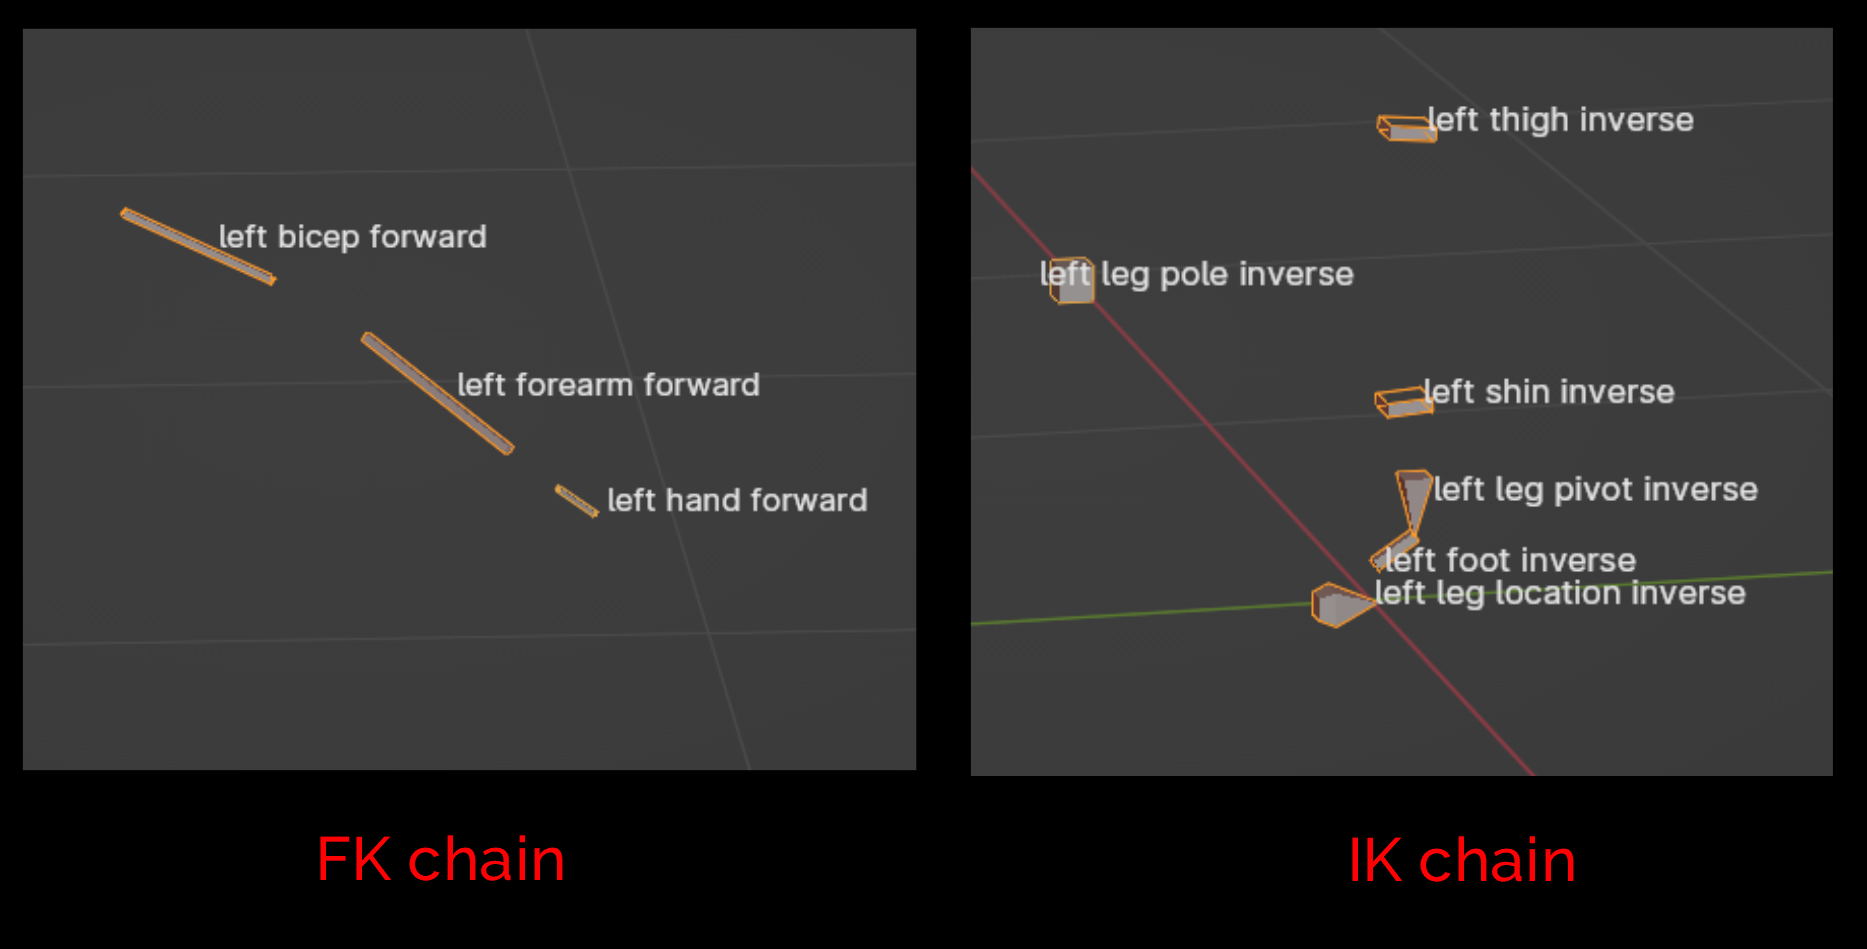
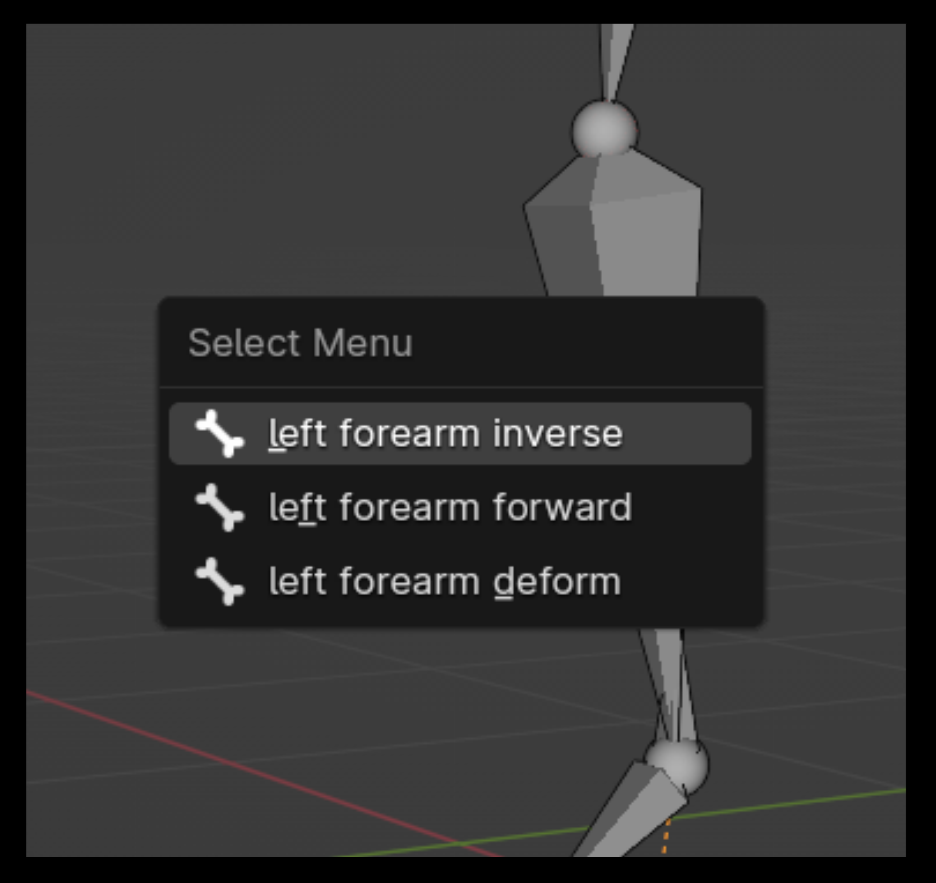
After working long hours staring at lists of bone names with tired eyes, the letters "IK" and "FK" began to blend into a soupy mess. I decided to start labeling all the bones that belong to the IK chain with the "inverse" suffix (as in "inverse kinematics") and the bones that belong to the FK chain with the "forward" suffix (as in "forward kinematics"). The labels "inverse" and "forward" have nothing to do with inversing or being forward and everything to do with being able to quickly recognize at a glance the type of chain a bone belongs to, because telling "inverse" apart from "forward" is a lot easier than telling "IK" apart from "FK", especially when reading quickly through a big list of bones names late in the evening.
The Kinematic Tool comes with a way to rename all the bones of an assembled limb, so if you like "FK_bicep.L" or something like that, you're totally able to rename to your heart's content. Personally I like a clean "left bicep forward" as a bone name, which indicates general region first, specific region next, and specific chain last (FK chain in this case). It's legible and I'm not forced to interpret a bunch of abbreviations "FK_" "DEF_", etc. 'Nuff said.
To prevent any problems with operators, DO NOT duplicate any bones that are part of an assembled kinematic limb. These bones are tagged, and duplicating a tagged bone will cause problems for operators.
Symmetrizing is explained at the end of this page. Now, let's get into rigging!
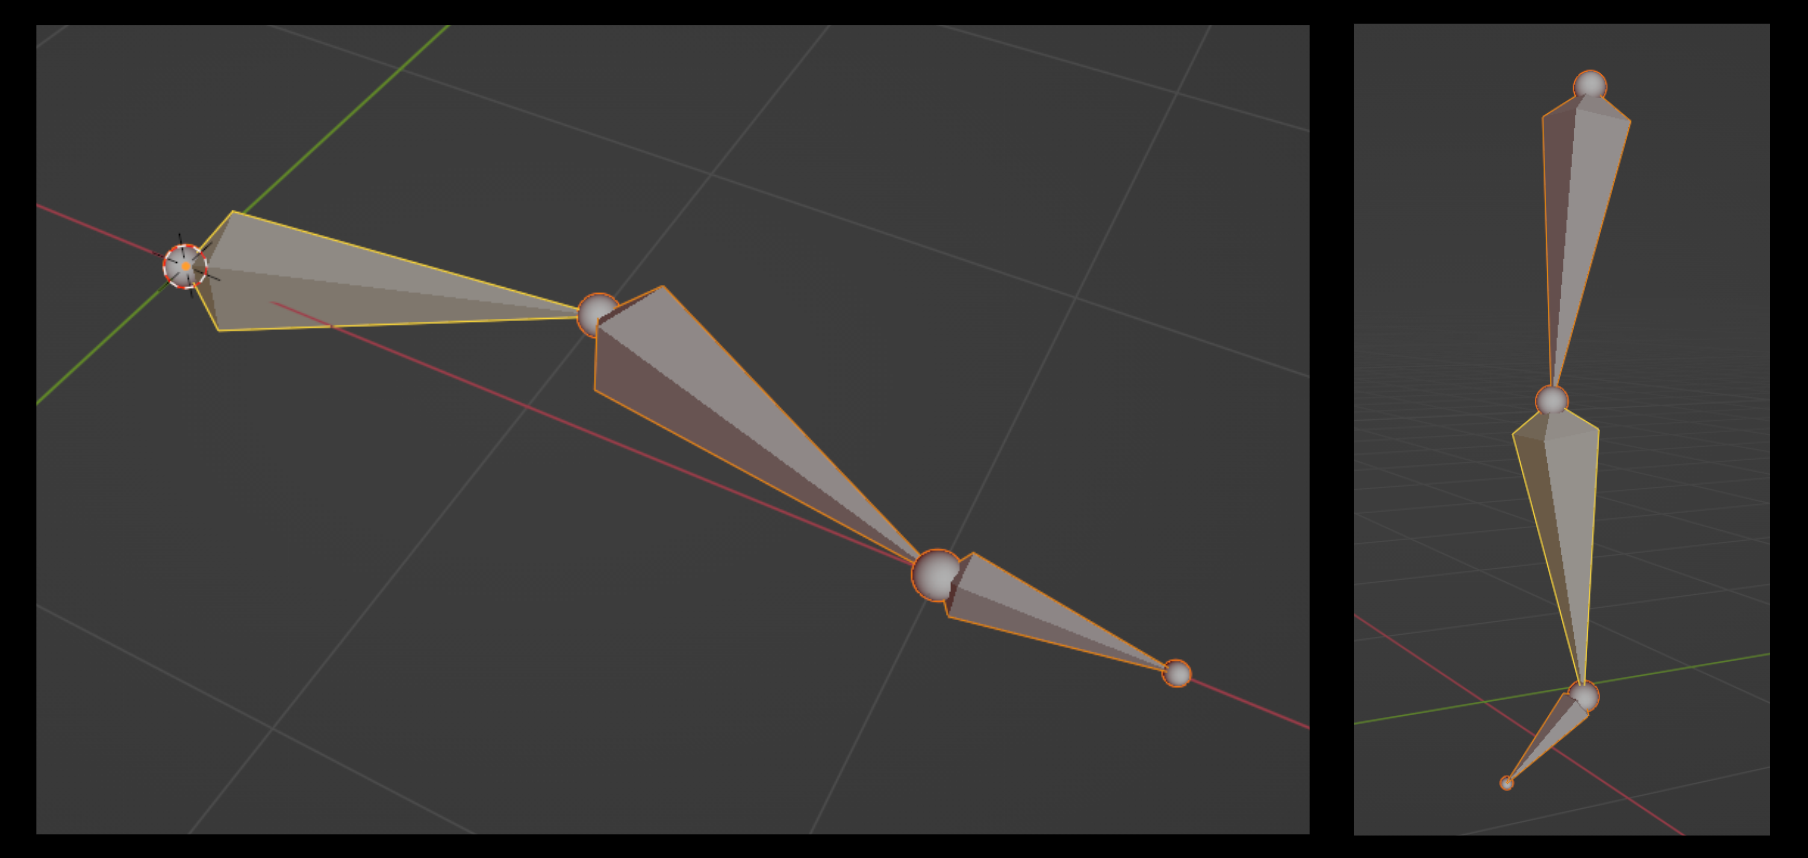
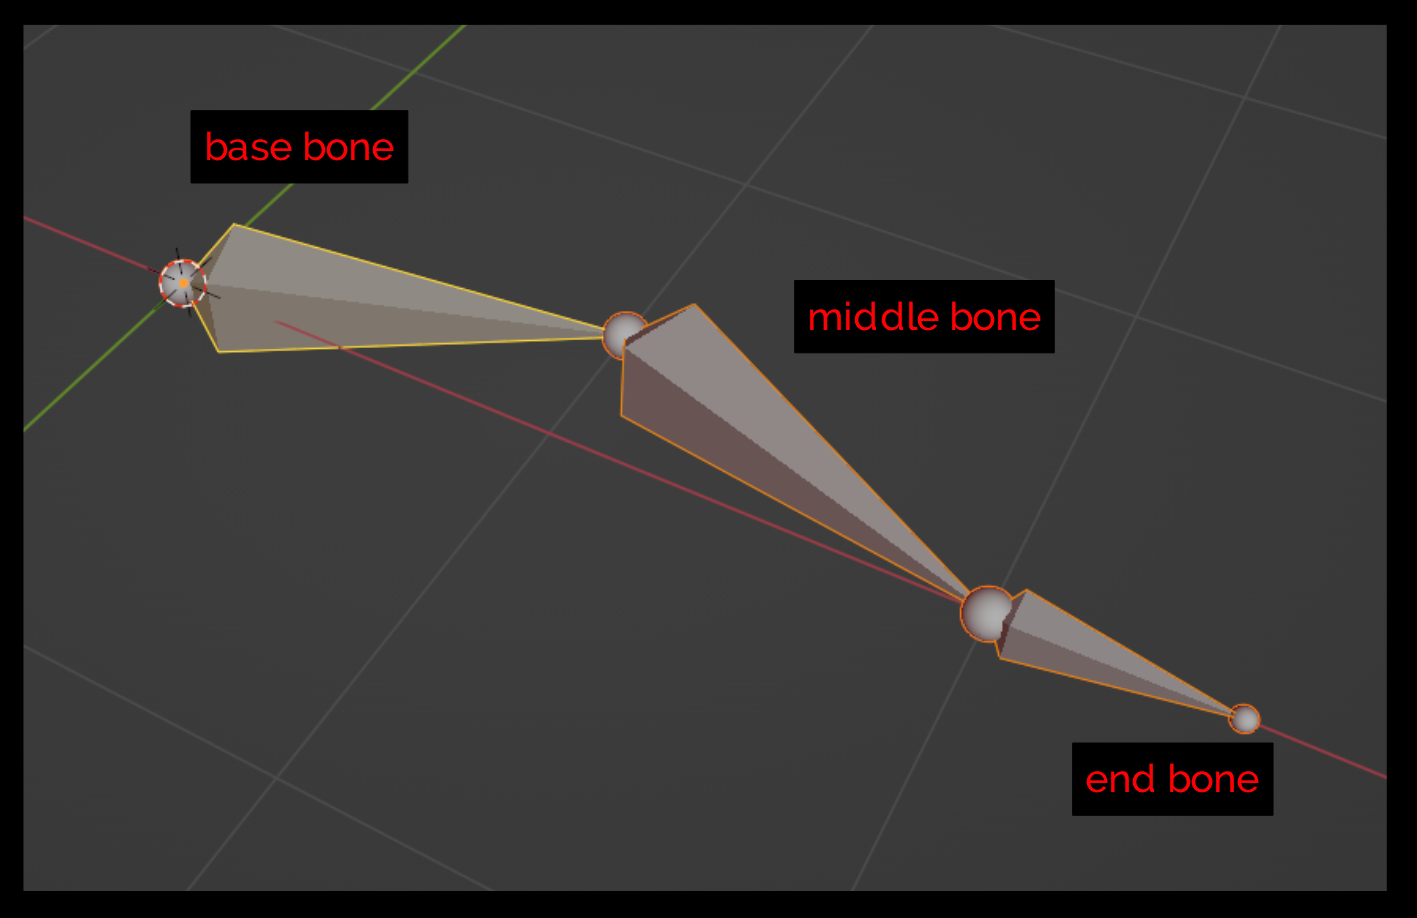
Rigging with the Kinematic Tool is quick and snappy. To rig a kinematic limb, all you need is a raw 3-bone chain that:
The three bones which serve as the foundation for an assembled limb are intended to be the deformation bones used to actually deform a mesh, and the various bones that are built on top of these deformation bones are used to control those deformation bones. I refer to these three bones as 'base', 'middle', and 'end'. These would be the equivalent of 'thigh', 'shin', and 'foot' or 'bicep', 'forearm', 'hand'.
There's a fair bit of detail we can get lost in, but before I spend more time explaining all the goodies, let's get right into rigging. You don't need a fully constructed character and rig to experiment with the rigging features of the Kinematic Tool. In fact, I encourage you to create a stand-alone armature and establishing a three-bone chain to experiment with these operators.
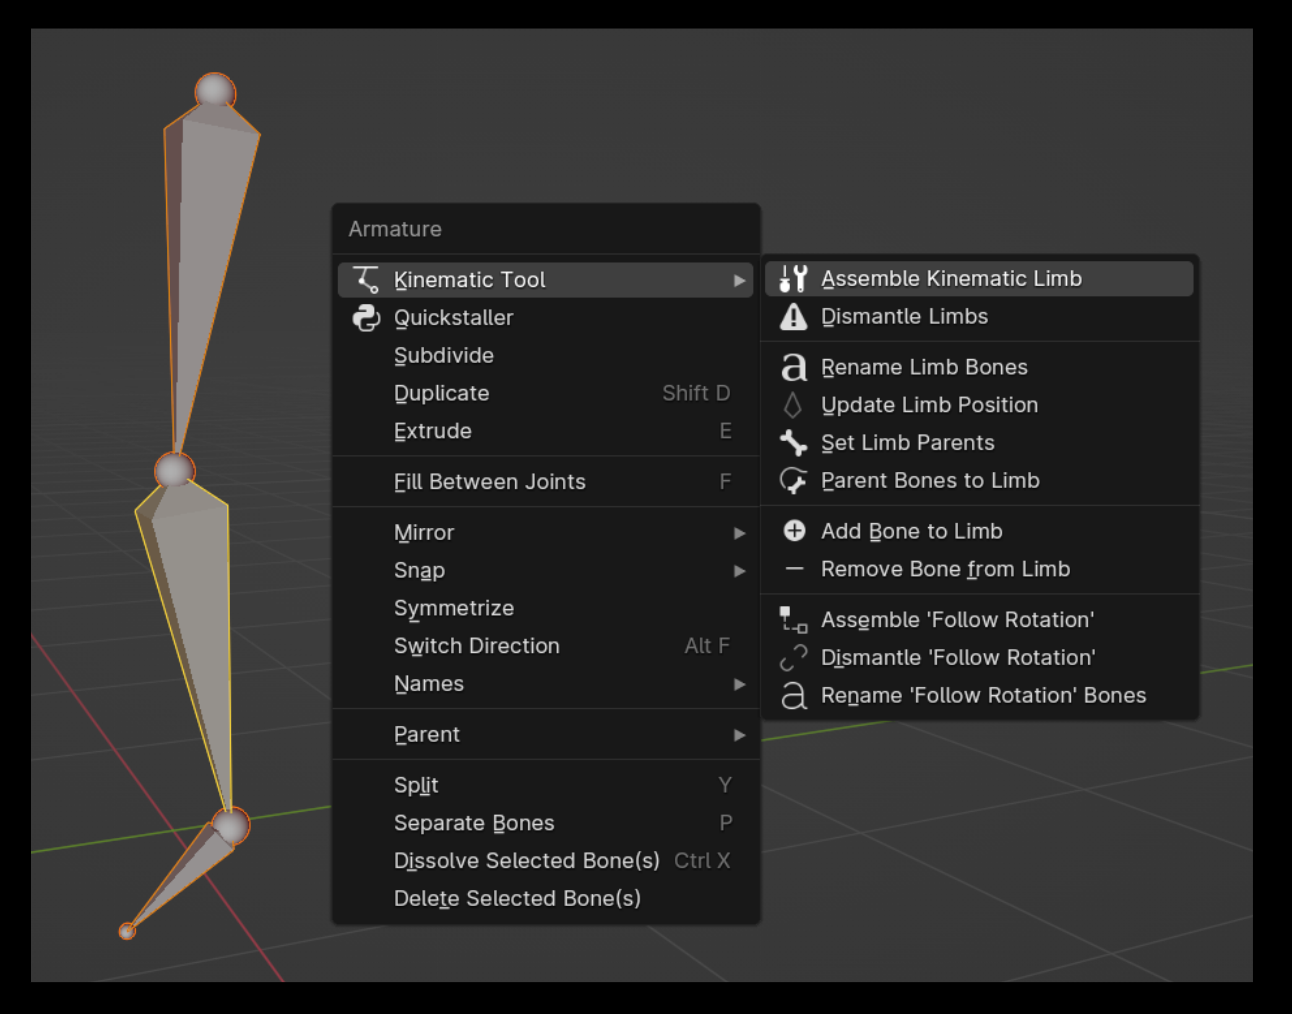
While in Edit mode, select the three bones of the chain and right click in the 3D viewport. From the Kinematic Tool menu, use the "Assemble Kinematic Limb" operator.
Immediately a kinematic limb is assembled and ready to be used. There's a lot of things I want to point out that come with an assembled limb, such as new bones, bone collections, constraints, custom properties, drivers etc, but before we dive head-long into all this, I want to show you how to dismantle a limb and how to put to use a couple of the other operators.
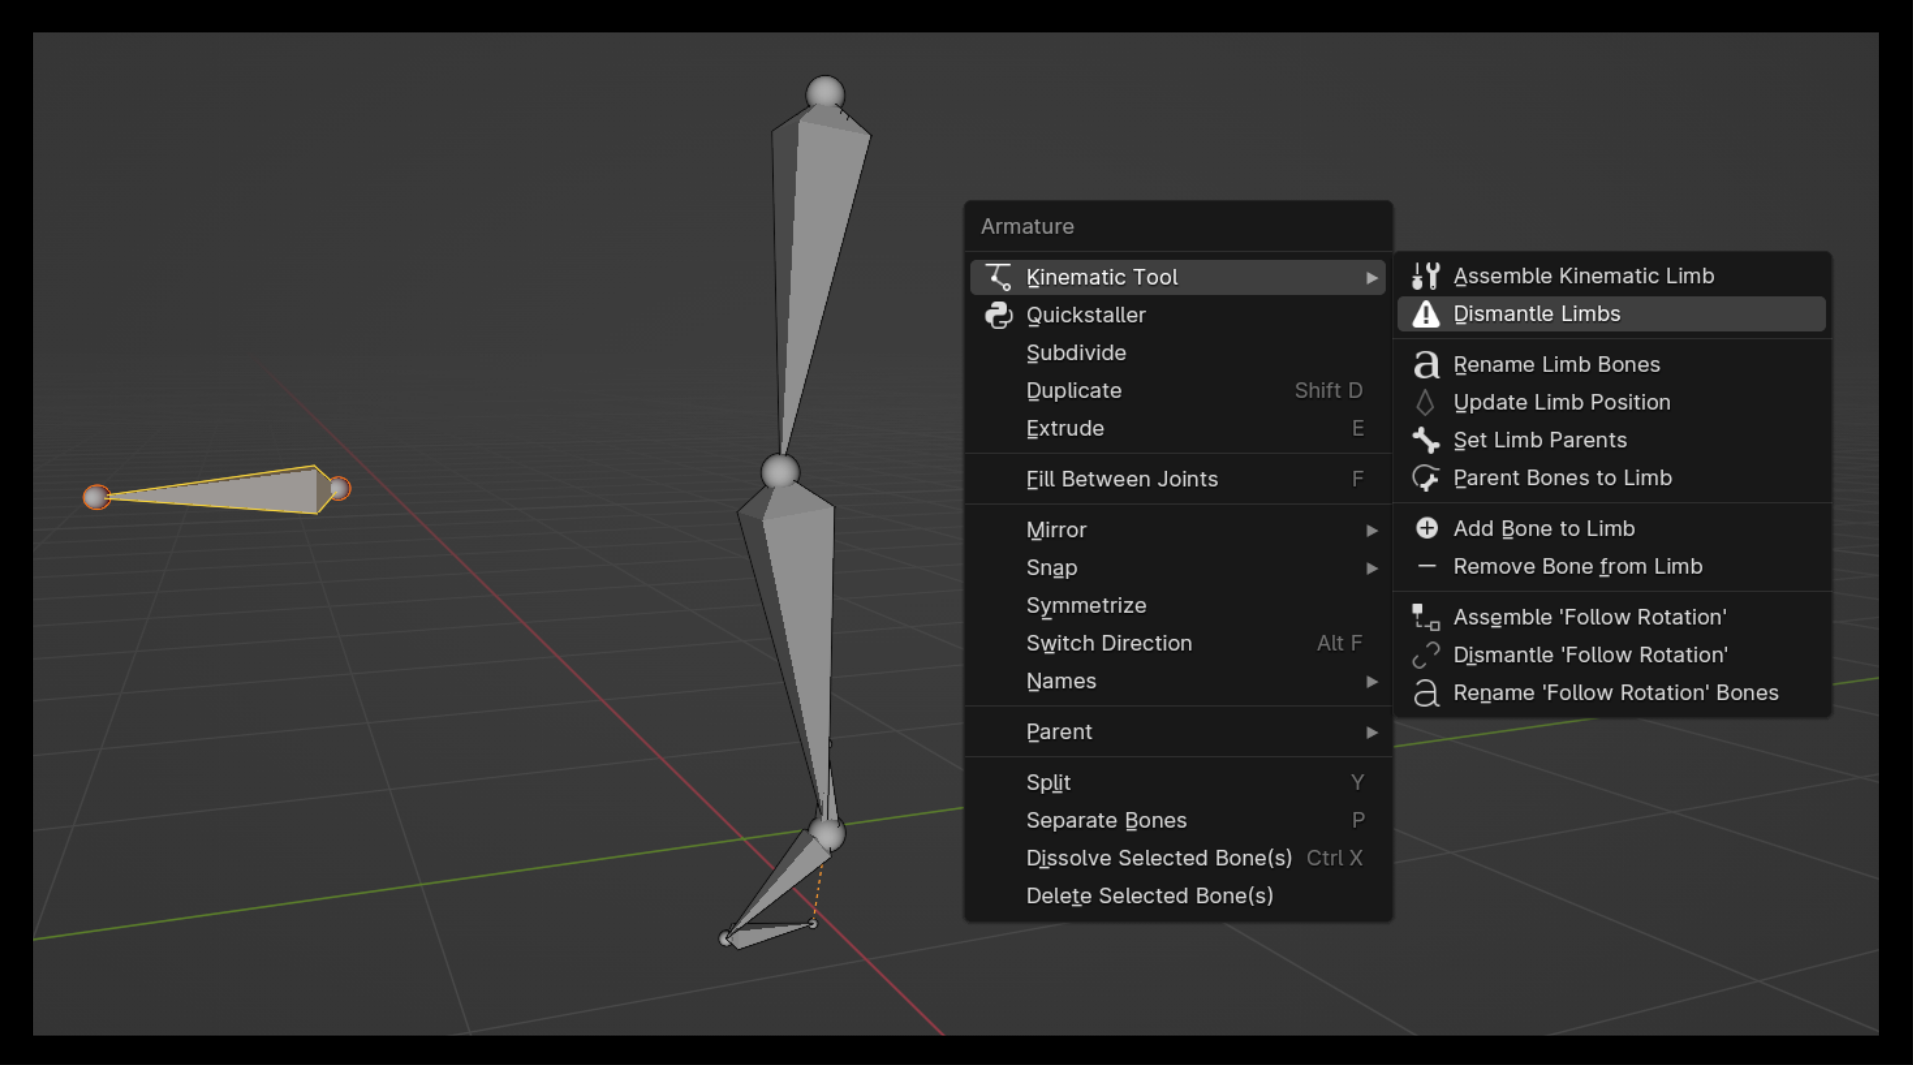
Select any bone in the newly assembled limb and use the next operator in the Kinematic Tool right-click menu, "Dismantle Limbs". This will remove all the extra bones, custom properties, and bone collections that were created during the assembly process, and leave you with the original three deformation bones parented to each other.
Using the "Dismantle Limbs" operator is preferrable to deleting bones within an armature, since the operator leaves things tidy as before and dismantles all the drivers that might otherwise linger. If the custom properties that are used to tag each bone (more on those in a bit) remain on a bone, they'll prevent reassembling a limb using that bone.
Now that you know how to assemble and dismantle a limb, I'm going to show you how to reposition an assembled limb and rename the bones that are part of the limb. Let's assemble the limb again. Select all three bones of the chain and use the "Assemble Kinematic Limb" operator once more.
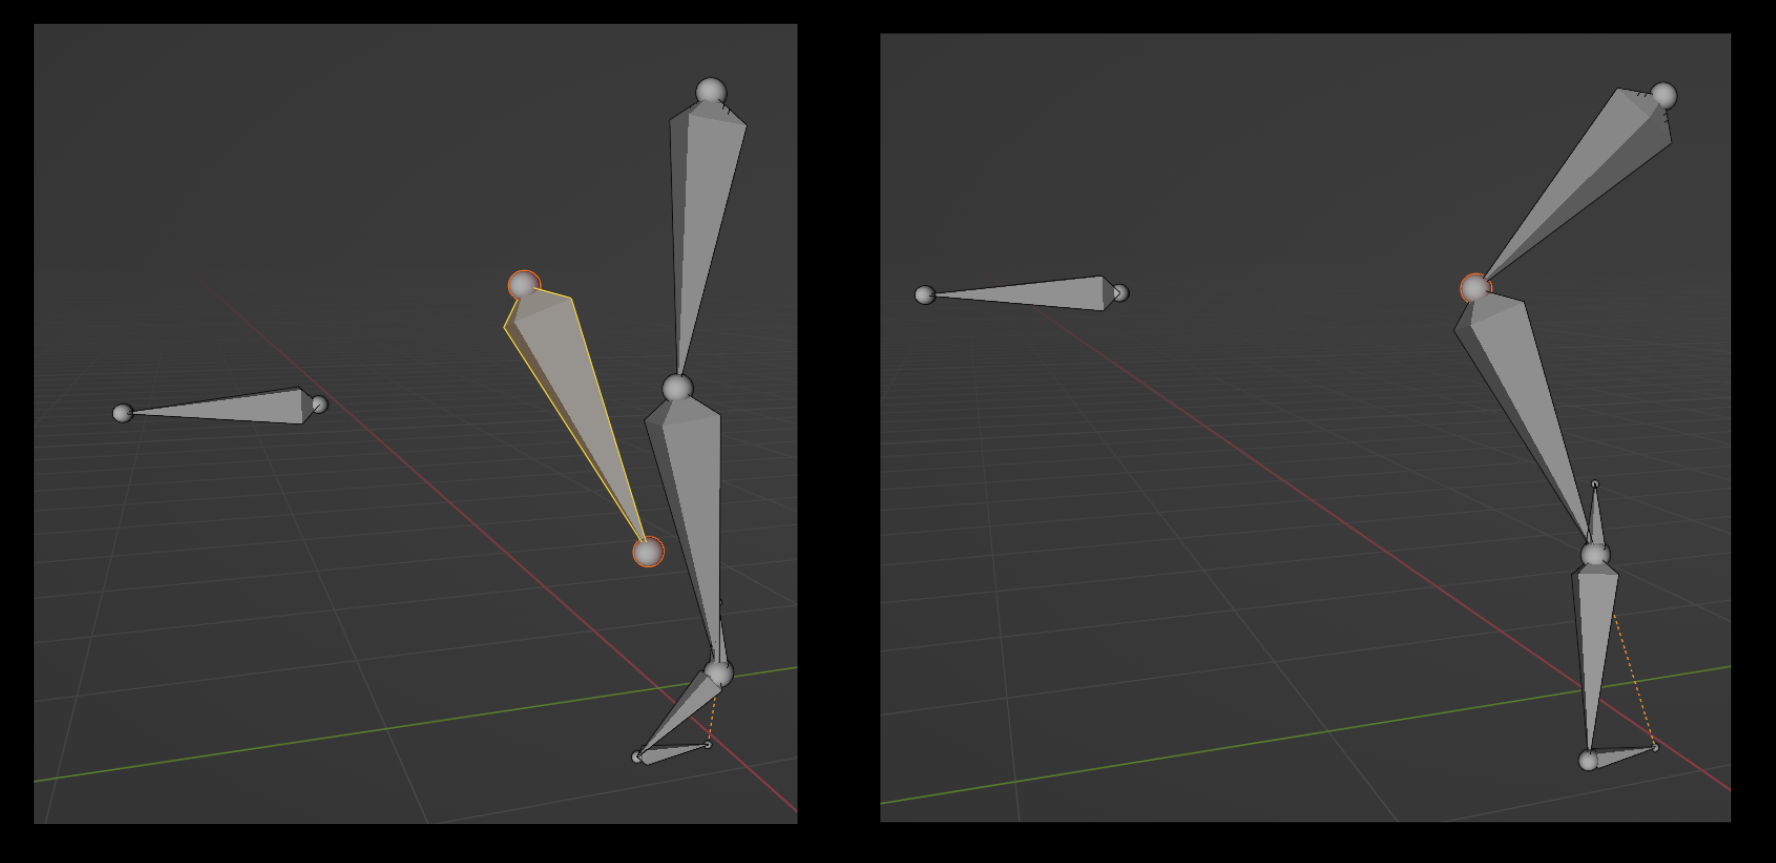
Select one of any of the base, middle, or end bones and move the bone to a new position, then rotate and scale it some amount. With the same bone still active and selected, access the Kinematic Tool menu, and choose "Update Limb Position". The bones of the assembled limb will reorient to the active bone. This operator allows you to make adjustments to your rig even after you've assembled it, so you don't have to dismantle it and reassemble it anytime you make changes to your character mesh and need to update your rig.
You can even use the "Update Limb Position" operator to relocate the position of the pole bone if you don't like its default position after assembly. In fact, any time you change the position of the bones of an assembled rig, you'll need to use the "Update Limb Position" operator to recalculate the pole angle of the IK constraint and the values of the Limit Rotation constraint established on the middle FK bone (more on those later). The update operator won't work on a few of the mechanical bones. Experiment to see what comes of it.
Let's talk about renaming the bones in the limb. Because the operators that come with the tool rely on custom property tags and a bone collection for reference, you are welcome to change the names of any of the bones of an assembled limb at anytime. However, it would be a lot of work to change each bone name individually, so the Kinematic Tool comes with a batch renamer, the "Rename Limb Bones" operator.
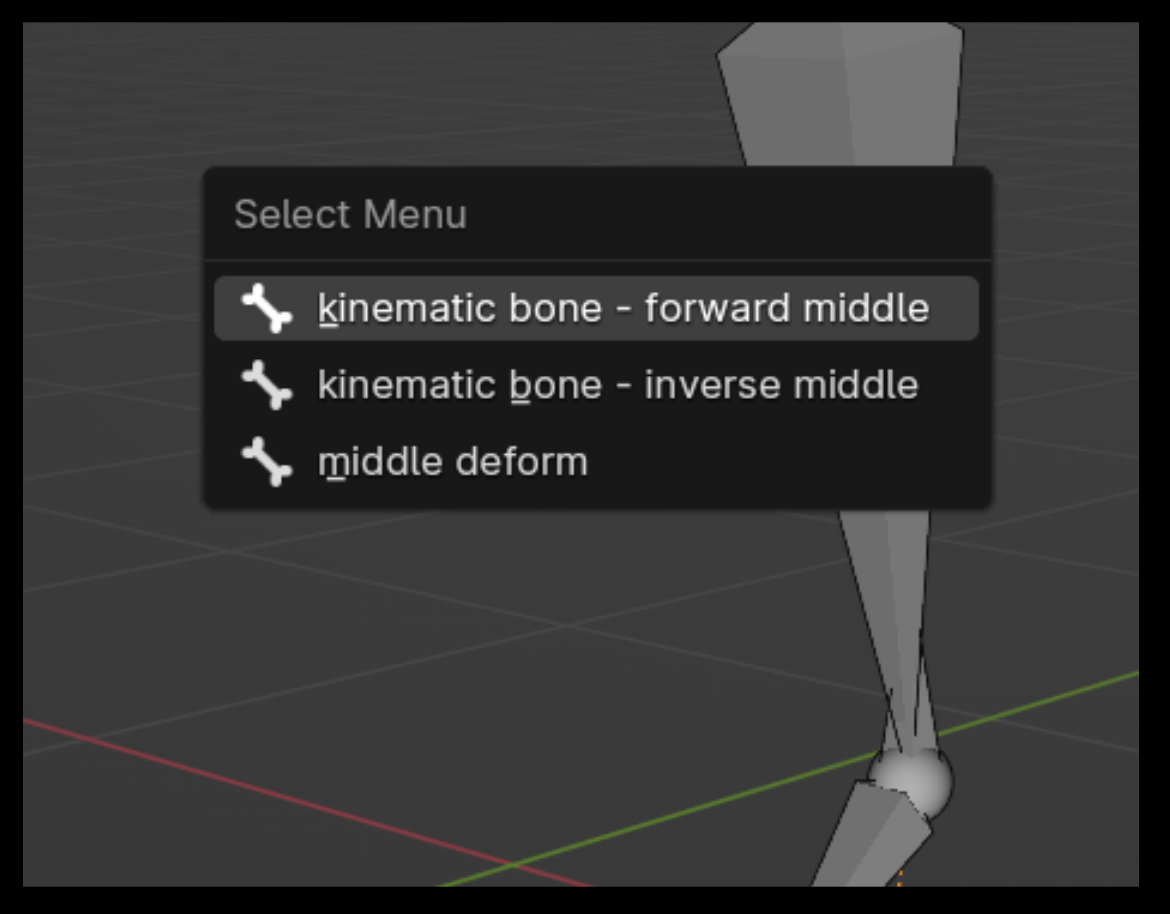
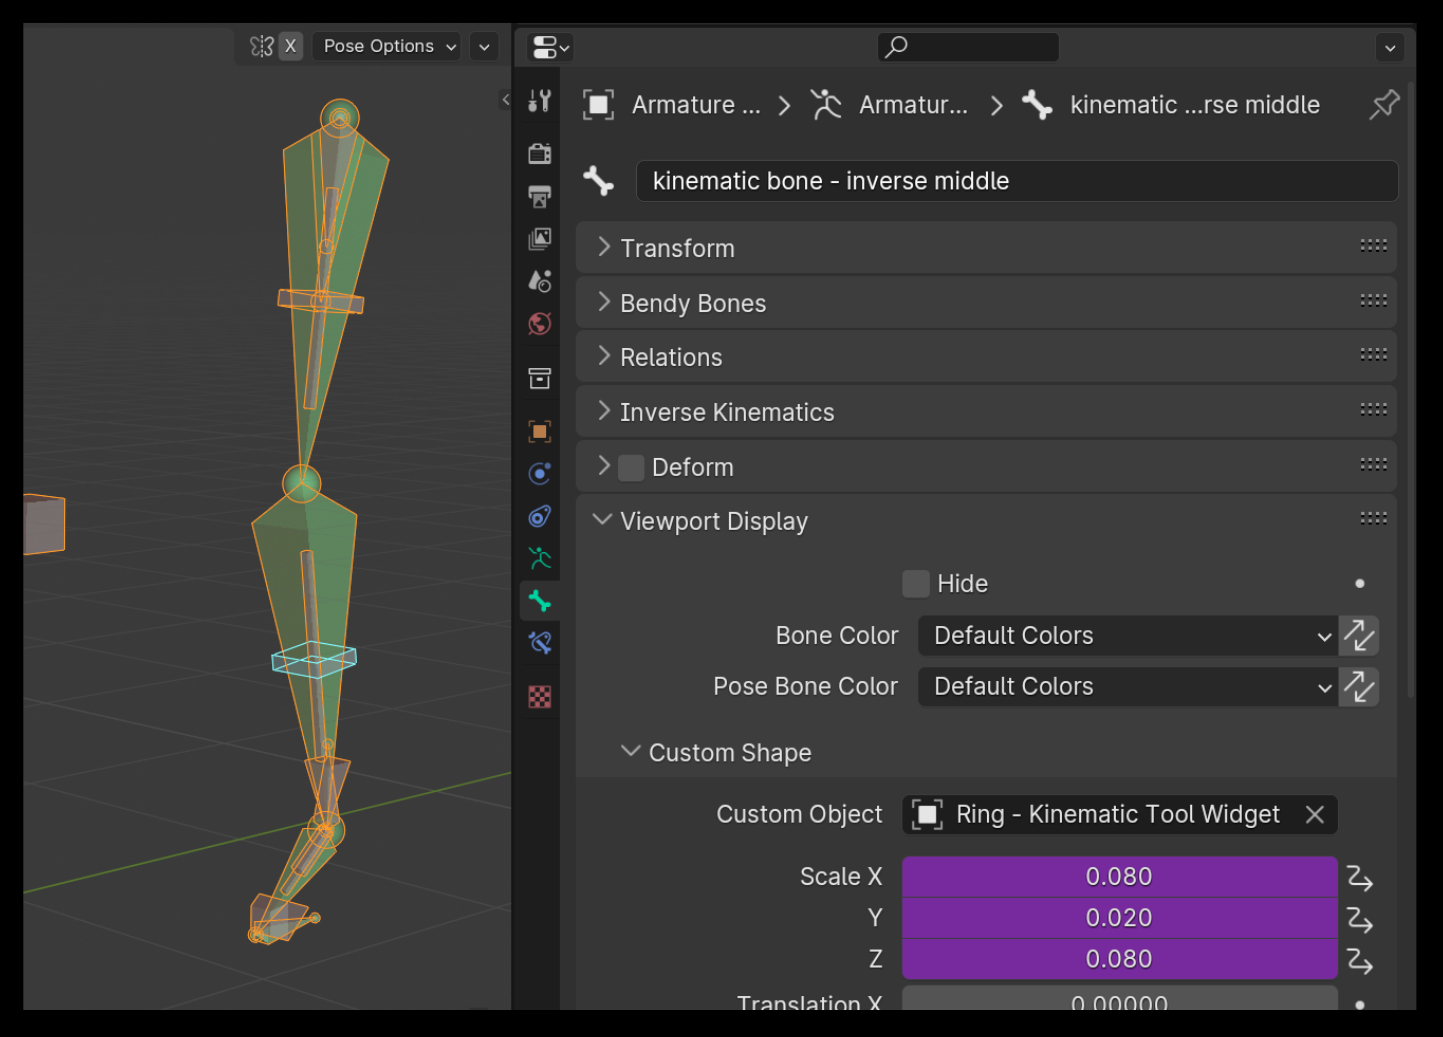
If you hold "alt" and left click over any of the base, middle, or end bones, you'll see that by default the Kinematic Tool gives the newly added bones of a limb some generic names. For instance, if you look at the names of the bones that occupy the middle bone position, you'll see something like "kinematic bone - forward middle" and "kinematic bone - inverse middle", along with the name of the original bone used to assemble your limb. These bone names are just place holders until you've renamed the bones.
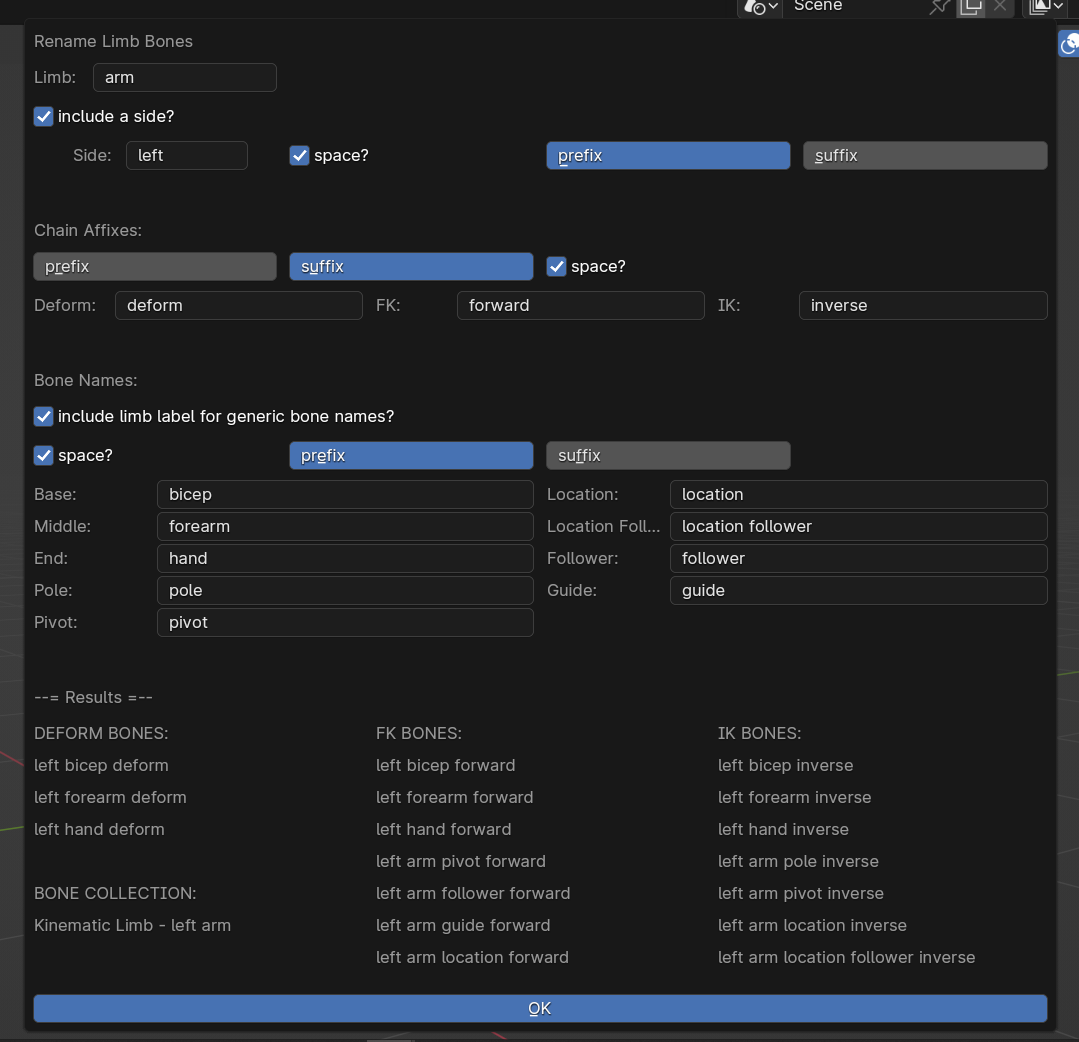
While in Edit mode, select any bone of the limb and choose the "Rename Limb Bones" operator. You'll be presented with a large panel wth a bunch of options. It might seem overwhelming at first, but it's just a way to provide a means of batch-renaming all the bones in the limb with your preferred labels. At the very bottom of the panel is a list of results updated in real time. Once you've hit "OK" the bone names as well as the bone collection that the limb is linked to (more on that later) will be updated. As you can see, there's a lot of bones that are part of an assembled limb (17 in total, including the original three you used to assemble a limb).
The first entry in the renaming panel is the name of the limb. This entry affects the name of the bone collection. The next row is an option for giving a side to a bone such as "left" or "right" or ".L" or "R ". With the prefix/suffix options you can decide to set this label at the beginning or end of a bone name. You can toggle on or off whether you want to include a side, and for convenience you can use the "space?" option to add a space before or after the side affix (depending on whether it's prefix or suffix)
The "Chain Affixes:" fields allow you to change the labels for different chains. Common affixes are "DEF", "FK", and "IK" for the chains, but as mentioned at the top of this page, I prefer to spell out the name of the chain, so it's easier to read at a glance when my eyes are tired (because of old man status).
The "Bone Names:" fields give you the ability to change all the names of each specific bone, depending on their location. In practice, I only ever change the first three options, the "Base:", "Middle:", and "End:" options, and leave the rest as is.
In fact, in most cases when I'm renaming a limb, I'm really only adjust the "Limb:" name, the "Side:" name, and the "Base:", "Middle:" and "End:" names. Play around with the settings while you watch the results at the bottom of the panel. If you have more than one limb on a rig, I recommend keeping the "include limb label for generic bone names?" ON (you can find it under the "Bone Names:" heading). Since most of the mechanical bones use generic names, associating them with a limb helps for identification.
Once you've made your adjustments, chosen your labels, and are happy with the results, press "OK", then alt-left click again on any of the sections of bone and take a look at the bone names. The names will be updated based on the inputs you gave the rename panel.
Now that we've covered the basics of rigging, let's look at the structure of an assembled limb. We'll start with Bone Collections.
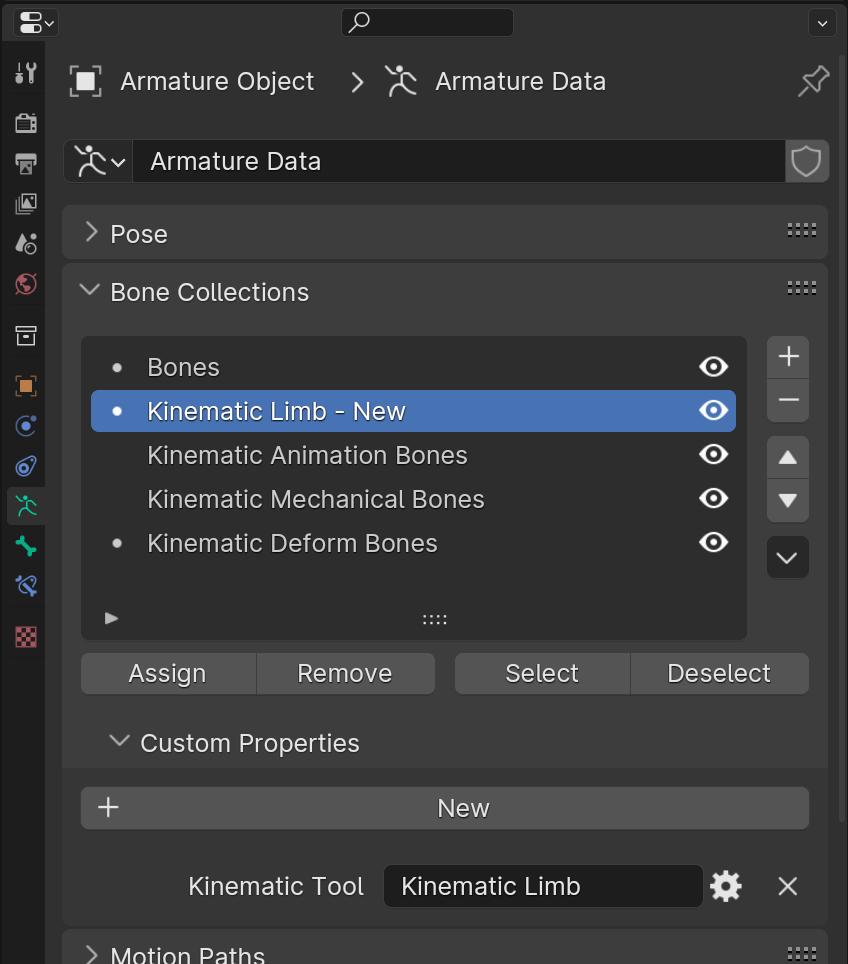
Head over to your armature data panel and look inside the Bone Collections section. With the creation of a newly assembled limb, 4 bone collections are created. One of the collections is labelled as "Kinematic Limb...", and the other three are labelled as "Kinematic ... Bones". For each of those collections, select each collection and take a look in the Custom Properties for each bone collection. Each of the collections is given a custom property. The name of each property is "Kinematic Tool", but the values differ.
The "Kinematic Limb" collection is the main reference point for the bones in your assembled limb, and the value of the "Kinematic Tool" custom property is "Kinematic Limb". The values of the other three are "animation", "mechanical", and "deform".
The most important of the four collections is by far the collection that has "Kinematic Limb" as its value. This collection holds the set of bones that belong specifically to that limb. Avoid adding or removing bones to this collection, since the operators rely on the selection of bones in this collection to work properly (along with custom property tags on bones which I'll explain in the next section). If the bone collection is named "Kinematic Limb - New", you don't need to rename it directly because the batch renaming operator also renames this bone collection.
If you accidentally delete the "Kinematic Limb" bone collection, you can create a new bone collection, select all 17 bones of the limb, and assign the bones to that collection, then make sure to give the bone collection a custom property named "Kinematic Tool", with "Kinematic Limb" as the value. So while the operators rely on a bone collection to identify the bones of a limb, making a mistake and deleting the necessary bone collection isn't a big issue because the bone collection is easy to restore by hand.
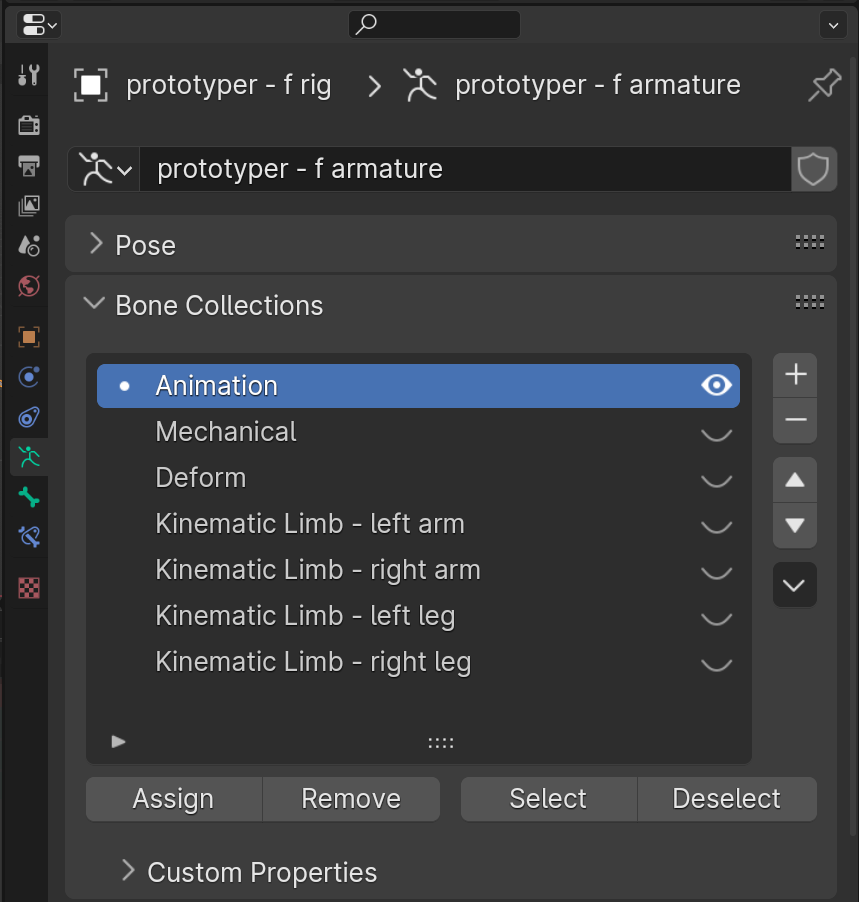
The other three bone collections tagged with "animation", "mechanical", and "deform" offer a separation of functions. You can move bones in and out these bone collections and even delete them if you'd like. They are simply for quality of life. "Animation" bones are the bones you will only directly interact with while animating. "Mechanical" bones are some special mid-layer bones that handle some special functionality. They aren't intended to be directly animated. "Deform" bones are simply the original three deform bones you used to assemble the limb, and aren't intended to be directly animated. In practice, keeping only the "animation" collecton enabled of the four collections is all that's needed for animating. I tend to pool all of my animation bones (including those that handle the spine, head and neck) into a general Animation collection and use that as my primary collection to work with.
Each of the Edit bones that are part of an assembled limb are tagged with a role. If you look at the Custom Properties of a bone while in Edit mode, and select through various bones, you'll see each bone is given a "Kinematic Tool" custom property and their values differ. For instance, the custom property of the original end bone of the deformation chain is labeled "deform end", the IK pole's custom property is labelled "inverse pole".
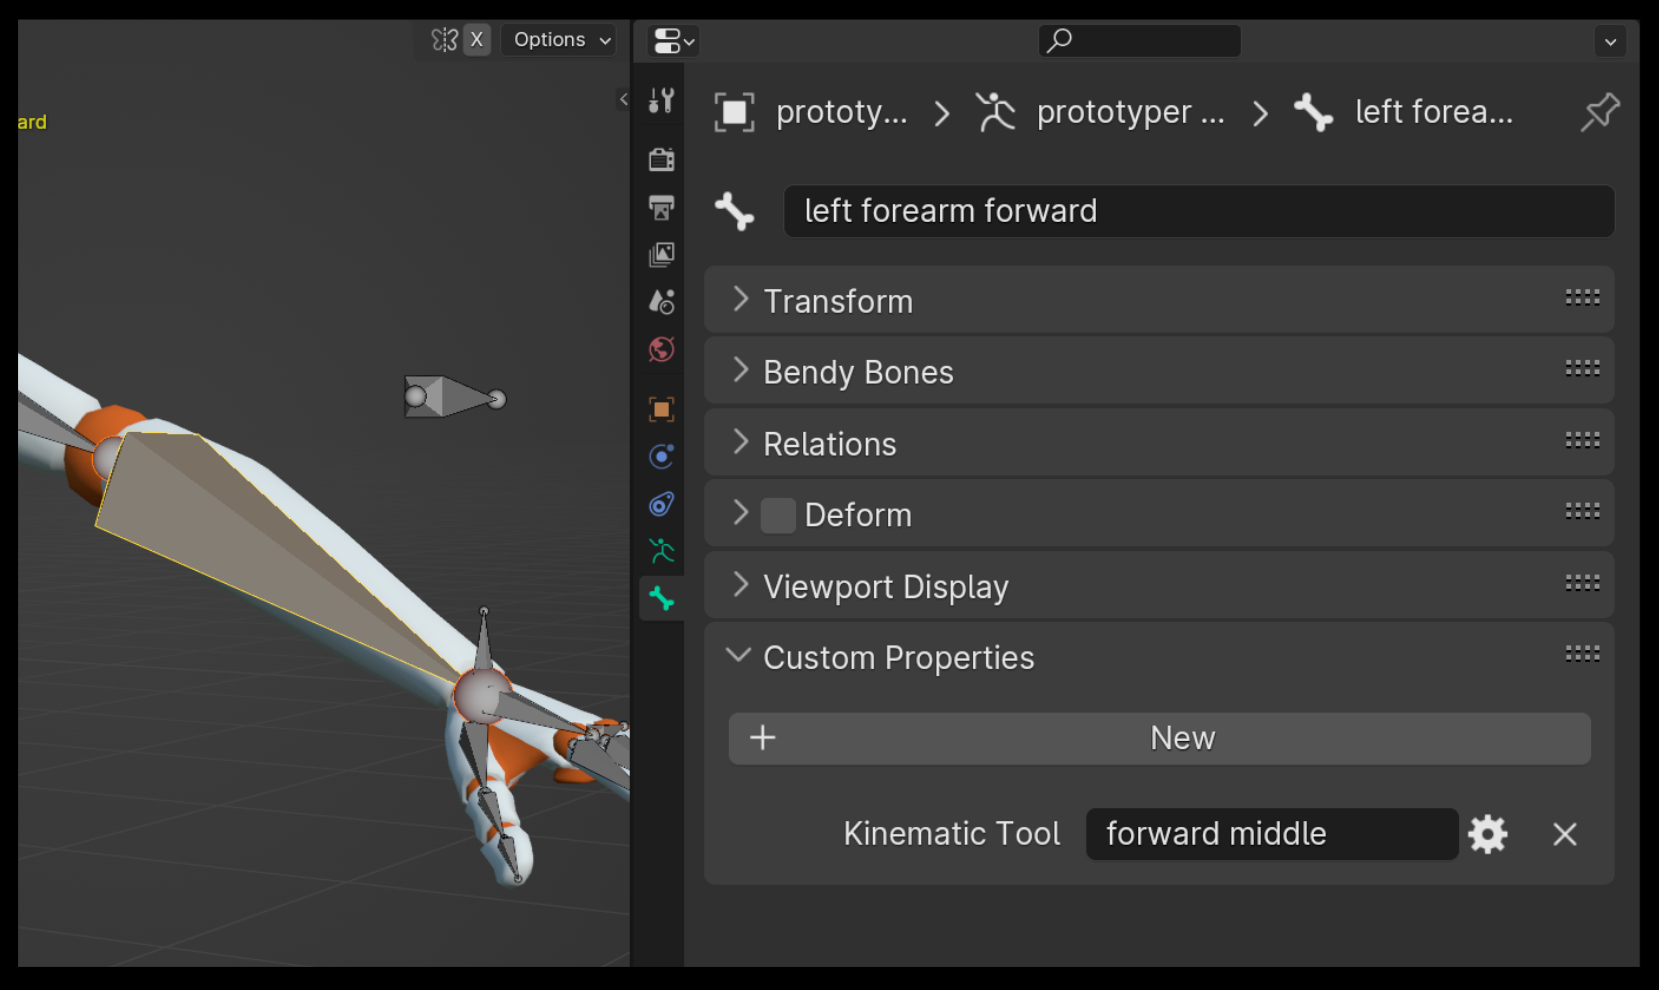
These values allow the operators to identify which bone is which within an assembled limb. If these values are modified or deleted, most of the operators are likely to have no effect on the assembled limb, and dismantling will likely not fully work, because dismantling also depends on these custom properties. If ever you make a mistake and end up modifying or deleting these custom properties, simply create a new throw-away armature, assemble a fresh limb inside of it, and compare the values on that limb to the one in question.
In order to take advantage of the visibility toggle on inactive chains, and as a way to differentiate between FK and IK bones, the Kinematic Tool assembles 4 custom shape widgets for use on certain bones.
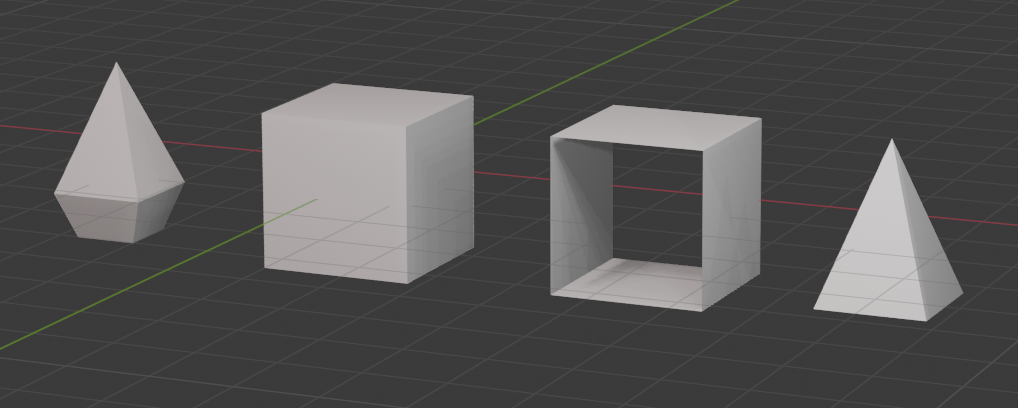
These objects, "Crystal", "Cube", "Ring" and "Pyramid", are intended to help differentiate between IK and FK chains, as well as to help the bones of the pivot system stand out. A scene collection named "Kinematic Tool Widgets" is created that houses the 4 objects. You can move this widget collection into any collection you'd like. Deleting these objects will prevent some of the visibility features from working. However, you aren't bound to using the custom shapes that are constructed. You're welcome to use whatever custom shapes you'd like with your animation bones. If you accidentally delete any of the drivers that affect the custom shape scales, there's a section at the bottom of the Chain Visibility article that will walk you through resetting or modifying the drivers.
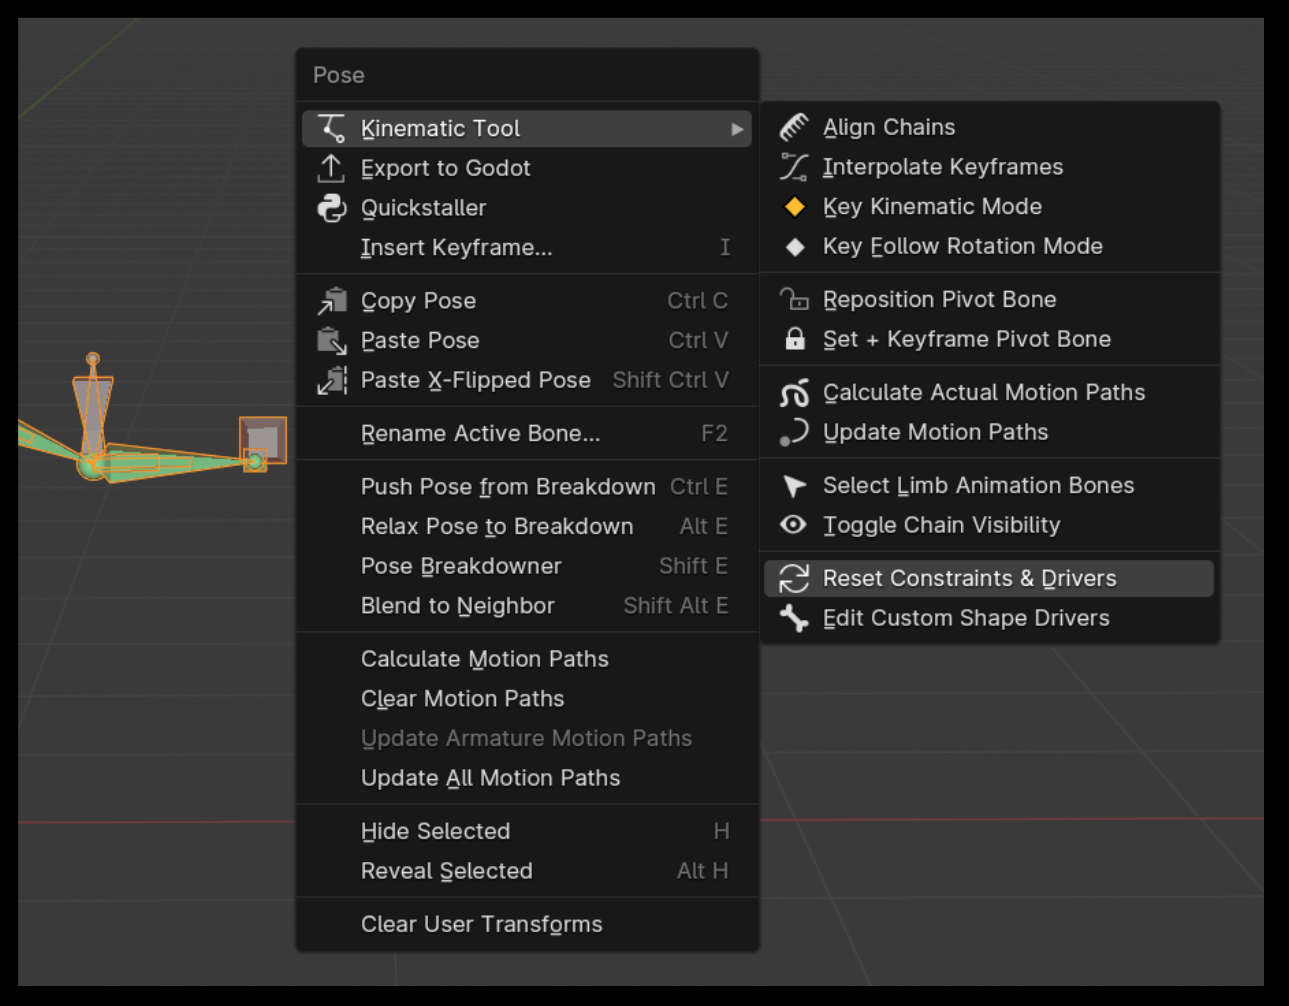
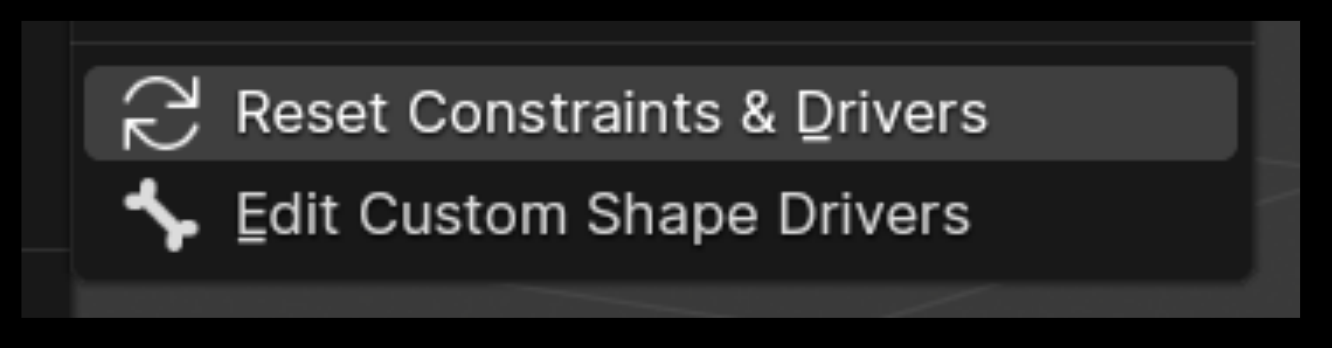
If at anytime you accidentally removed a Pose mode custom property or a constraint or a driver, try using the Pose mode operator, "Reset Constraints & Drivers", before disassembling and reassembling a limb. The operator does its best to restore a limb to most of its factory settings. If that doesn't do the trick, dismantling and re-assembling is pretty quick. You may just need to spend a moment to batch rename the limb.
Okay I'm going to saturate you in a lot of detail for a moment. If you don't care about the specifics, move along to the next section to continue rigging.
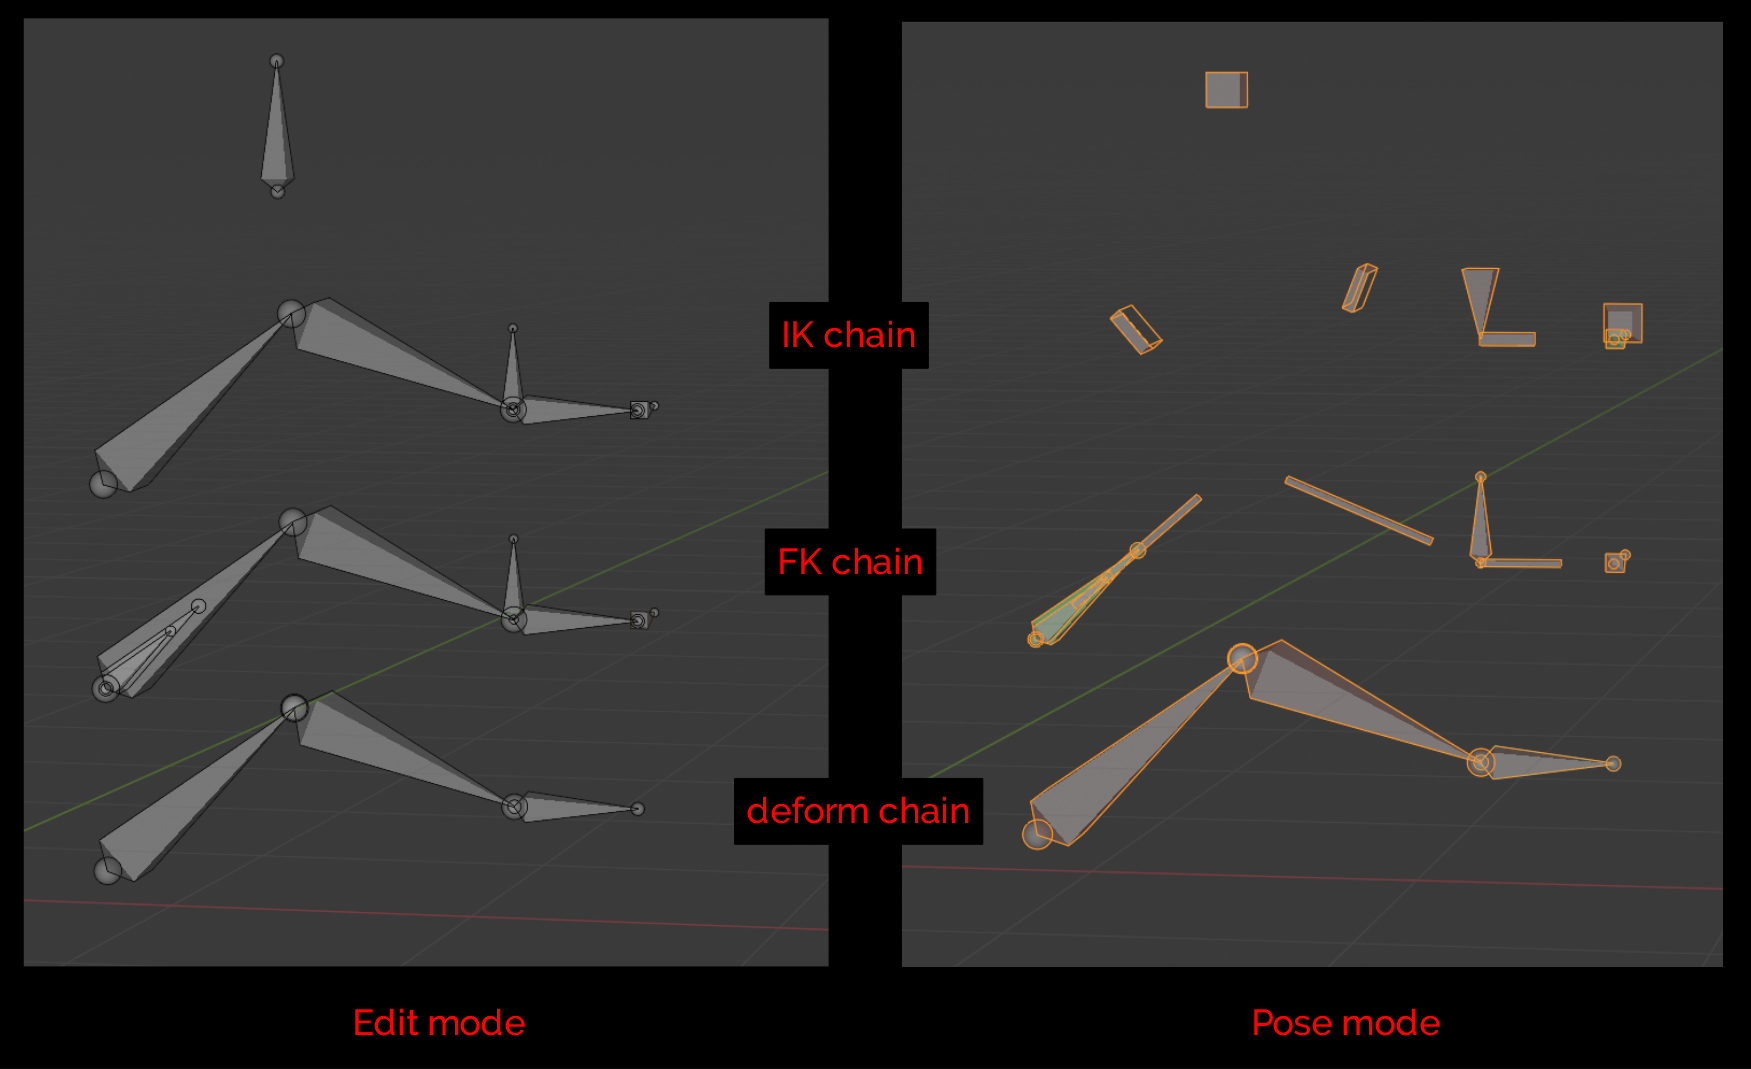
Each assembled limb is sorted into three chains:
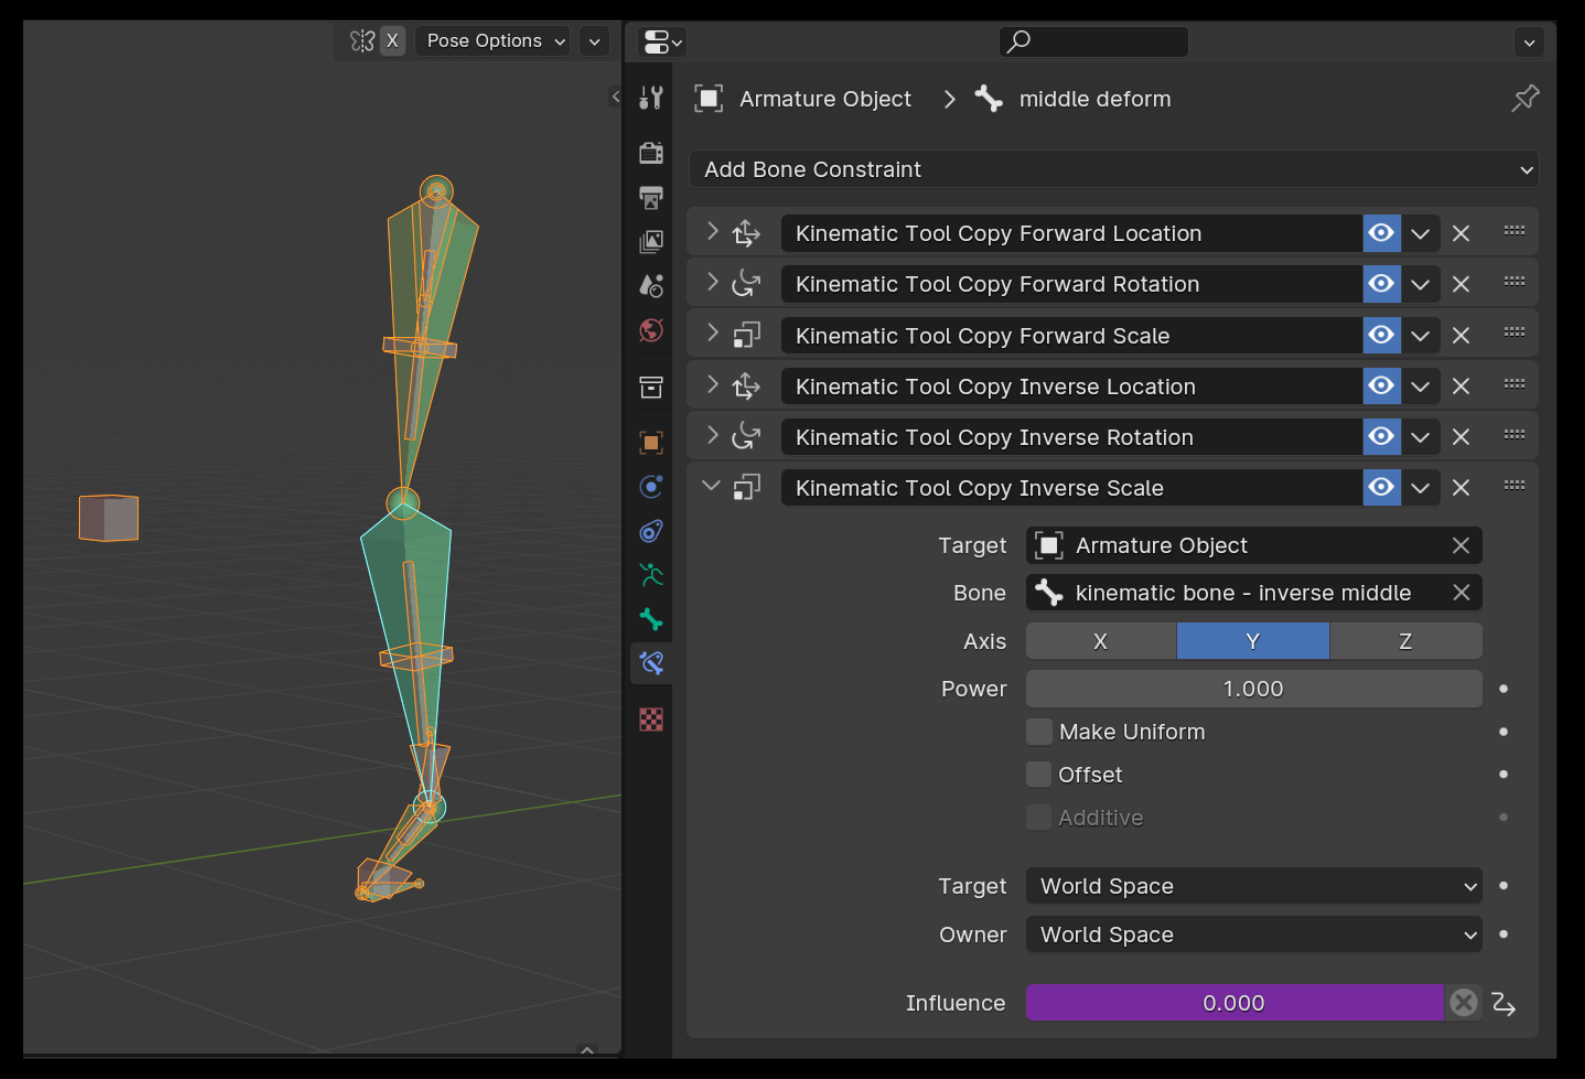
We already know the deform chain is made of the original three bones you used to assemble the limb. Each of the deformation bones has 6 constraints that are essentially "Copy Transform" constraints isolated into copy-rotation, copy-location, and copy-scale, 3 pointing to the FK bones, 3 pointing to the IK bones. This allows the Y-axis to be the only axis to scale when stretching a limb. The influences on the constraints which point to the IK bones are driven by the "Kinematic Mode" custom property that lives on the IK middle bone.
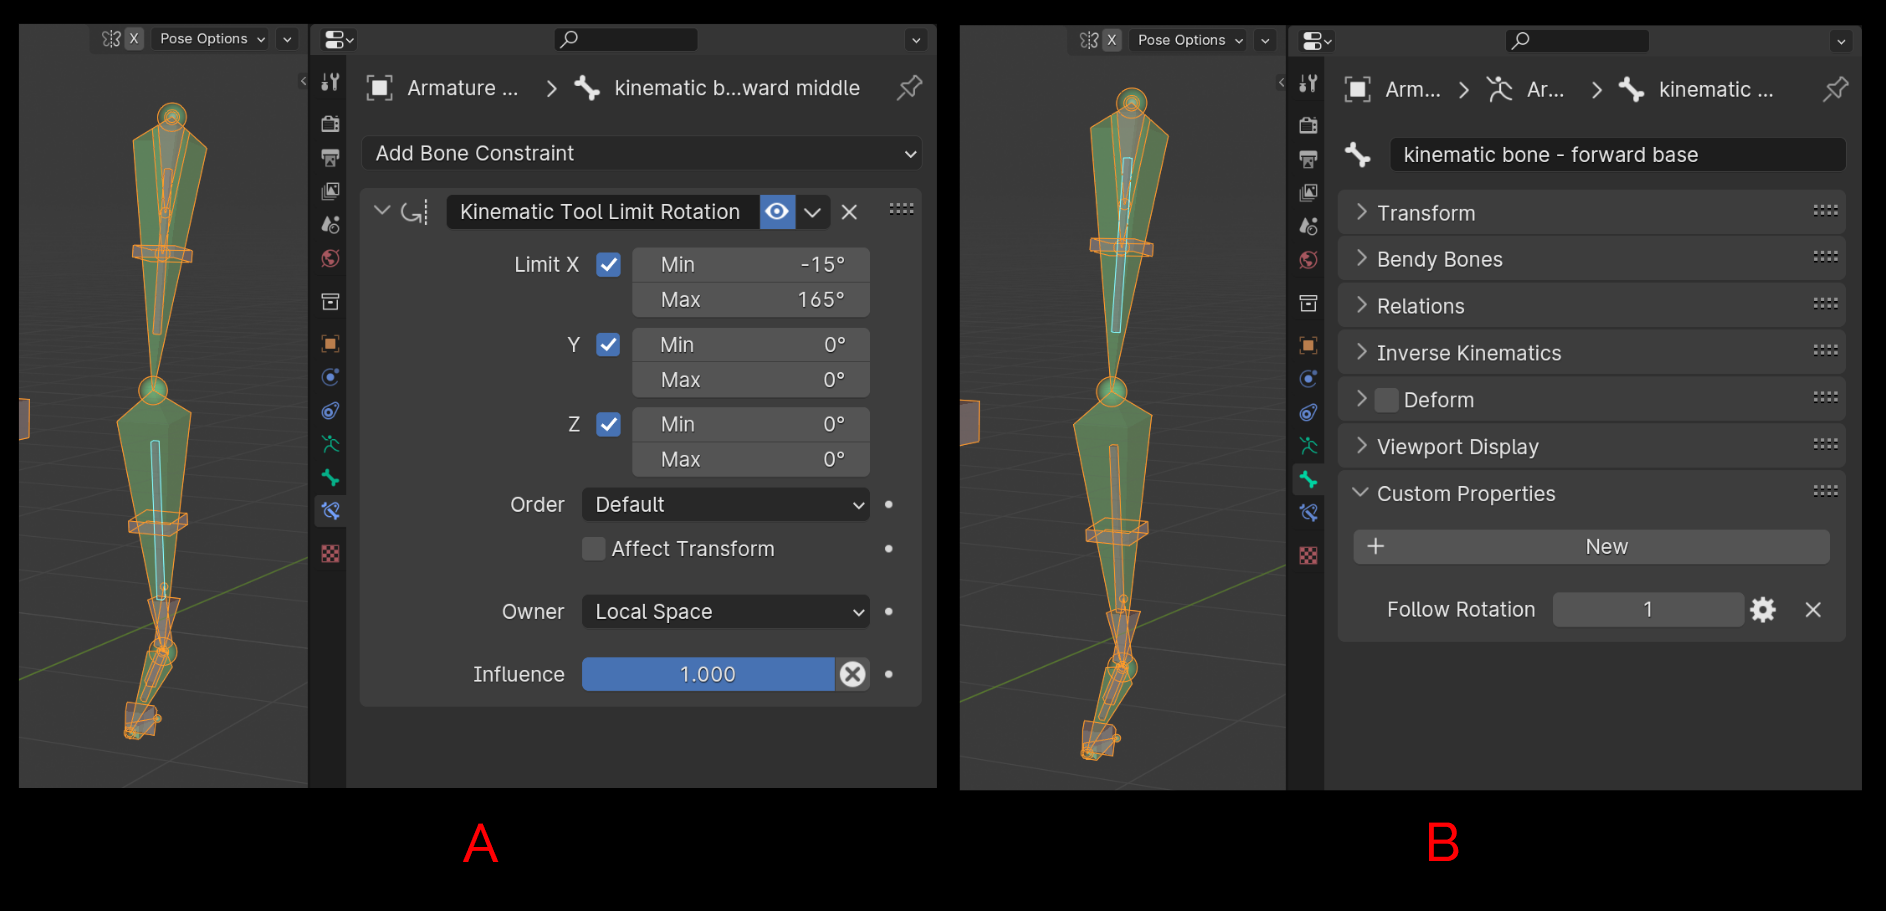
The FK chain includes 7 bones, 4 of which are in addition to the base, middle, and end bone. 2 of these additional bones operate the Follow Rotation system, and two of the bones help operate the pivoting system. While in Pose mode, the base, middle, and end bones use stick-looking custom shapes (simple bars to swing around). The FK middle bone comes with a "Limit Rotation" constraint that's calculated during assembly and whenever using the "Update Limb Position" operator. This constraint prevents the FK middle bone from extending 180 degrees beyond the FK base bone. If you delete it, the IK chain may have problems aligning with the FK chain. Experiment if needed, but I encourage keeping it on. Also, The FK base bone has a custom property named "Follow Rotation" which drives the Follow Rotation system. This property will be keyframed with the "Follow Rotation OFF / FR0" and "Follow Rotation ON / FR1" operators.
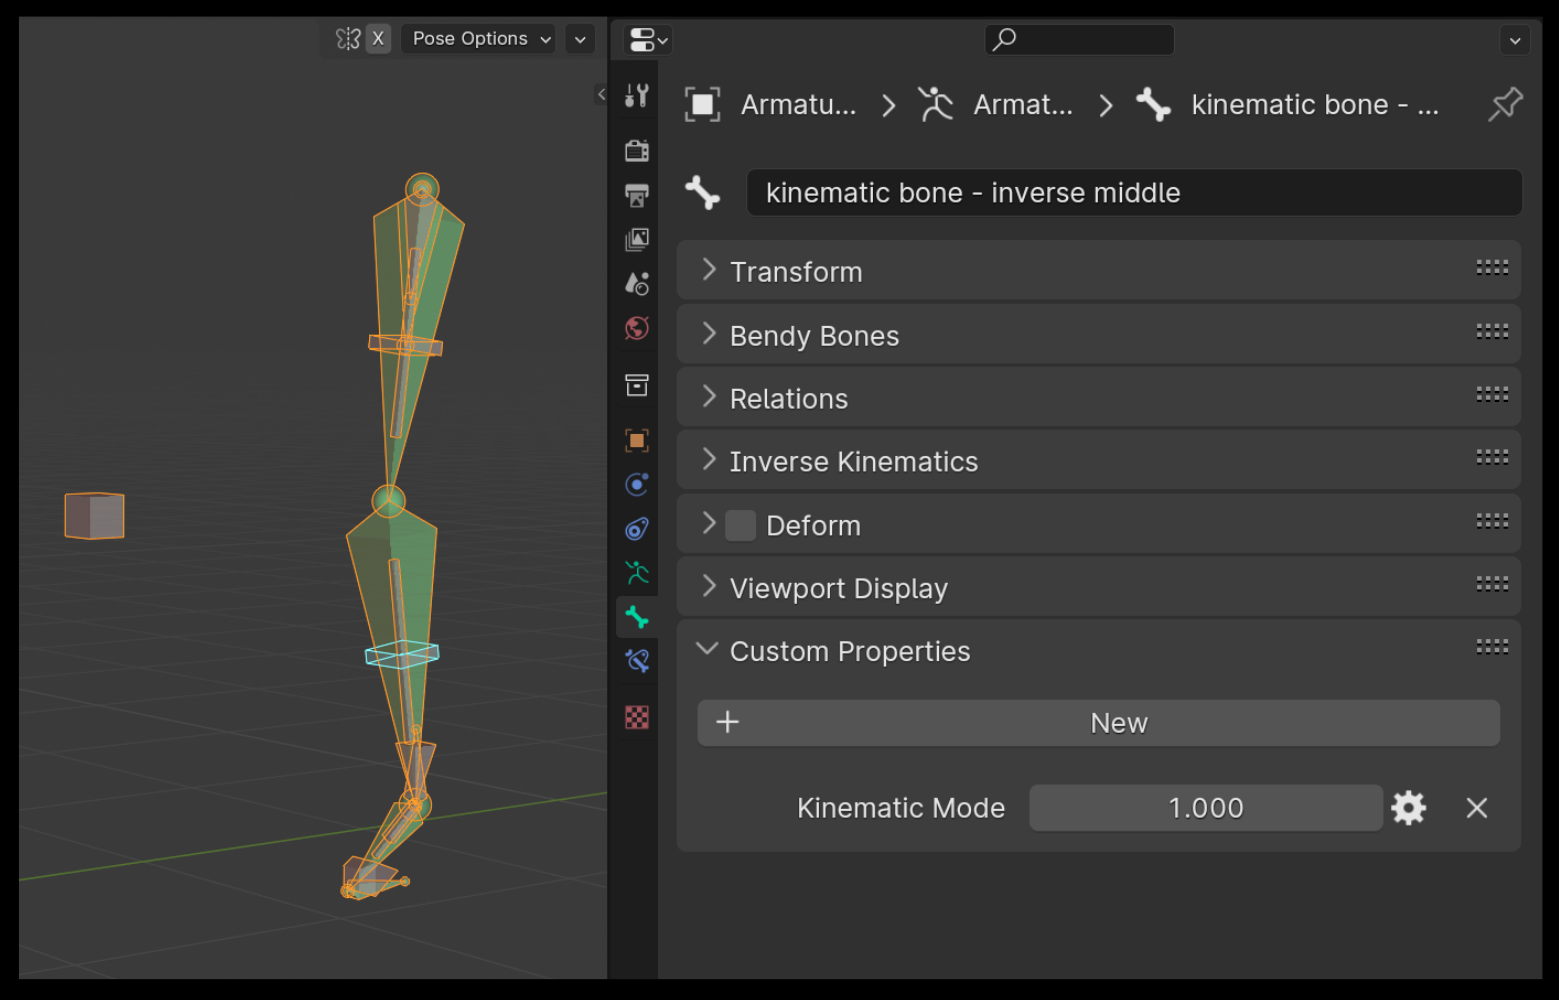
The IK chain includes 7 bones, most of which are animation bones: a base, middle, and end bone, a pole bone for adjusting the position of the joint between the base and middle bones, a pivot bone and a location bone. The only mechanical bone is the IK "inverse_follower" bone, and it prevents the location bone's rotation from affecting the rest of the chain. The main custom property that drives the entire kinematic switching and visibility system lives on the IK middle bone, named "Kinematic Mode", and will be keyframed with the Key Kinematic Mode operators "Start IK / IK0", "End IK / IK1", and "FK".
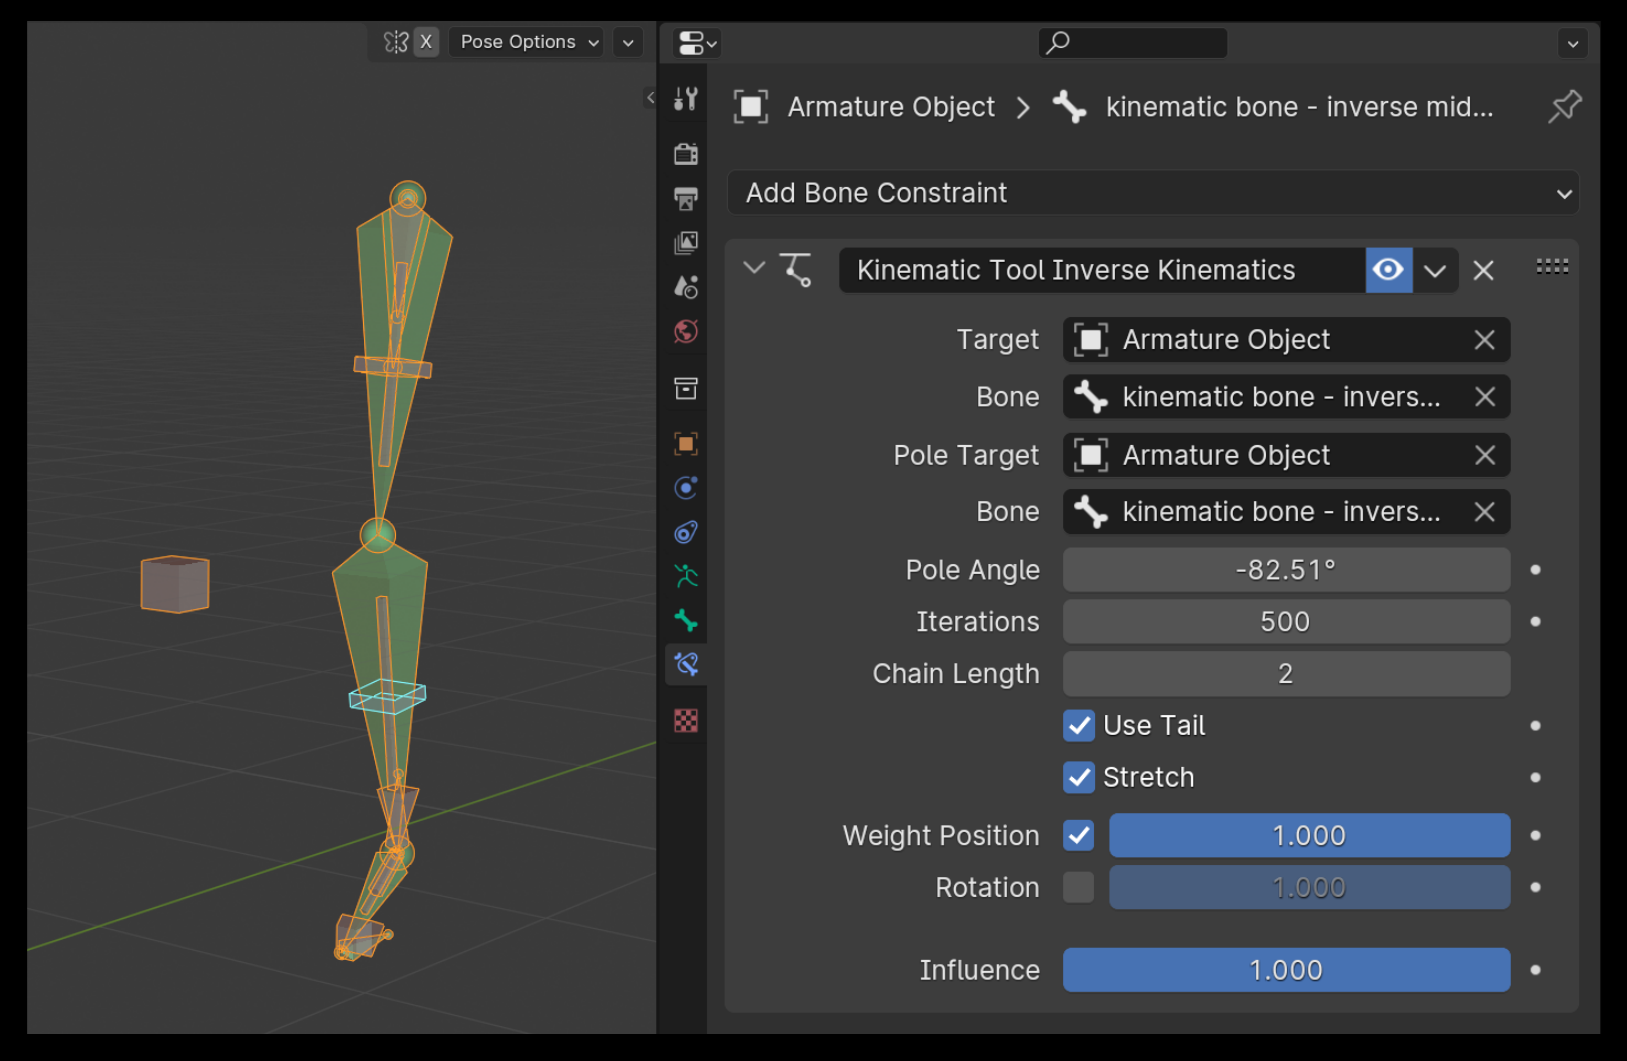
The IK constraint for the assembly also lives on the IK middle bone. The pole angle for the IK constraint is calculated during assembly, and whenever you use the "Update Limb Position" operator. Inside the base and middle bone's "Inverse Kinematics" section (inside the Bone panel), their IK stretches are set to 0.05. For the middle IK bone, two of the Lock IK axes are locked depending on the orientation of the bones.
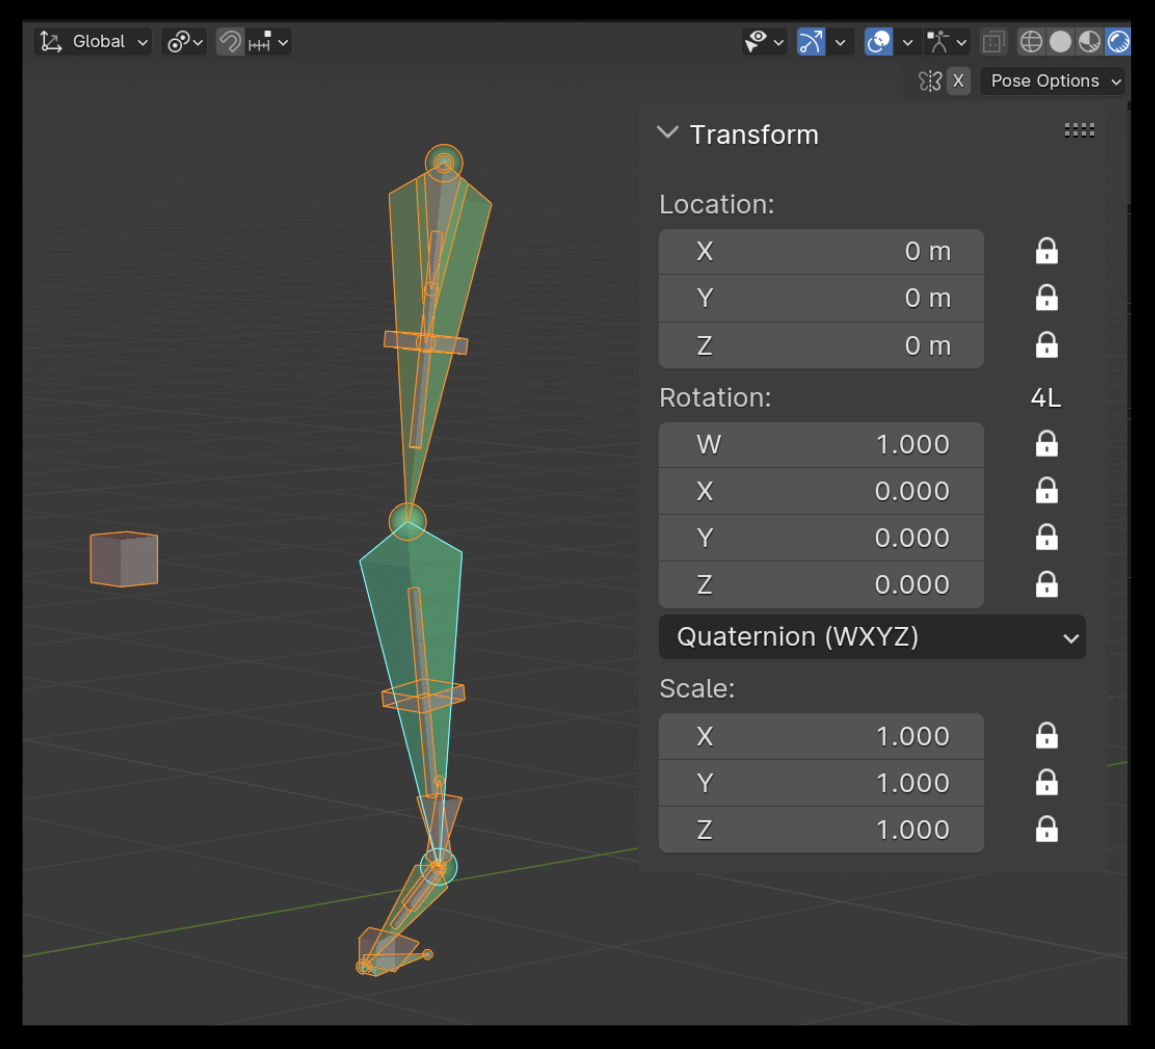
All of the non-animation bones have their transform channels locked to prevent keying them. Only the FK middle bone has a couple of rotation channels locked, depending on the orientation of the original chain when rigging (to work in step with the "Limit Rotation" constraint and to help the IK chain reliably align to the FK chain when needed).
Only the deformation bones have the "Deform" option checked on. The rest have the "Deform" option OFF.
All of the animation bones have their custom shape scales driven by the "Kinematic Mode" property that lives on the IK middle bone and the "Kinematic Tool Chain Visibility" property that lives on the armature. All of the animation bones by default have their rotations set to "Quaternion". You're welcome to change this rotation mode to whatever you prefer (honestly, after spending more time binging on Quaternion knowledge to better understand them, I'm convinced they are superior to Euler for animating characters - working with Quaternions just takes a bit of demystifying, but they are the path to reliable quality rotations).
Once you've assembled a limb, you'll likely want to integrate the limb into the rest of the armature. There are two operators available to help you with that: the "Set Limb Parents" and "Parent Bones to Limb" operators. They both work slightly differently.
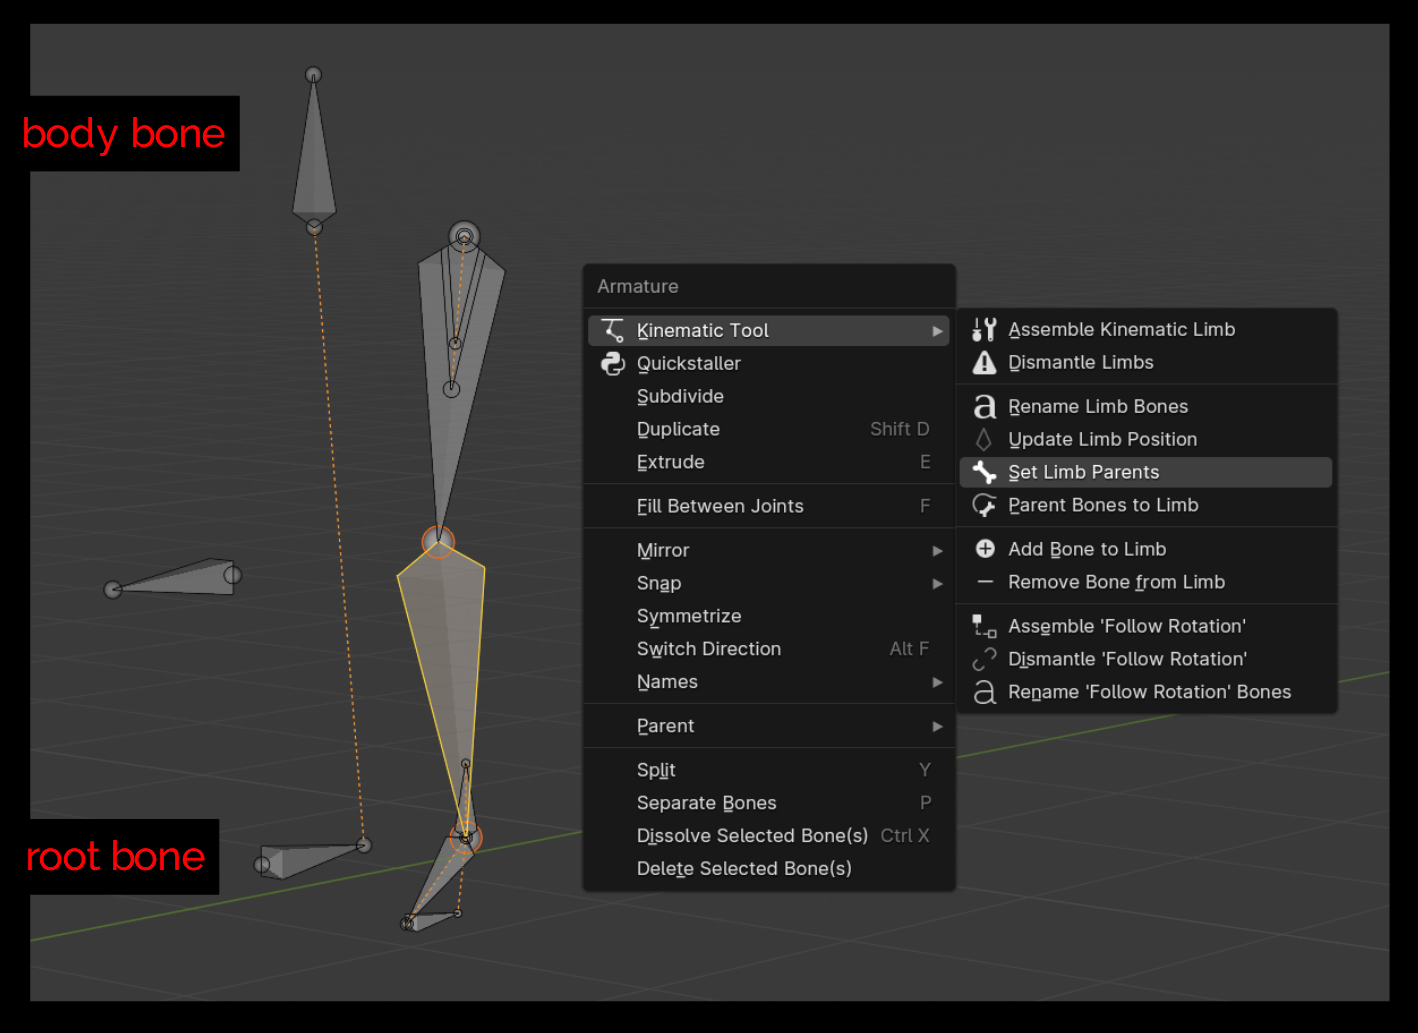
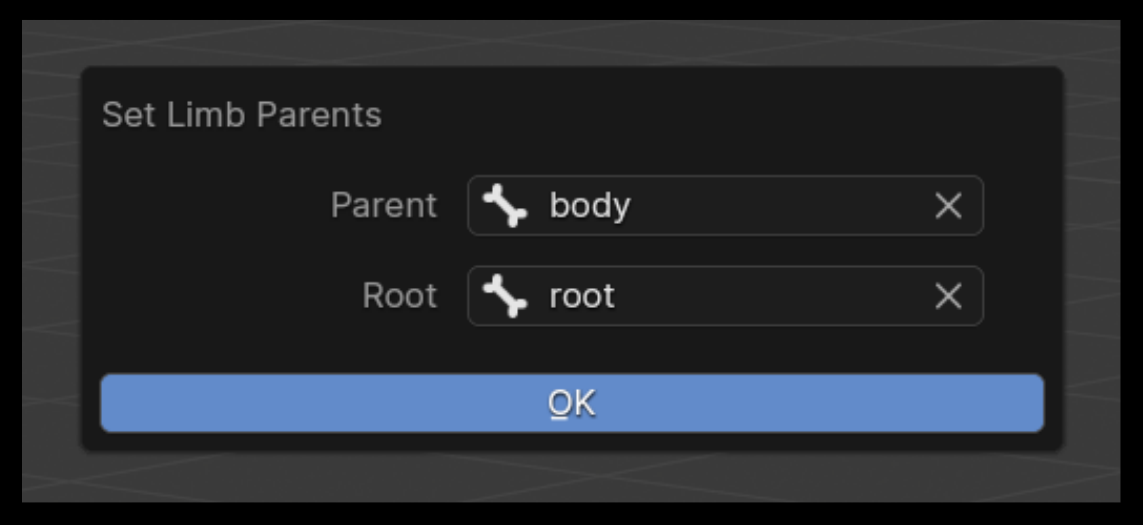
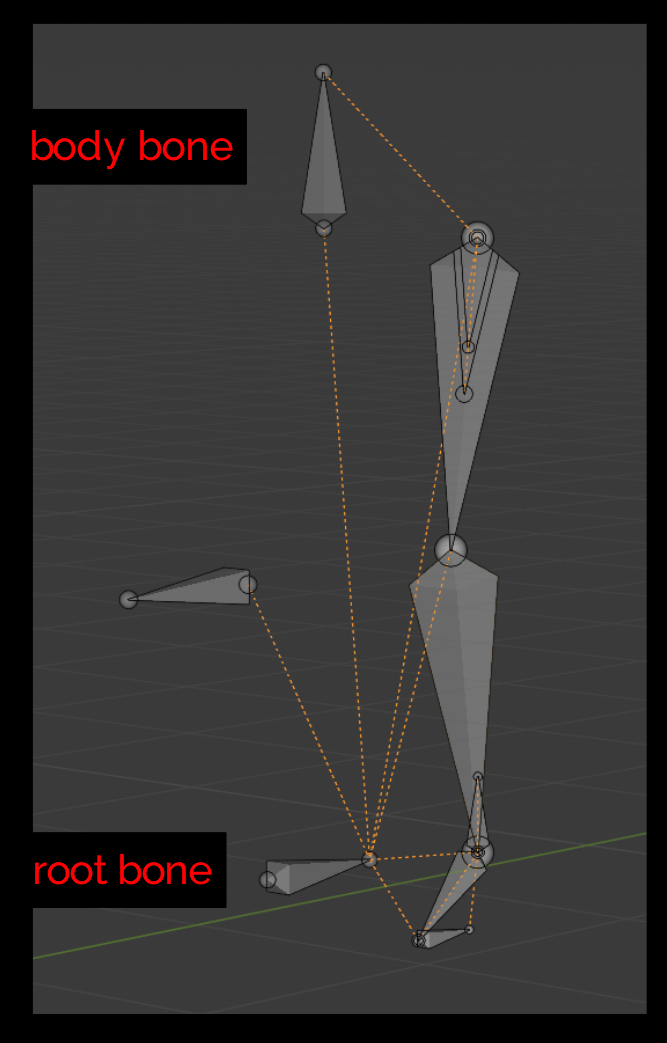
To attach your limb to the rest of the body, let's say we're attaching an arm to a collarbone: select the arm and choose "Set Limb Parents". You'll be given two fields: a "Parent" field and a "Root" field. In the parent field, choose the collarbone bone. If your armature has a root bone (I highly encourage setting one up!), choose that bone for the Root field. The IK base, and FK guide bones set the collarbone as the parent, and the deformation bones and all the other dangling bones use the root bone as their parent. These dangling bones are the FK follower, IK pole, IK location, and IK location_follower bones.
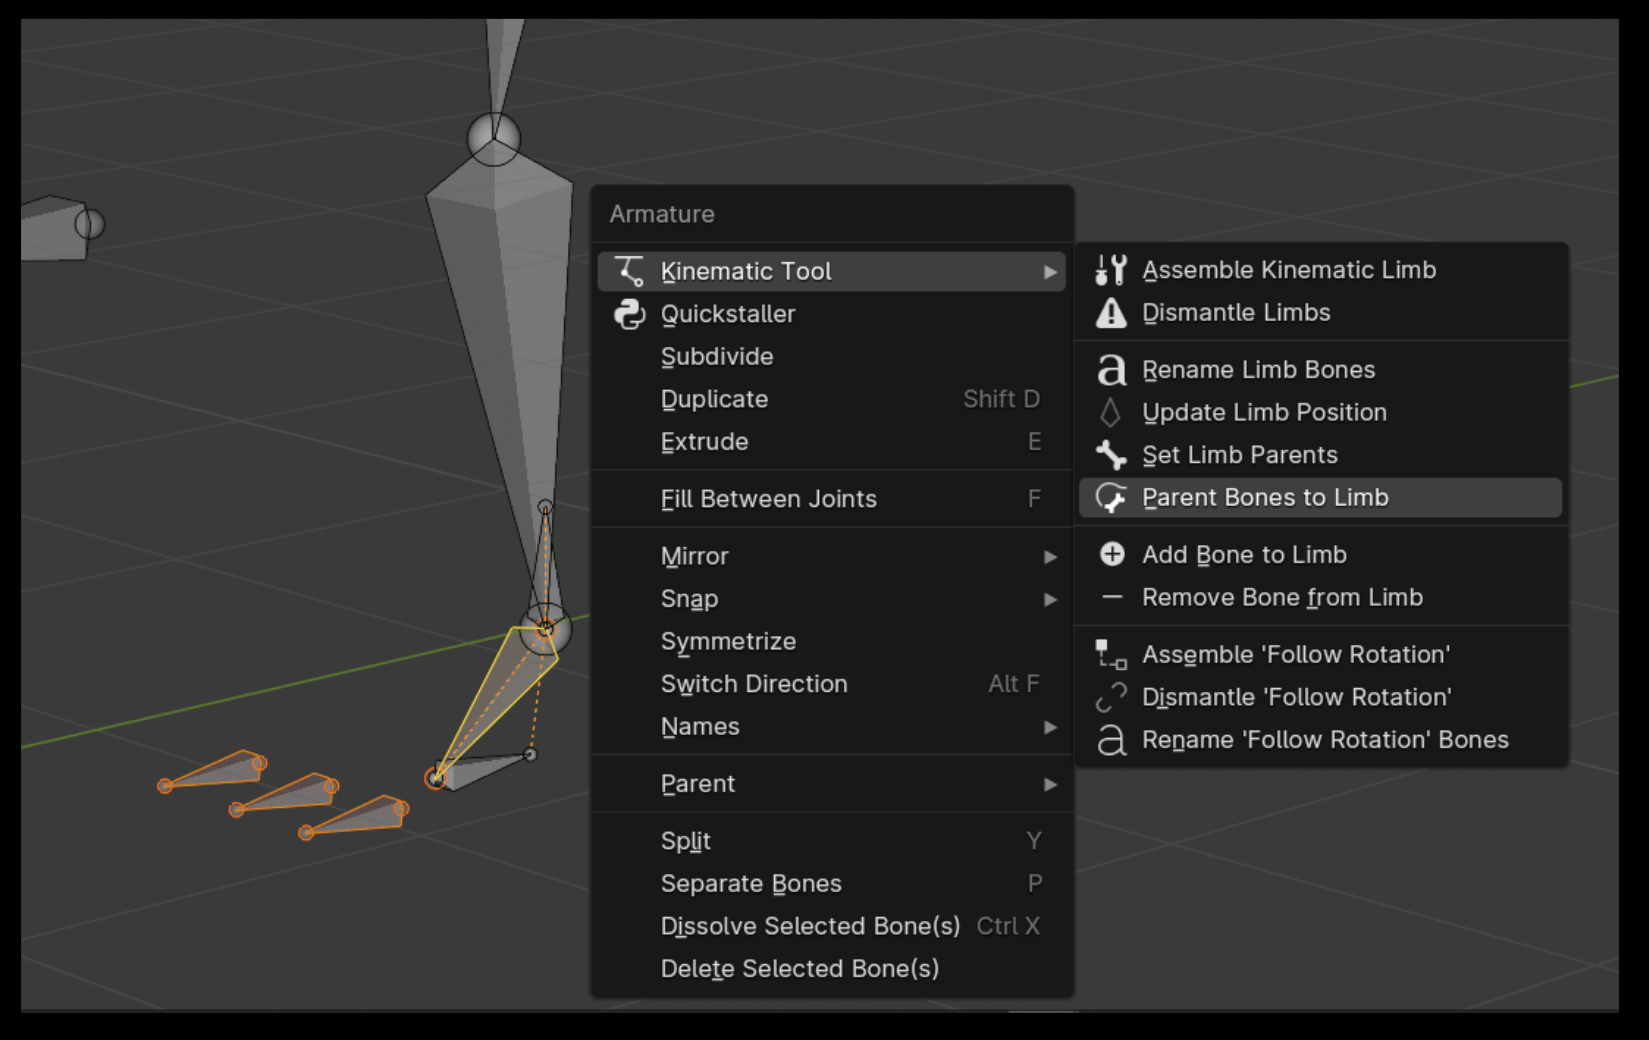
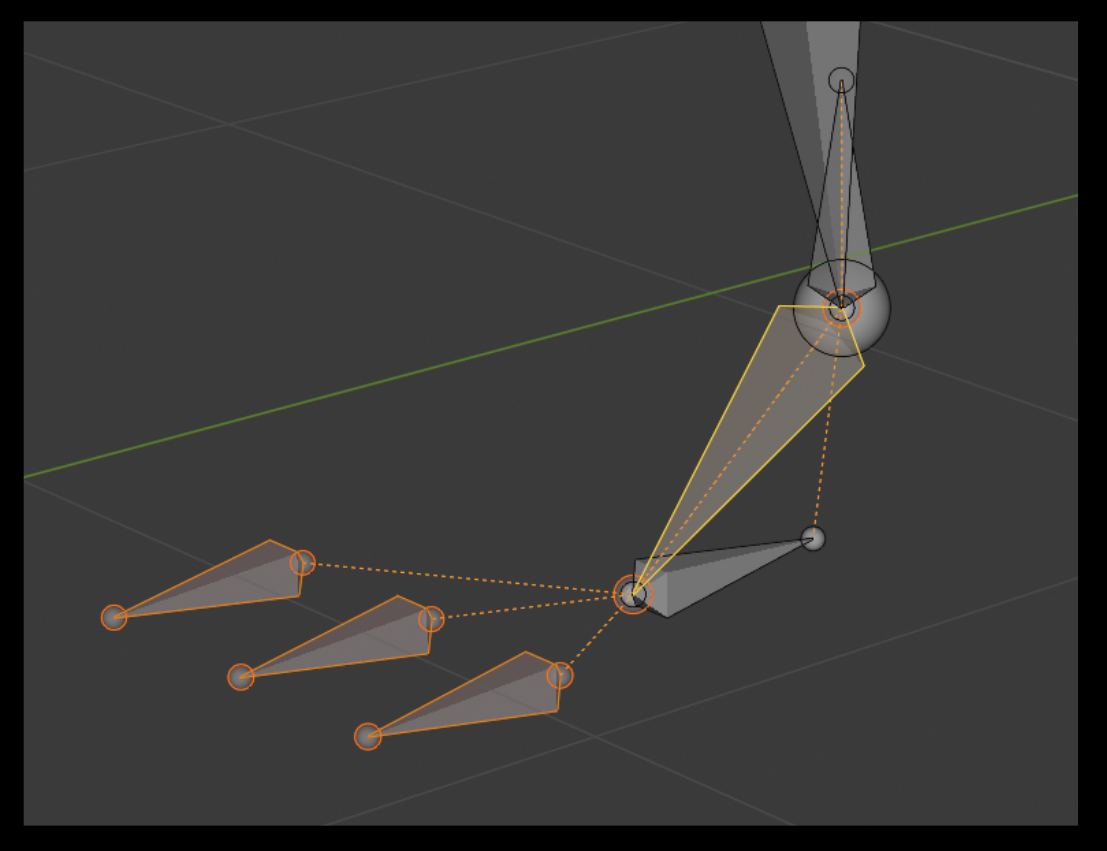
To attach a bone to a limb, for instance a finger to a hand, select the bones you want to be the children of the end bone of the limb, then Shift-select any bone in the limb, so that one of the bones in the limb is active, then use the "Parent Bones to Limb" operator. This essentially just parents the bones to the deform end bone.
Each assembled limb comes standard with a "Follow Rotation" built into the FK chain. However, you may want to rig the Follow Rotation system onto a standalone bone, such as for a toe-box so it can switch between following and not-following the rotation of the foot while the foot is pivoting on the toe or freely swinging in the air.
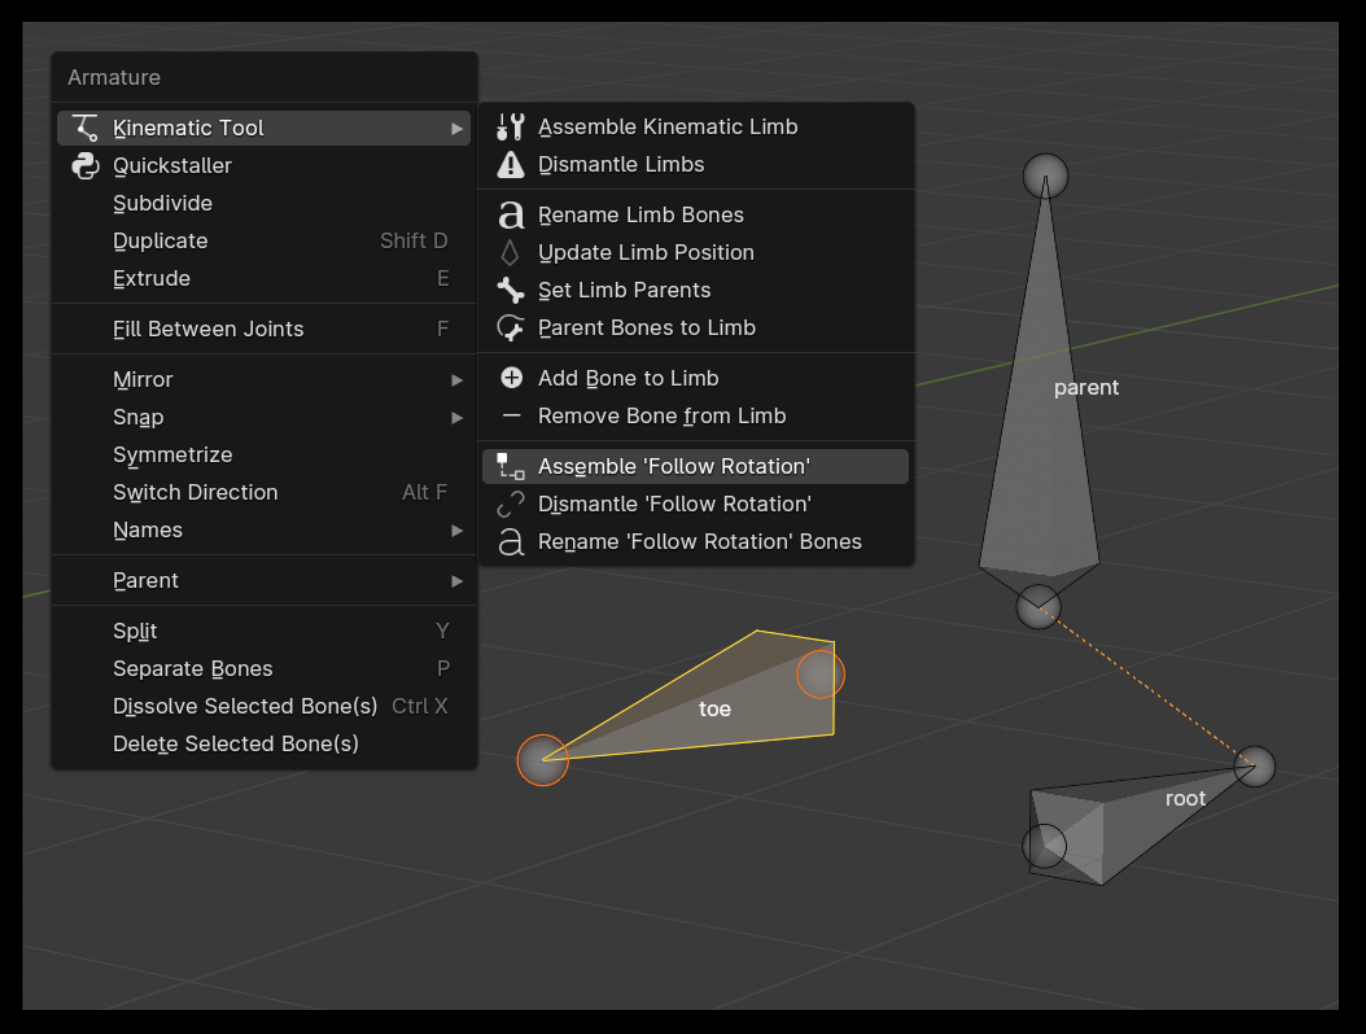
Rigging a Follow Rotation on a standalone bone is quit simple. Select the animation bone you'd like to upgrade, and use the "Assemble 'Follow Rotation'" operator. Unlike assembling a limb, you don't need to select a deformation bone, just select the animation bone.
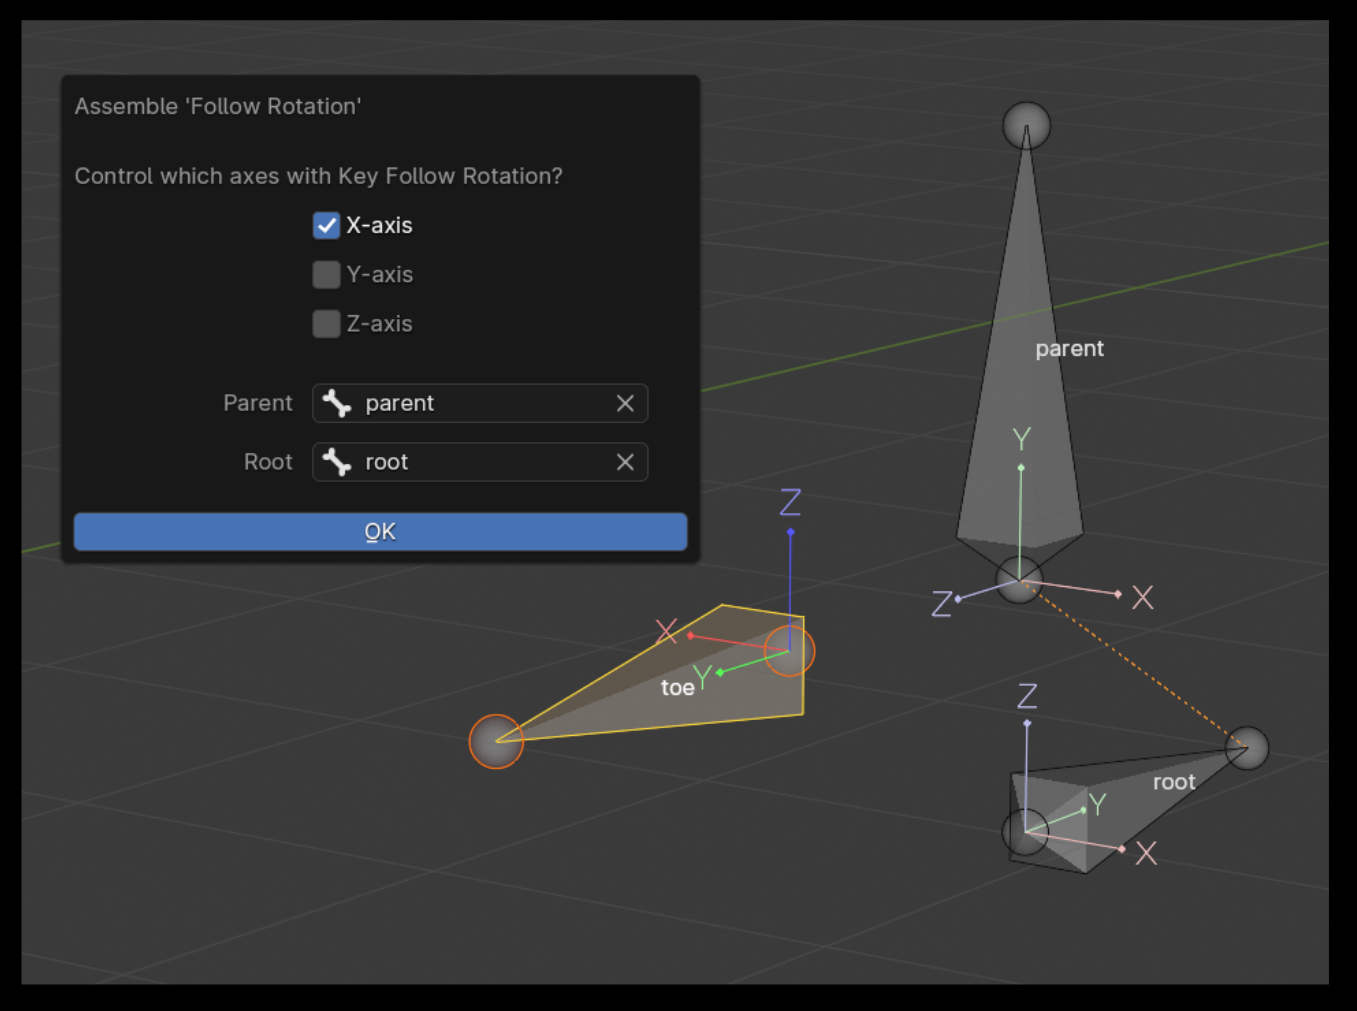
When you use this operator, you're given options to decide which rotation axes are isolated and you can even choose a parent for the system (choose the deform version of any of the bones for an assembled limb, for instance the deform end bone to work with both chains), and you can choose your root bone as the Root, to help anchor the dangling follower bone. Using this operator will build a follower bone (with constraints and drivers) and a guide bone, and will add a "Follow Rotation" custom property to the animation bone you used to assemble the system. If you ever need to change these parenting or axis settings, reuse the operator on the same original bone.
Using this operator will create a "Kinematic Mechanical Bones" bone collection if one does not already exist from assembling kinematic limbs. The two new bones that are assembled with the standalone Follow Rotation are stored in this collection and you're welcome to can move these mechanical bones to other collections and even delete this collection if desired.
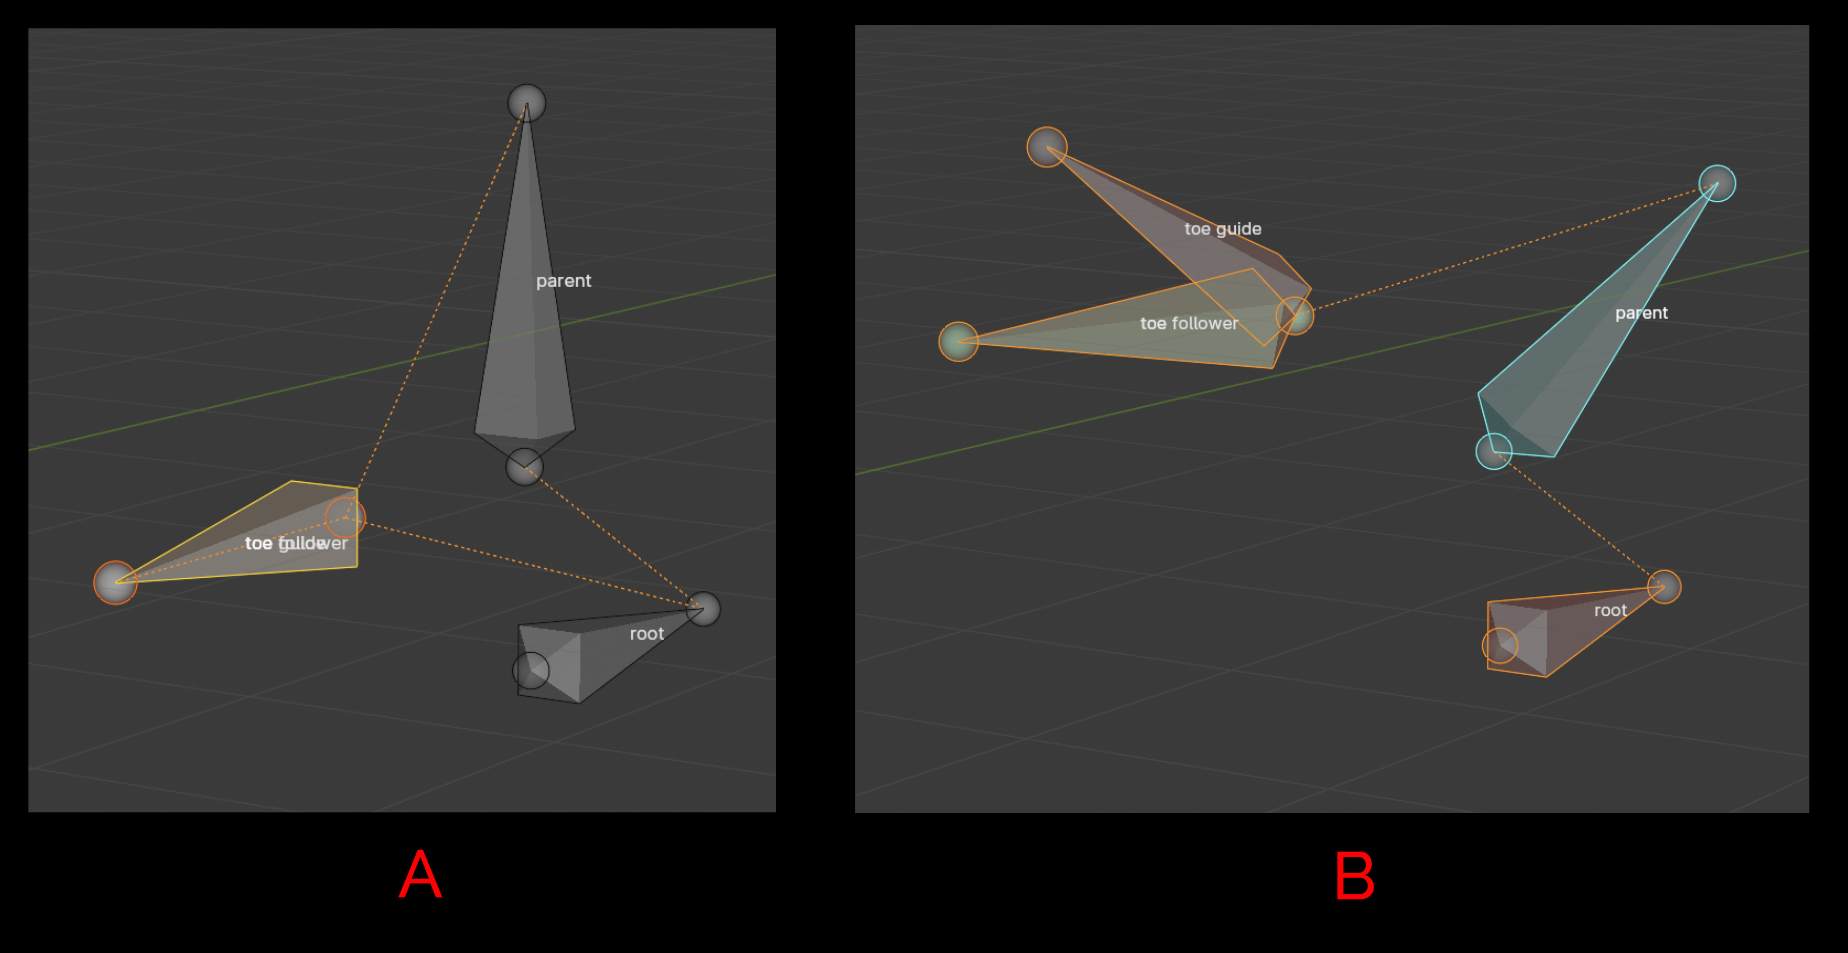
You can test the newly assembled system immediately by switching into Pose mode, selecting any of the bones of the Follow Rotation system (such as the animation bone you used to assemble it), and use the "Follow Rotation OFF / FR0" and "Follow Rotation ON / FR1" operators, then rotate the parent bone you identified when assembling the system. Watch the animation bone to see if the rotation is or is not following the parent bone.
You can dismantle the Follow Rotation assembly by using the Edit mode "Dismantle 'Follow Rotation'" operator on any of the bones that are part of the assembly, and doing so will default the parent of the original bone to the parent that was chosen during the assembly stage.
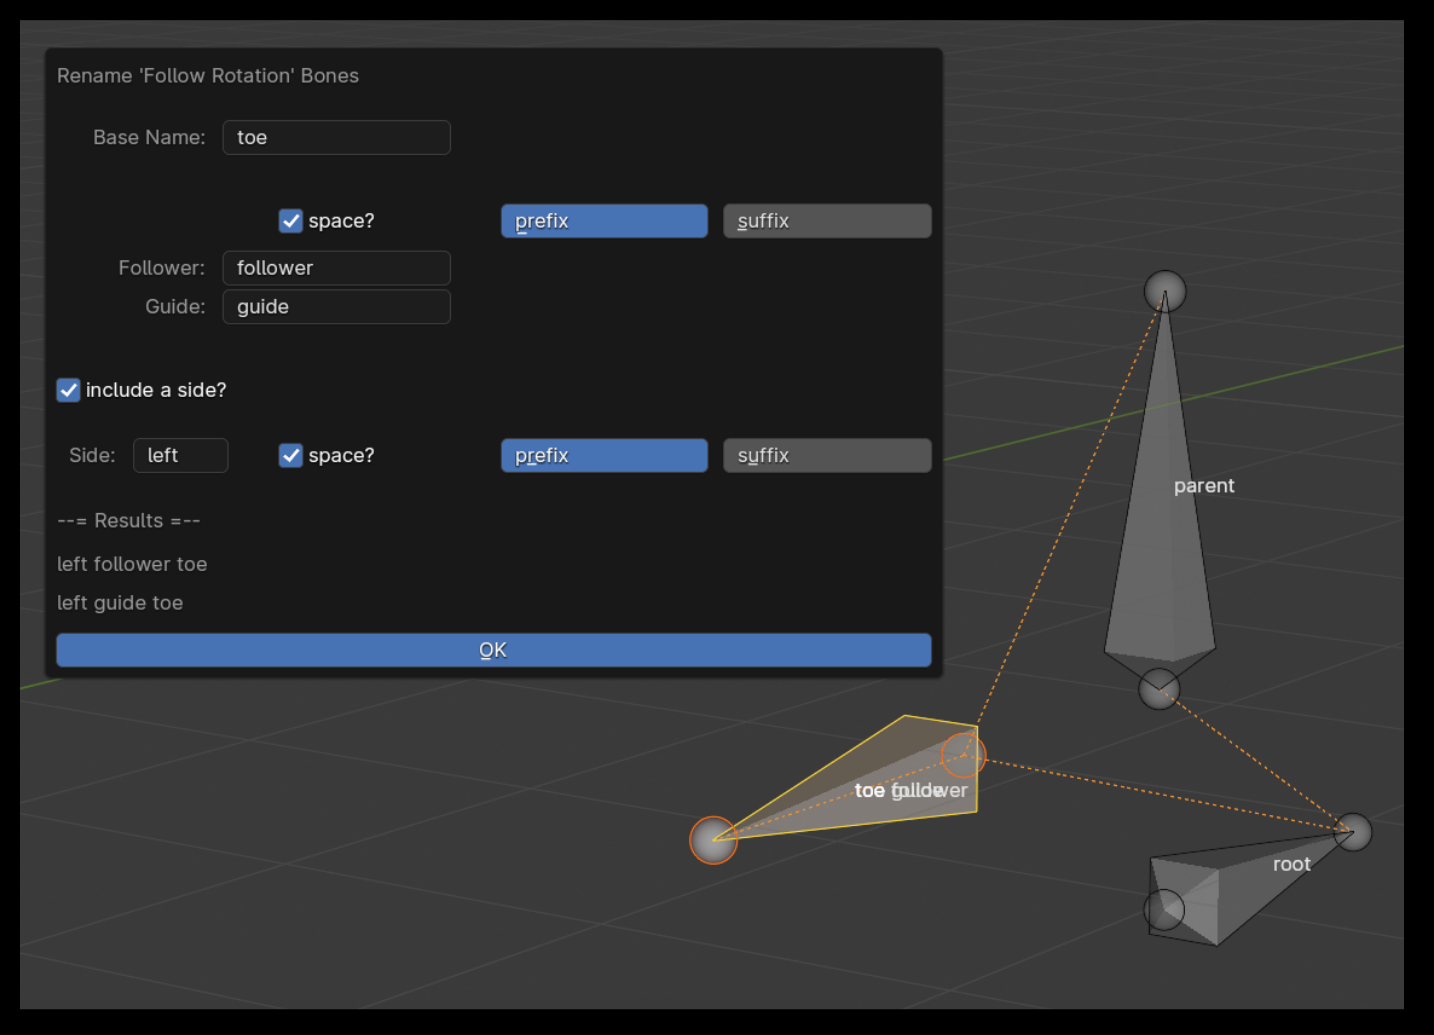
If you want to rename the mechanical bones that are constructed and give them a side to help with symmetrizing, you can use the "Rename 'Follow Rotation' Bones" operator. The options are similar to the options found in the "Rename Limb Bones" operator. However, unlike the limb renamer, the Follow Rotation renamer will NOT rename the original bone.
Symmetrizing is a wonderfully efficient approach to rigging. The problem with symmetrizing is that it doesn't symmetrize drivers and bone collections. The Kinematic Tool comes with a Pose mode operator, "Reset Constraints & Drivers" that helps solve this problem.
After you've batch renamed all of your limbs and Follow Rotation assemblies on a single side (such as giving them "left", "L.", "L-" affixes), make sure all of your collections are visible and all your bones are unhidden (double-check!), then select all the bones on one side and use Blender's "Symmetrize" operator. The new limbs that are created from symmetrizing will surely not work as normal, so immediately after symmetrizing use the "Reset Constraints & Drivers" operator. This should recognize when a limb is on a different side of the X-axis, and it will separate the new limbs by creating new bone collections for them (and will try to properly rename the new bone collections for you, if the original collection has a "left/right/L./R-" etc naming convention). The operator will also build fresh drivers for the limbs.
Taking this approach usually does the trick, but if you are still having problems with chain visibility, take a moment to select all the bones in the new limbs and use the "Reset Drivers on Custom Shape Scales" sub-operator found inside the Pose mode "Edit Custom Shape Drivers" operator. This should completely resolve any of the problems that come from symmetrizing. If for some odd reason this still doesn't resolve the problem of symmetrizing, you can also simply dismantle and reassemble the limbs on the newly created side.
These operators that help with symmetrizing will likely not succeed at symmetrizing any limbs that cross the center line between the +X and -X axis (in other words splitting the Y-axis).
To start animating, let's talk about the first and most important aspect of the Kinematic Tool, IK Ranges.