Introduction
Installation
Pre-Rigged Models
Rigging
Contact
Animation
IK Ranges
Aligning Chains
Chain Visibility
Pivoting
Motion Paths
Automatic Features
Follow Rotation
System
To take advantage of kinematic switching, the Kinematic Tool allows you to keyframe IK ranges with clear starts and ends.
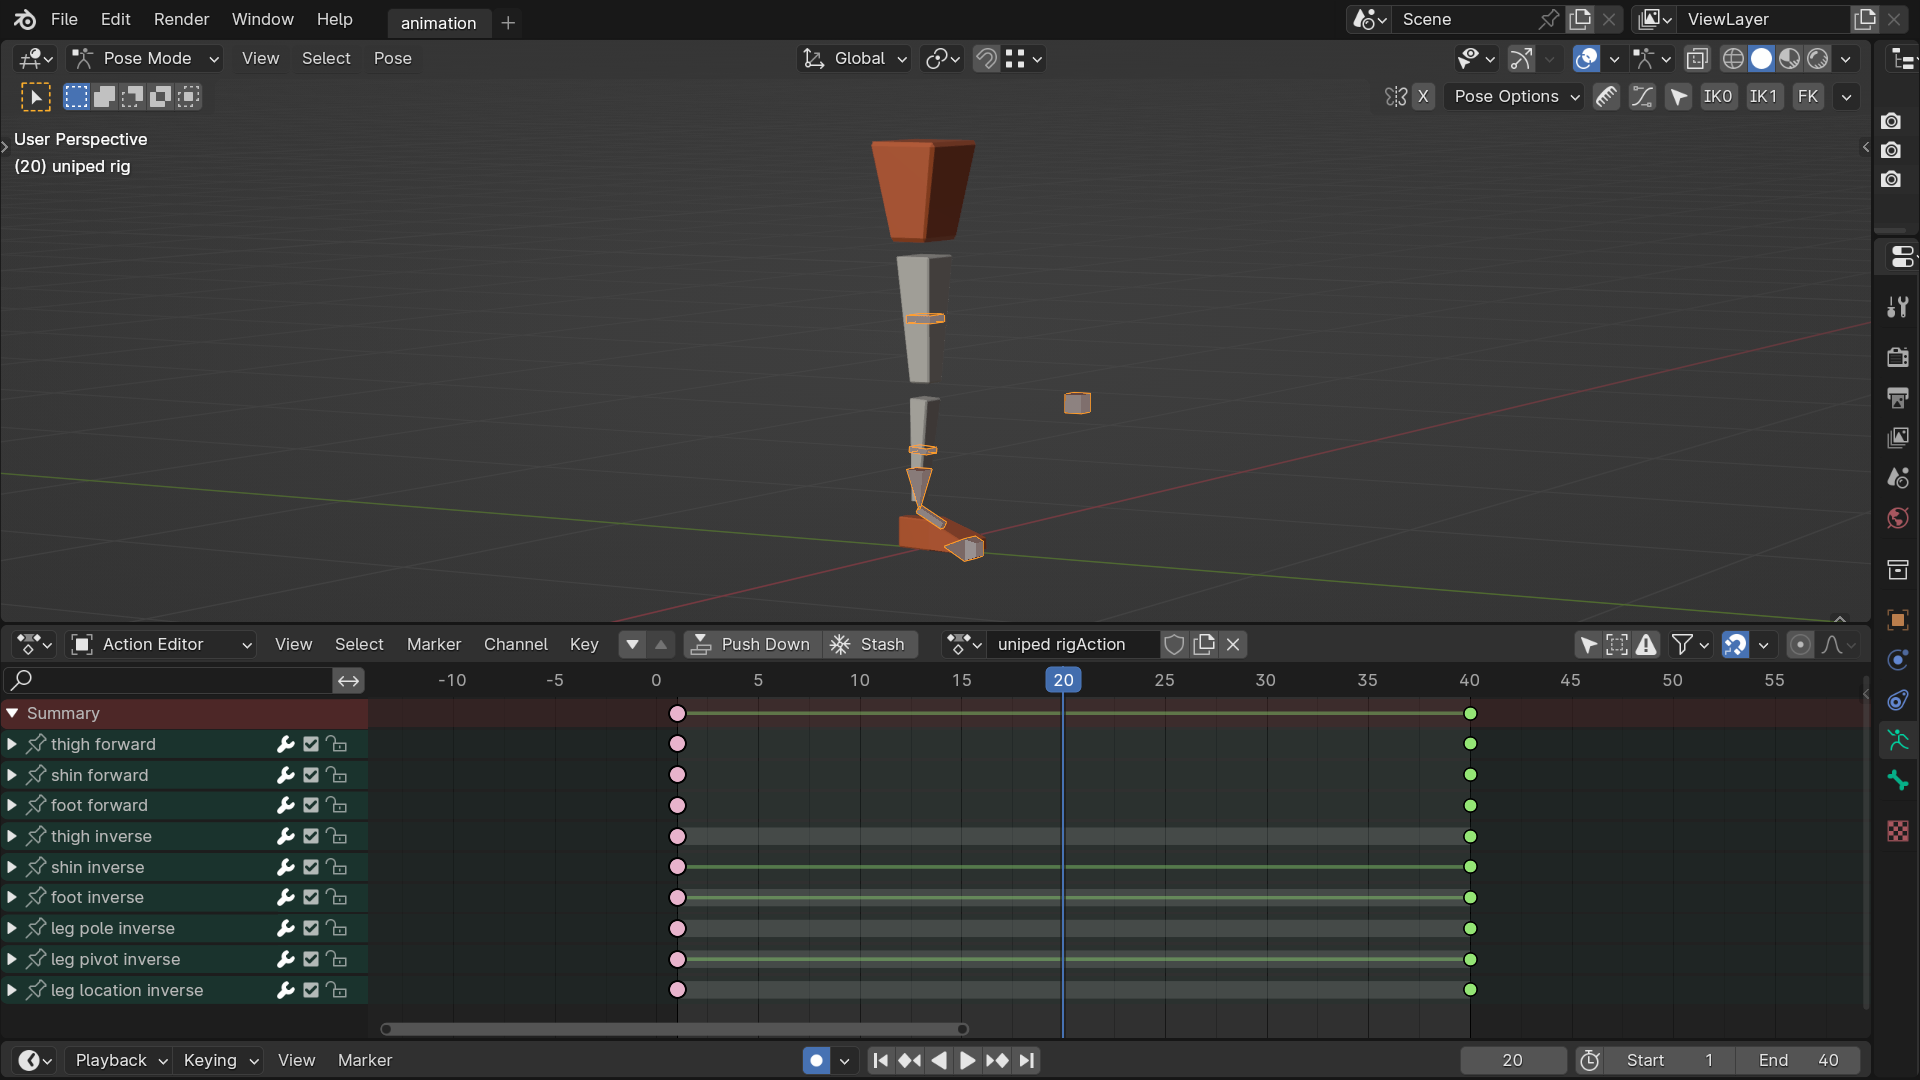
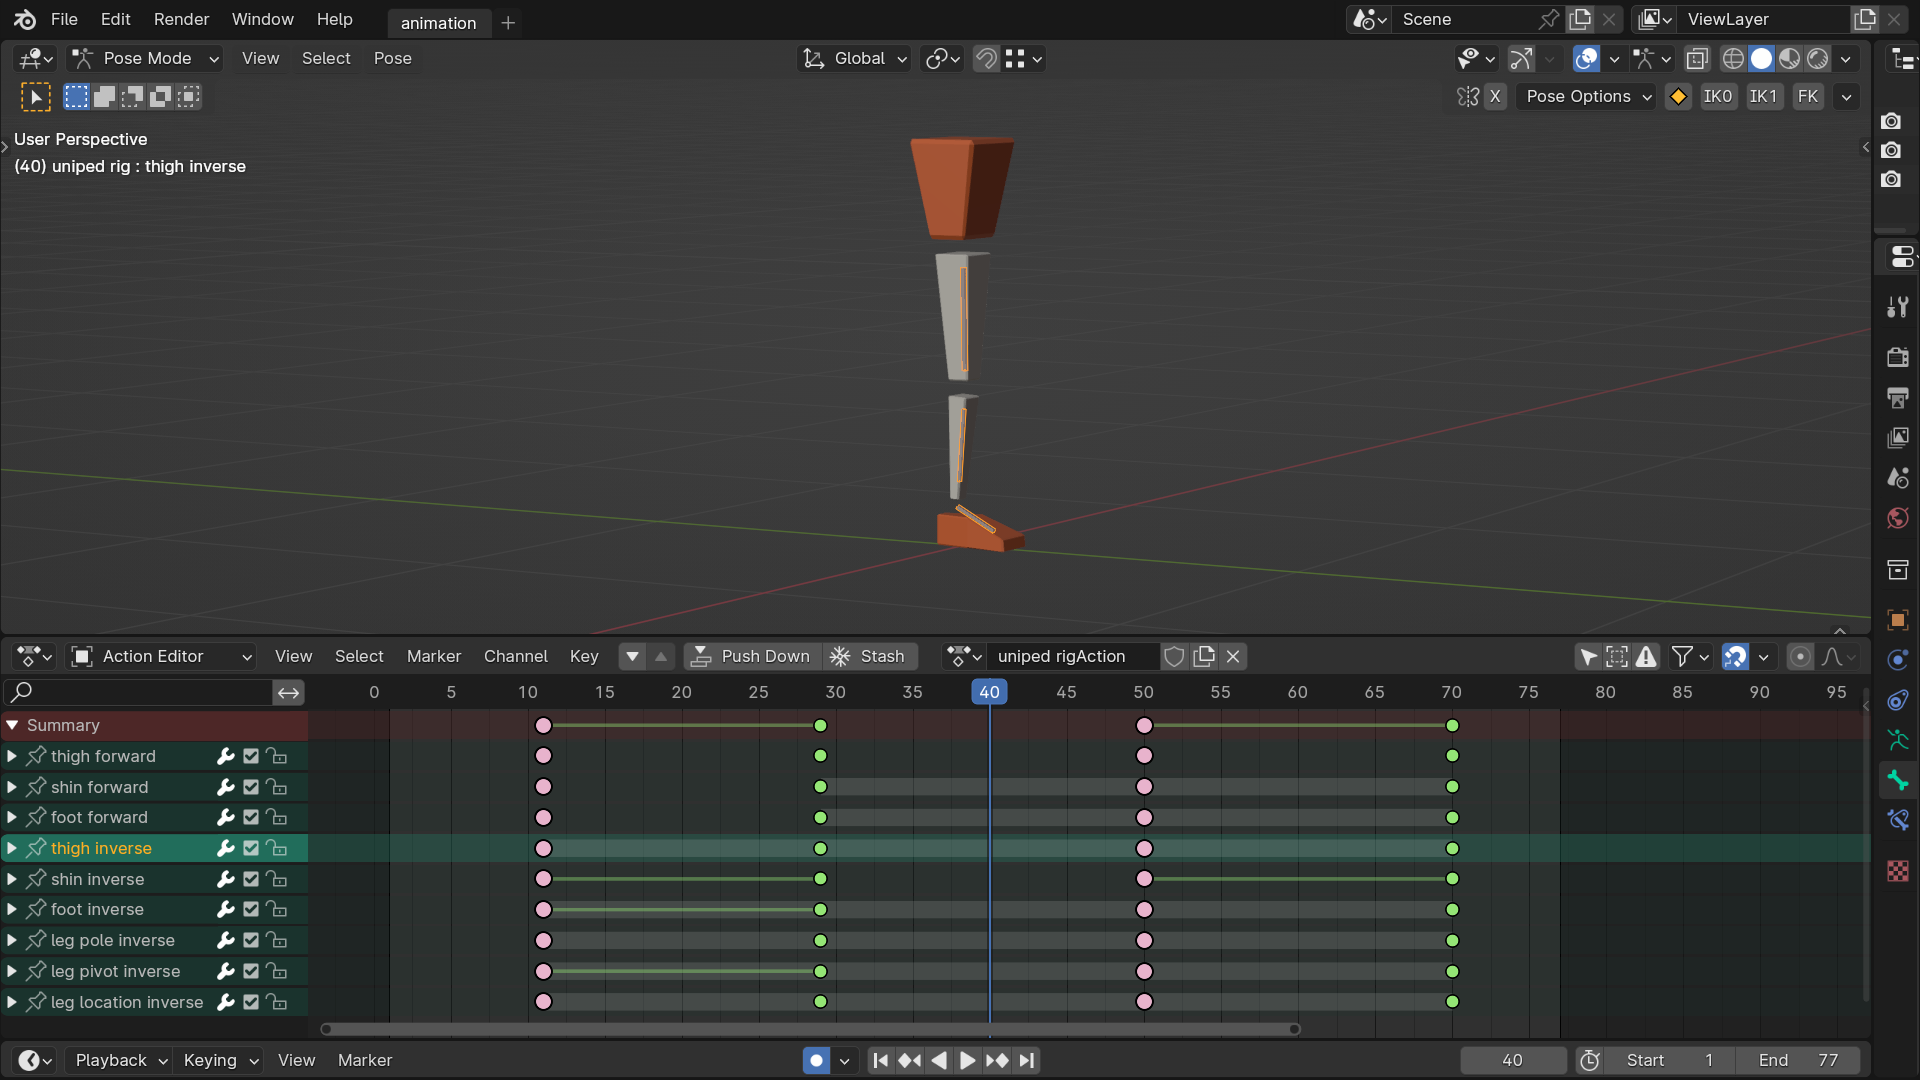
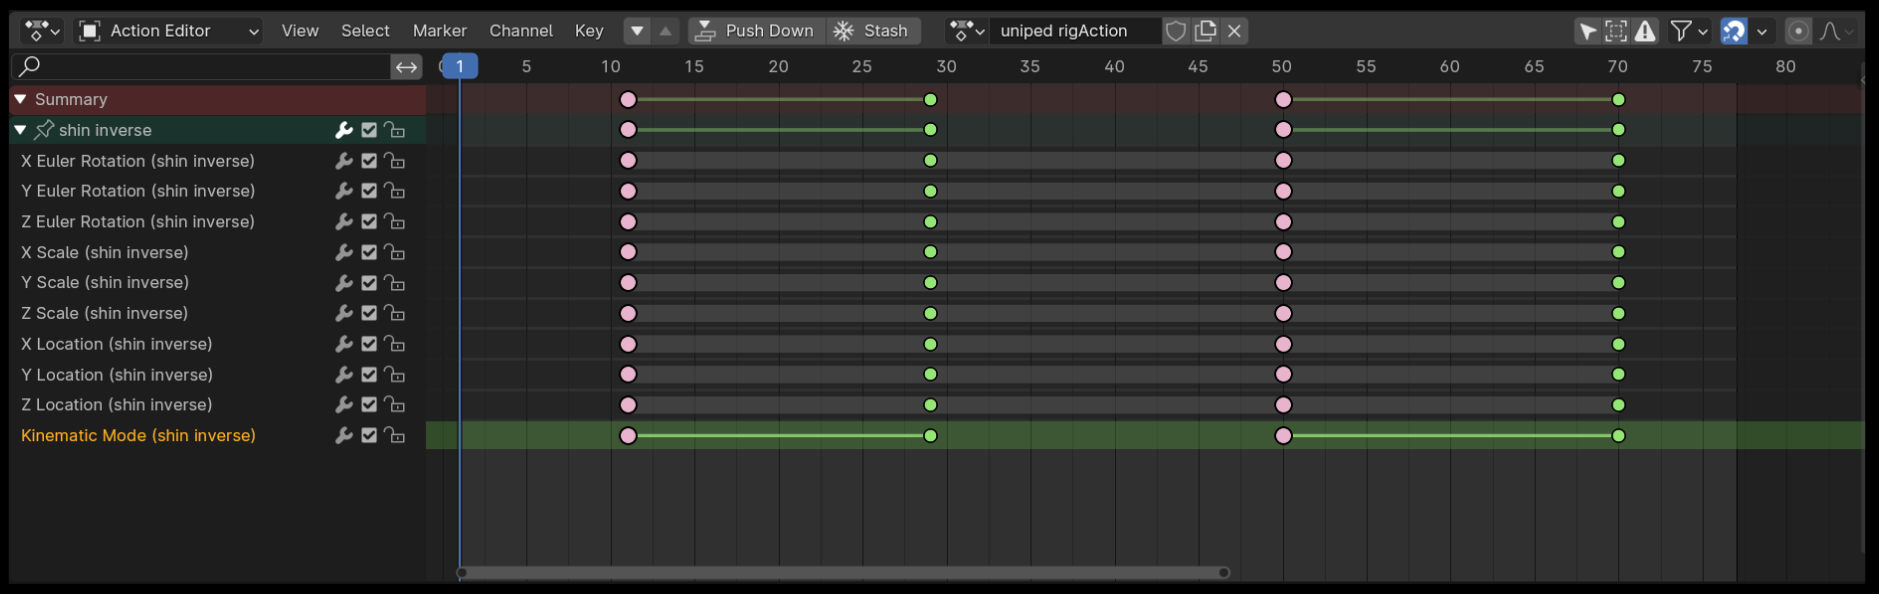
You can define the beginning of an IK range by using the "Start IK / IK0" operator, and the end of an IK range with the "End IK / IK1" operator. These operators work on the selected limbs. Any limb is considered selected if one of the bones within that limb is selected. These start/end operators keyframe all of the animation bones that belong to an assembled Kinematic Limb, along with a custom property named "Kinematic Mode" which exists on the IK middle bone (the same bone that holds the IK constraint). The "Start IK / IK0" operator keys the "Kinematic Mode" property to 0 and the "End IK / IK1" operator keys the property to 1. The set of keyframes that result from these operations I like to refer to as "keyframe columns", and the keyframes of these columns are intended to remain together under a single frame, because the kinematic switch occurs on these keyframe columns.
Once the beginning and end of an IK range are established, both the first and last keyframes, as well as everything in-between, will maintain IK status. This is possible thanks to some clever manipulations of interpolations. Don't worry, the Kinematic Tool comes with an operator that can handle these interpolations for you, and I'll explain more of this a bit further on.
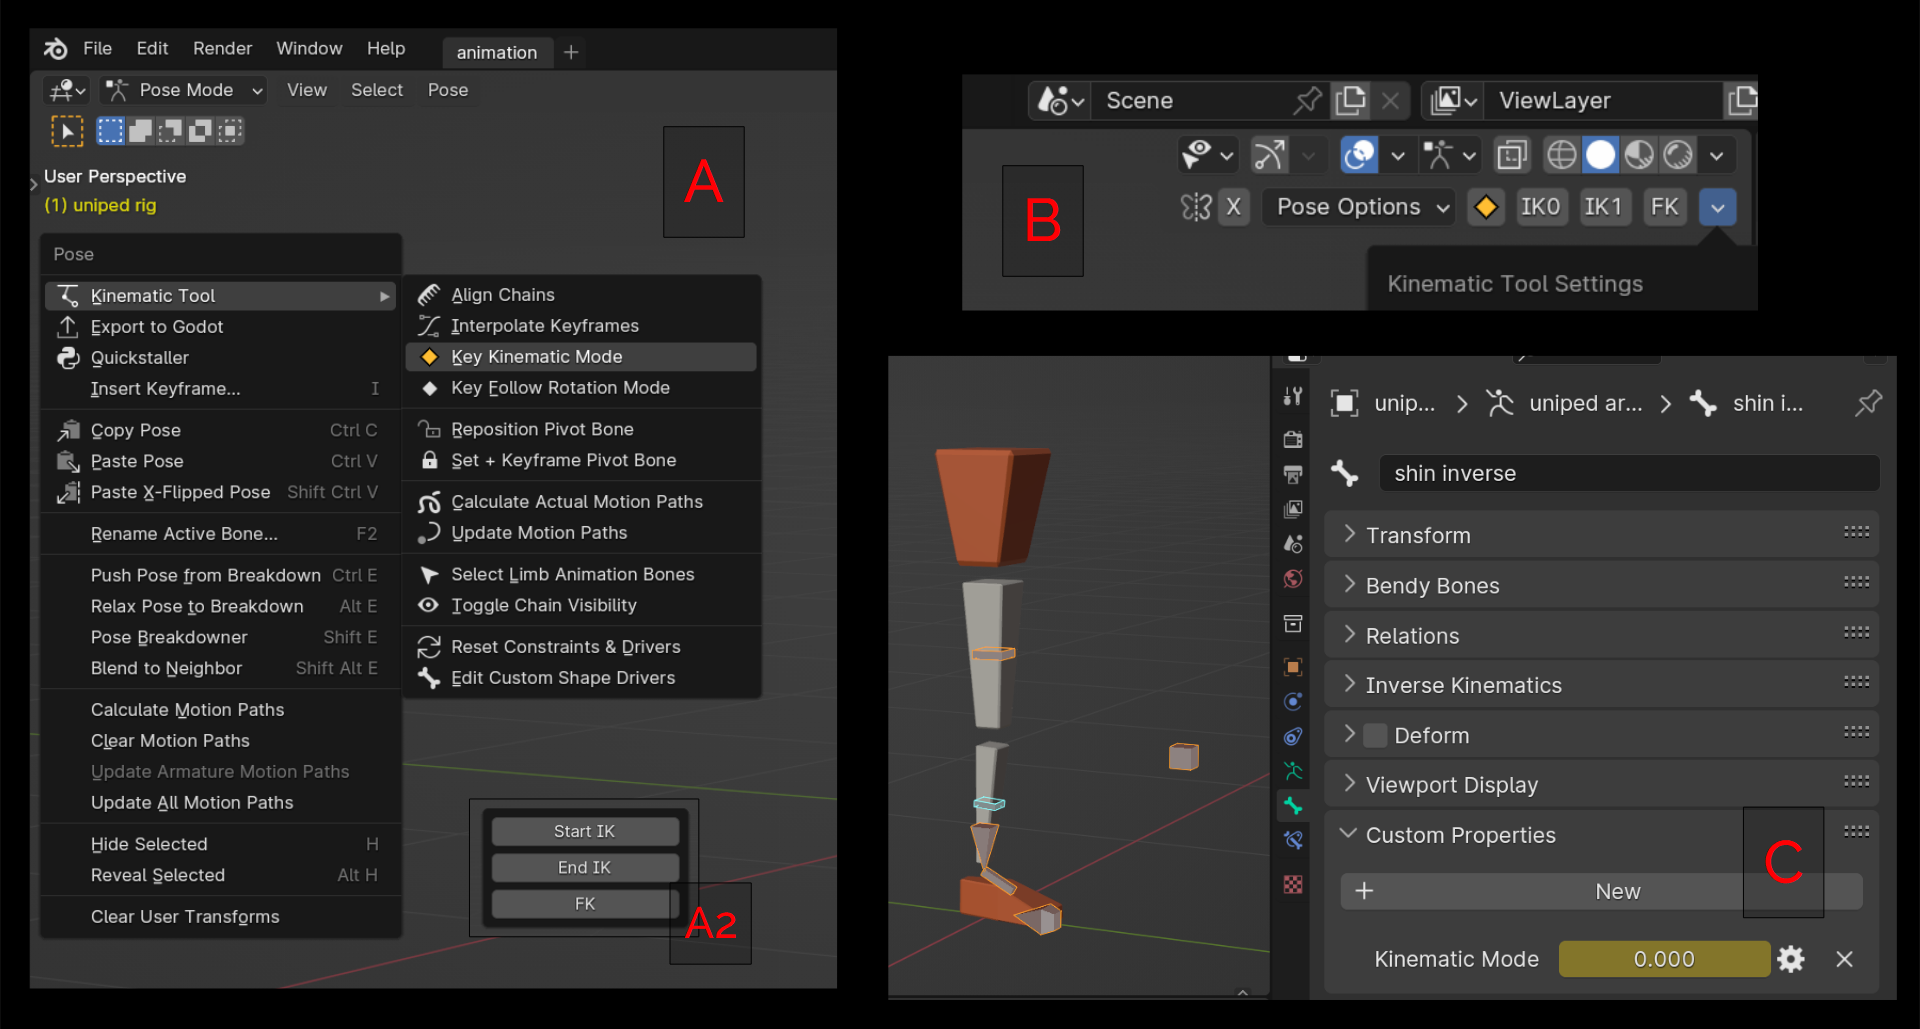
If only a start and an end of an IK range are established for a limb, that limb will remain in IK mode even while outside of an IK range until either an FK keyframe column is established (by using the "FK" operator) or another IK range is established. When two IK ranges are established apart from each other, everything between the end of one IK range and the start of another will be in FK mode. Like the IK operators, the "FK" operator keyframes all the animation bones of the selected limbs, and keys the "Kinematic Mode" property for each limb to a value of 0.5.

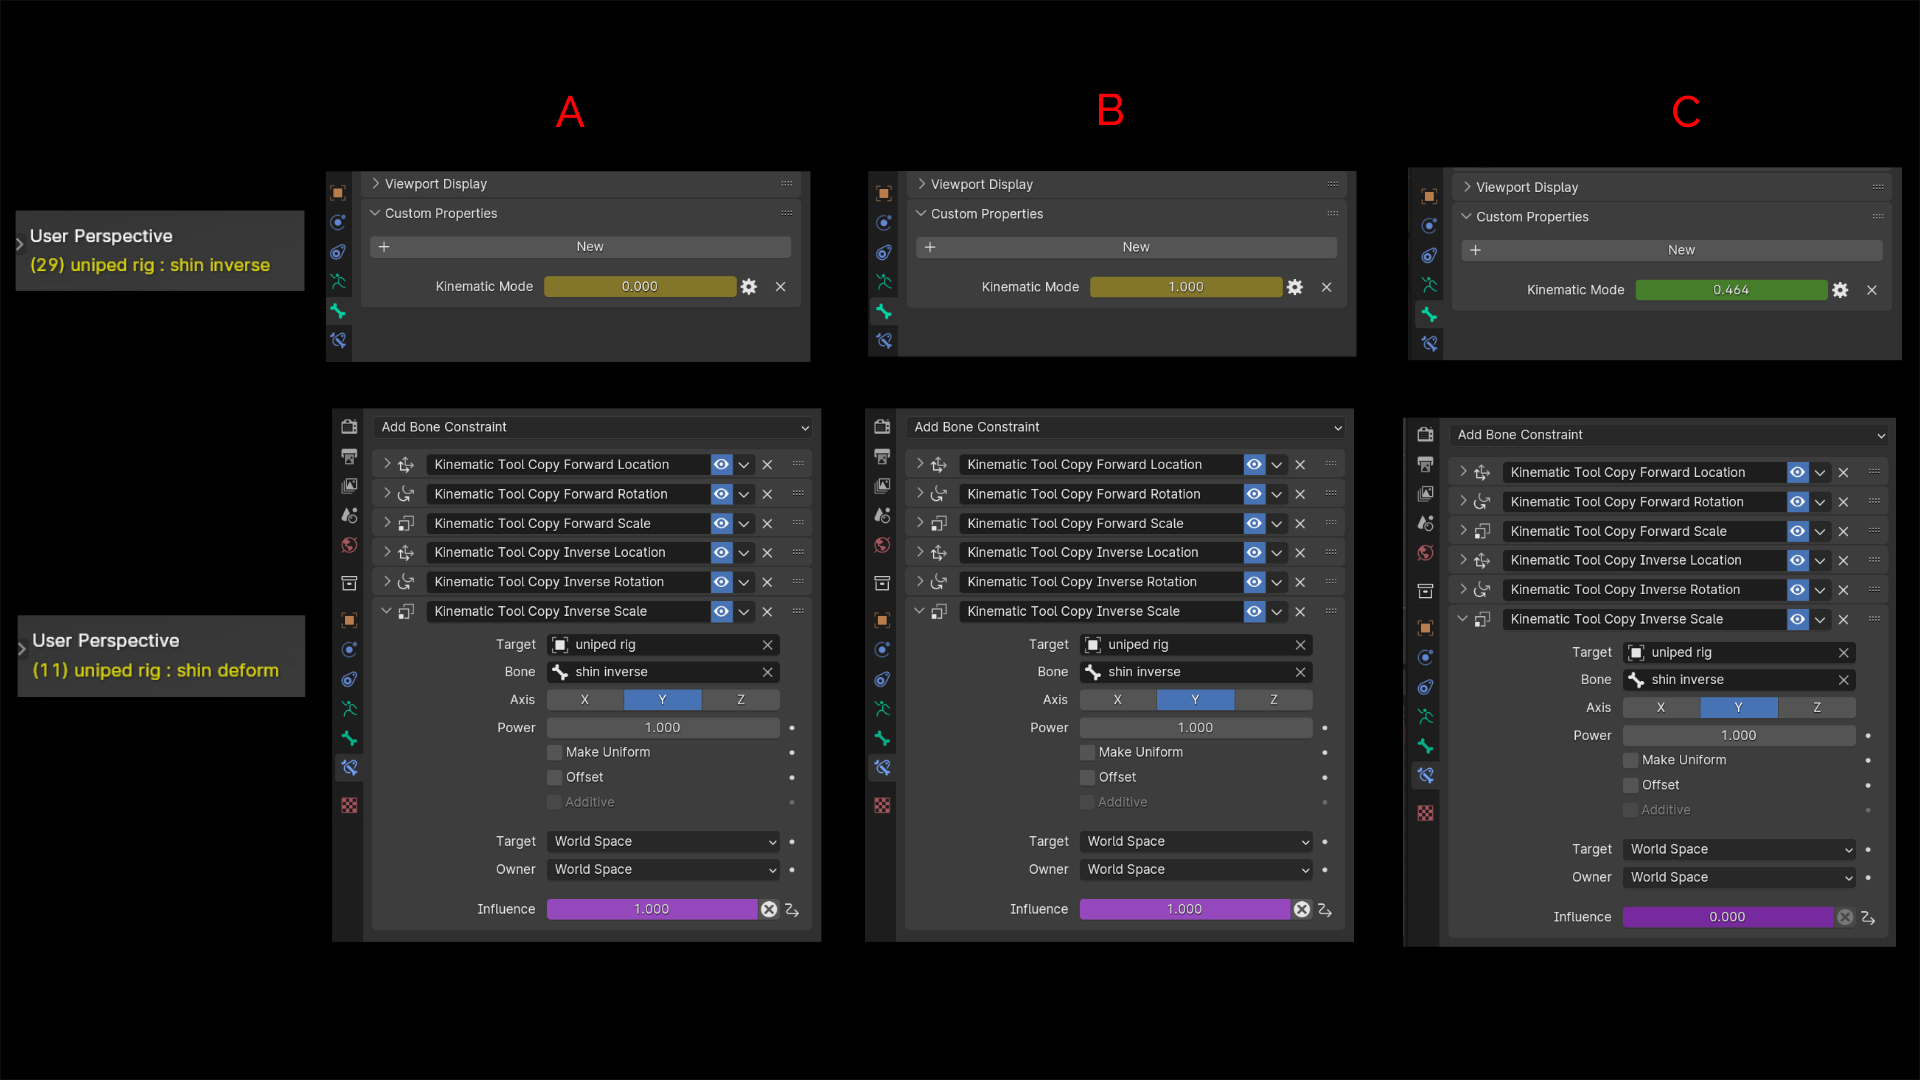
As mentioned, the "Kinematic Mode" custom property exists on the IK middle bone while in Pose mode. The value of this property is a floating point number that moves between 0.0 and 1.0. The value of this property drives the influence of copy-transform constraints on the bones of a Kinematic Limb's deform chain, and causes the deform chain to switch between copying the positions of the IK and FK chains. When the value of the "Kinematic Mode" property is 0 or 1, the deform chain copies the constraints of the IK chain. When the value is anything between 0 and 1, for instance 0.23 or 0.89, etc., the deform chain copies the constraints of the FK chain instead.
This is because the drivers that affect the deform bones say something like, "If the value of the 'Kinematic Mode' property is 0 or 1, turn on IK mode, otherwise just use FK mode". There's a more detailed explanation of this system in the System section.
While this trick with the drivers allows an assembled limb to be in IK mode on both the first and last keyframes of an IK range, the limb will only continue to remain in IK mode while between the first and last keyframes of an IK range if the interpolations of the "Kinematic Mode" property are set to certain interpolations.
In order to maintain a value of 0 up to the final frame of an IK range (and thus remain in IK mode), the "Kinematic Mode" property keyframes must be set to Constant Interpolation wherever their value is 0. In order to allow moving into FK mode after the keyframe that marks the end of a range, the "Kinematic Mode" property keyframes must be set to Bezier Interpolation wherever they have a value of 1. Bezier Interpolation is also the interpolation used when the value of the "Kinematic Mode" property is set to 0.5 with the "FK" operator.
Bezier interpolation allows the value of the "Kinematic Mode" property to transition between 1 and 0, such as 0.93, 0.86, 0.79, etc as it works toward the 0.5 value of an FK keyframe or the 0 value at the start of a new IK range.
So the trade off to get this system to work (and all the nice benefits it provides) is that the interpolations of "Kinematic Mode" property keyframes must always follow a specific pattern: Constant Interpolation at the beginning of an IK range, Bezier Interpolation at the end of an IK range (and Bezier where marked with "FK"). Fortunately, the "Interpolate Keyframes" operator will batch update the interpolations of all the "Kinematic Mode" property keyframes, so you can group edit the interpolations for the purposes of blocking and splining, and immediately just hit one button to update the kinematic switching system. You don't have to worry about wasting time trying to carefully edit all the individual interpolations to get the system to work (what a headache that would be!)
Assuming the interpolations of your "Kinematic Mode" keyframes are up-to-date, here are some acceptable ways to establish IK ranges for a limb within an animation:
Your limb is completely in IK mode for the duration of the animation:
IK0 --> IK1
Your limb has two IK ranges, and the limb is in FK mode while the frame is between the end of the first range and the start of the second range (notice no FK keyframe column was established):
IK0 --> IK1 --> IK0 --> IK1
Separating the two IK ranges with an FK keyframe results in the same behavior as the previous example, since moving from IK1 to IK0 will already provide access to FK mode:
IK0 --> IK1 --> FK --> IK0 --> IK1
You can even put an FK column at the beginning or end of an animation to force your limb to behave in FK mode while outside the IK range:
FK --> IK0 --> IK1 --> FK
You can establish as many ranges as you'd like, start your limb in FK mode at the begining of an animation, end the animation in IK mode, even create a few ranges, and separate the end of one and the start of another with an FK keyframe:
FK --> IK0 --> IK1 --> FK --> IK0 --> IK1 --> IK0 --> IK1
Finally, if needs be, you can start an animation with the end of an IK range and end an animation with the start of an IK range. This will cause the limb at the beginning and end of your animation to be in IK mode, yet will cause the limb to be in FK mode for the frames in between:
IK1 --> IK0
So if placing an FK keyframe inbetween the end of one IK range and the start of another IK range creates the same FK behavior as though it wasn't even there, what's the point in using placing an FK keyframe between two ranges? Well, I find that when I'm first establishing the poses in my animation, I'm usually posing in chronological order. I'm rarely ever thinking ahead, I'm just doing one pose after the other. And in order to get access to FK mode before establishing the start of the next IK range, I can use the "FK" operator to gain access to FK mode.
Once you've established your IK ranges, you'll need to update and align the FK chain to the IK chain whenever you edit the pose at the beginnings and ends of any IK ranges. Find out more in Aligning Chains.
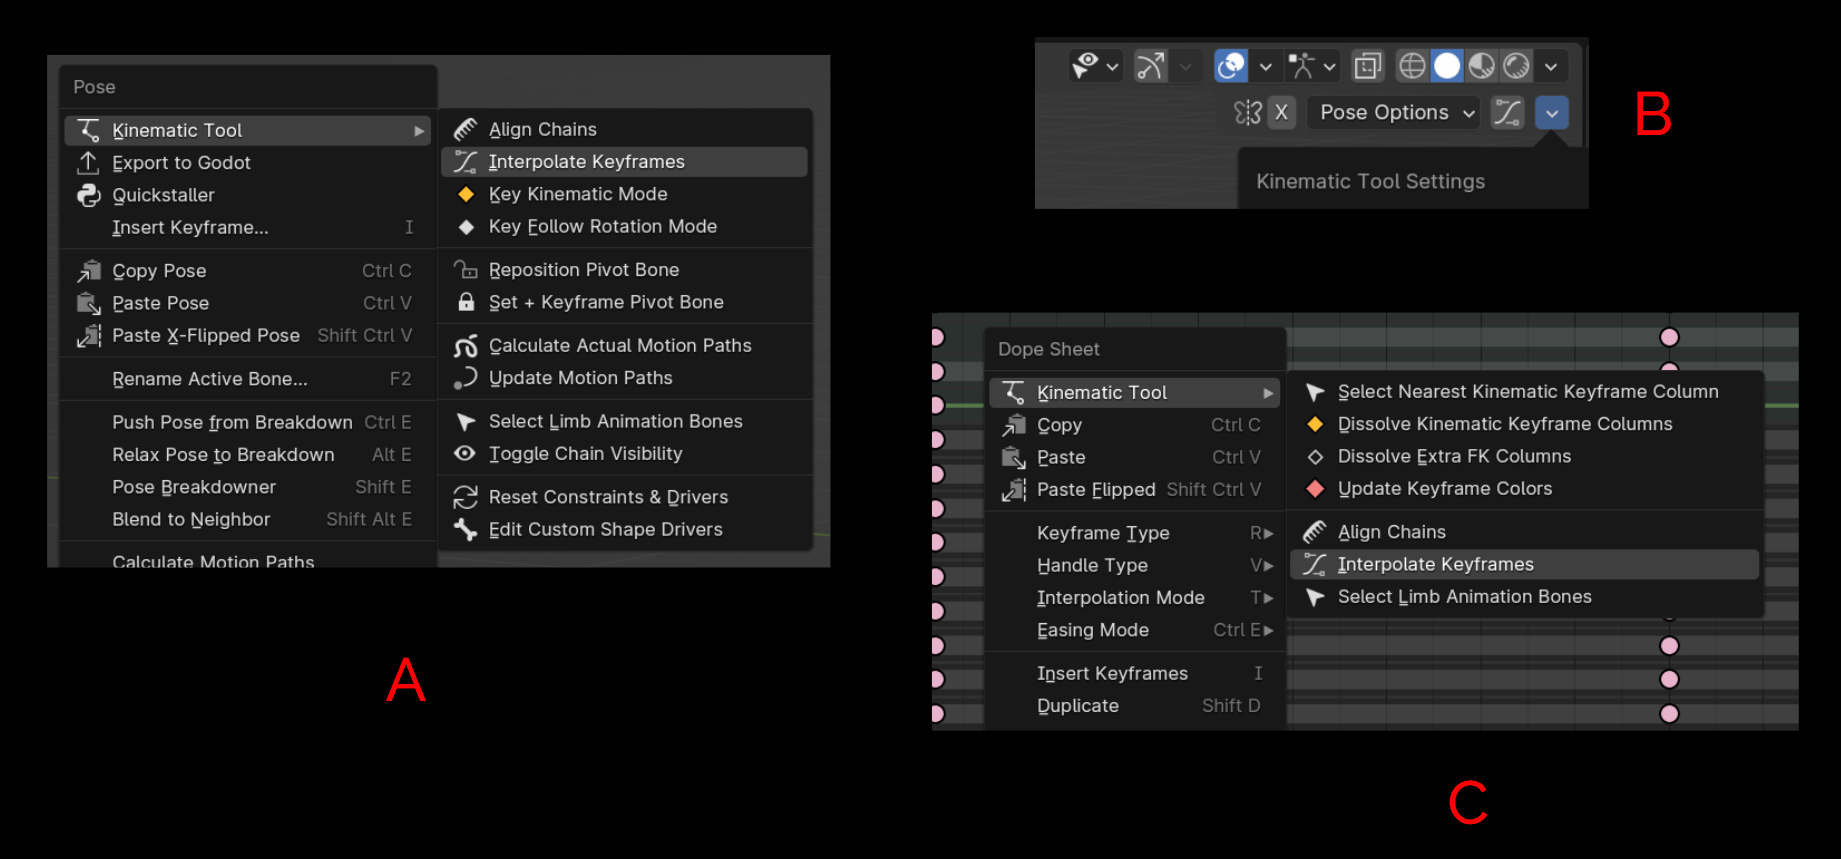
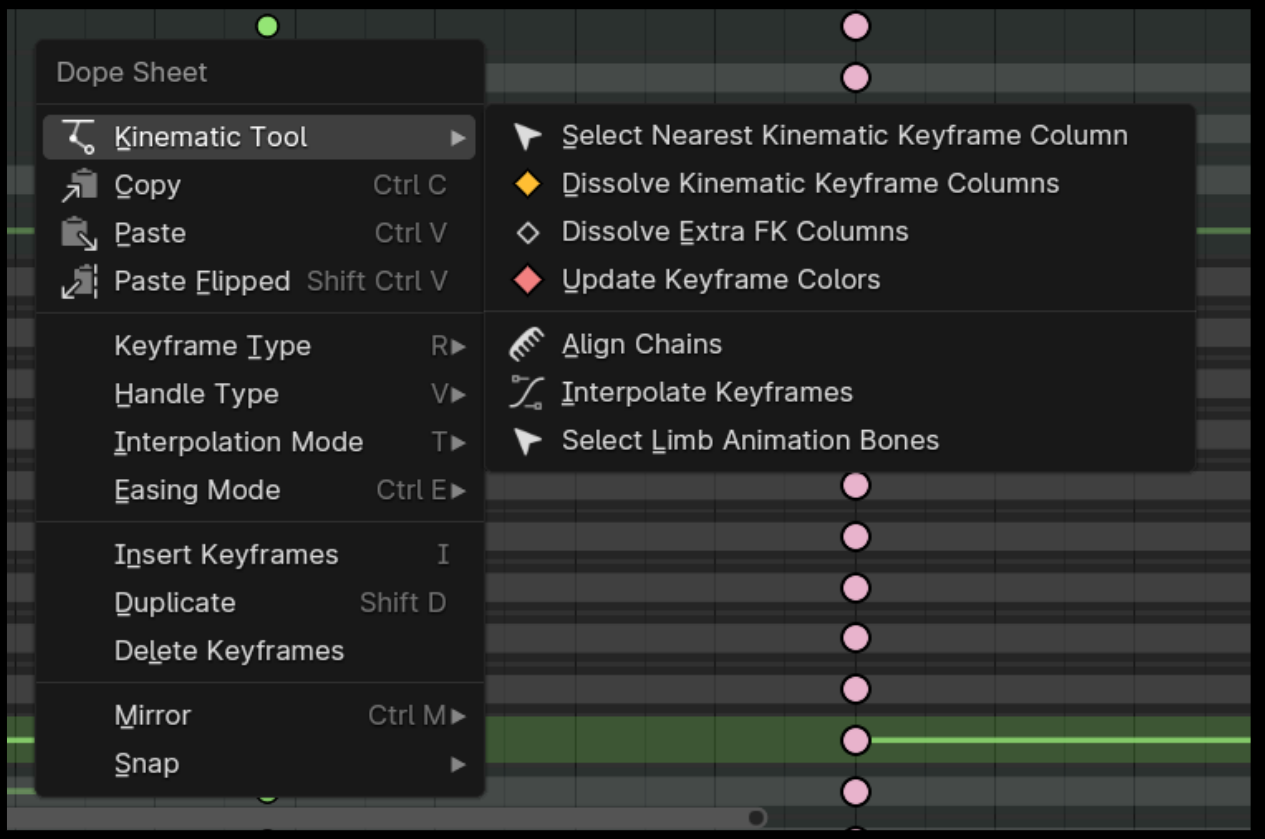
The Kinematic Tool provides some quality-of-life operators to help manage keyframe columns. You may want to select keyframe columns as a group, dissolve certain keyframe columns that you've created with the IK/FK operators, or update the colors of the keyframes used in the keyframe colors. These operators are available in the right-click menu inside the Dopesheet/Graph Editor menu.
The "Interpolate Keyframes" operator has an automatic updating version that is part of the Auto-update features of the Kinematic Tool. You can learn more about it in the Automatic Features section.
To loop your animation in the Graph Editor using the "Make Cyclic (Shift-E)" operator, make sure to define the start or end of an IK range (or set it with FK) at the beginning and end of your animation for each of your limbs BEFORE you select all your keyframes and use "Make Cyclic", so that the mode is consistent between the end of an action and the start of an action. For a looping animation, it's okay to end an animation with IK0 and start an animation with IK1, since they both end and start a limb in IK mode.
Next, let's learn how to align the FK chain to the IK chain in Aligning Chains.